With macrame you can create usable items like handbags, plant hangers, or straps, or projects that are purely for decor like wall hangings, jewelry, or table runners. You can even make your own Christmas stocking!
Related: Simple Macrame Handbag Tutorial, Macrame Camera Strap Tutorial, Simple Macrame Table Runner, Macrame Christmas Stocking, Macrame Room Divider, Macrame Yarn Garland, Make Your Own Macrame Bracelet, Macrame Curtain, Macrame Plant Hanger

What is macrame?
Macrame is a crafting technique where you create a texture through making a series of knots and loops with either rope, yarn, string, or cords. The top of your project is secured onto either a mounting ring or tied to a stick or dowel and then the pattern is created through handmade knots.
Often the hobby of macrame is combined with other crafting mediums like weaving or knitting, but pure macrame is when the full piece is made of knots made by hand.
What’s the history of macrame?
Macrame may go back as far as the ancient Persians and Babylonians who used macrame-like knotting in artifacts in centuries BC.
The more modern macrame was brought to the west from more Arabic countries who mainly used the knots in the 13th century to tie ends in items like rugs, shawls, or other items that had fringe. By the 17th century, ladies in waiting for Queen Mary II used the technique as the pastime spread through England.
Sailors started to use the macrame knots to pass the time on ships and would even trade made items like belts or hammocks once they got to shore, which also helped the craft spread through Europe. Macrame remained popular through the 17th and 18th centuries until the Industrial Revolution brought about the sewing machine and then the technique fell out of favor until the 1960s and ’70s brought the craft back to popularity as part of the handmade movement.
The word “macrame” either comes from the Arabic word “migramah,” meaning ornamental fringe or it may also come from the Turkish word “makrama,” which refers to a towel or napkin.

Is macrame easy or hard to learn?
Good news! While it may look complicated, macrame is actually very easy to learn and it’s very similar to making friendship bracelets if you remember doing those as a kid.
There are a few basic knots that we will teach you, and once you get those down you’ll be able to make almost any macrame project you want!
How long does it take to complete a macrame project?
The time needed to complete a macrame project will vary greatly depending on your level of skill (your first macrame project will take more time and experts will knot much faster), material, size, and complexity of your project.
While smaller/simpler projects can definitely be completed in a short afternoon, you may need several hours spread over a few days for larger wall hangings.

What kind of cord do you use for macrame?
There are several types of macrame cord that you can use for your macrame project.
- Rope: The twisted strands of cotton cord rope give macrame projects durability and you’ll get a defined thick knot that is unlikely to unravel. The most common kinds are twisted three-ply and braided six-ply ropes for macrame and rope comes in a large variety of thickness for larger projects as well.
- String: A string is a much finer twisted strand compared to rope so you get a smaller and softer look than with rope. Your knots will also be much smaller so it can be better for finer, more delicate projects.
- Yarn: While yarn is often used for knitting, you can also use it for macrame. Wool, acrylic, and hemp are common bases for yarn and this option provides the biggest color range.
- Waxed cord: A waxed cord is smaller in diameter than a rope and it is coated in beeswax to make the cord more waterproof. The wax also strengthens the cord so it makes for strong knots as well.

100% Natural Cotton Macrame Rope Cord

Soft Cotton Macrame String Thread

Bulky Wool and Acrylic Blend Yarn

1.5MM Waxed Cotton Macrame Cord
T
How much macrame cord do you need for a project?
When measuring out how much cord you need for your macrame project, you’ll want to determine the approximate length of your finished project and cut your cords 4 times that length.
If the cord needs to be folded in half for the project, then you want to cut the cord 8 times the finished length.

What supplies do you need for macrame?
To make your macrame project, you’ll want the following items:
- Macrame cord
- Scissors
- Measuring tape
- A stick/rod or a mounting ring (a metal hoop) to hang your project on
- Wooden beads or other beads for decoration (optional)
TIP: Before you cut your cord when working with yarn or rope, use masking tape and wrap it around the yarn or rope. This will keep the end of the cord from unraveling while you work.

5 Basic Macrame Knots
While there are more than five knots you can use in macrame, if you practice these five simple knots, there are so many projects you’ll be able to tackle right away.
1. Lark’s Head (aka Cow Hitch Knot)


A Lark’s Head knot is so easy! Fold your string in half and place the halfway loop behind your hanging rod.
Slip your two string tails through the top loop and pull.
2. Square Knot


Tie two Lark’s Heads knots side by side on your rod. This knot uses only the strands on the outer left and right edges and the middle two strands stay put.
Take the strand all the way on the left and cross it over the middle two strands but then behind the strand all the way on the right. It will look like a number “4.”


Next, take the right strand, keeping it over the strand that came from the left, and go behind the middle two strands coming out where the hole in the “4” was created in the previous step. Pull that knot tight to the top.
Now you’ll repeat the process backwards by taking the right strand and creating a backwards “4” that goes over the middle two strands and under the strand on the left.


Take the strand on the left, keeping it over the strand that just came from the right, go behind the middle strands and come out again where the hole in the backwards “4” was created.
Pull strands tight and you’ll see a square knot!
3. Spiral Knot
The spiral knot is basically the same as the square knot except that you keep making your “4” shape in one direction so it creates a spiral shape.
Tie two Lark’s Heads knots side by side on your rod and continue to make your first knot like your would with a square knot.


Rather than reverse the direction to complete a square knot, keep making the same knot over and over, pulling each knot tight to the top.
As you make more knots, you’ll see the spiral pattern start to emerge.
4. Berry Knot


Start by making a square knot but when you tie your knot at the top, leave a little room above the knot so you can turn your tails through that hole later.
Make two more square knots so you have three square knots in a row.


Take the tails of your cords and push them all through the small hole in the middle you left above your first square knot.
Pull the cords all the way through and you’ll see that your square knots have created a ball-like berry shape.
5. Double Half-Hitch Knot (DHH)


This knot is often used to create lines in your work and you’ll want to start with at least four Lark’s Head knots side by side. The outermost left cord will be your working cord and the next three cords in line will be your holding cords.
Use your left cord to loop around the first holding cord so that the loop is facing down and the tie of the loop is facing up.


Tighten the loop to the top.
Repeat the action so you have two loops tied at the top of the cord.


Take your working cord and start to tie loops on the second holding cord in line and tie two loops at the top of that cord.
Repeat again tying two loops with your working cord onto the third holding cord and then let your working cord hang (it should now be the fourth cord in near the middle of your project).


Now you just repeat the process backwards on the other side by using the outermost cord on your right side as your working cord and tying two loops on each of the next three hanging cords.
Now you should have both your working cords in the middle of your work.


Now you’ll tie one last Double Half-Hitch Knot by using your left working cord to tie a loop around what was your right working cord.

Avoid these common macrame mistakes:
- Cutting cord too short: Rather than just eyeballing your cord, make sure you are measuring that you have at least four times the full length of your finished project to ensure you won’t run out! There’s nothing worse than not being done with your piece and suddenly you run out of cord.
- Pulling knots too tight: It’s a very similar thing with friendship bracelets, that if you are pulling your knots too tight, then your knots will look deformed and your project will start to twist and curl. Pull your knots just snug enough without over tightening and try to keep all the knots the tied at the same tightness. As you start your projects, you’ll know if your knots are too tight if your project curls and you’ll want to start over not pulling your knots so hard.
- Not practicing/giving up: Like all new skills, it takes time to feel more confident and take on harder and bigger projects, so keep practicing and don’t give up as you get the hang of it!

Love crafting? Try these weaving projects!
]]>Making candles does require a few basic supplies, including a stovetop or something similar to melt the wax.
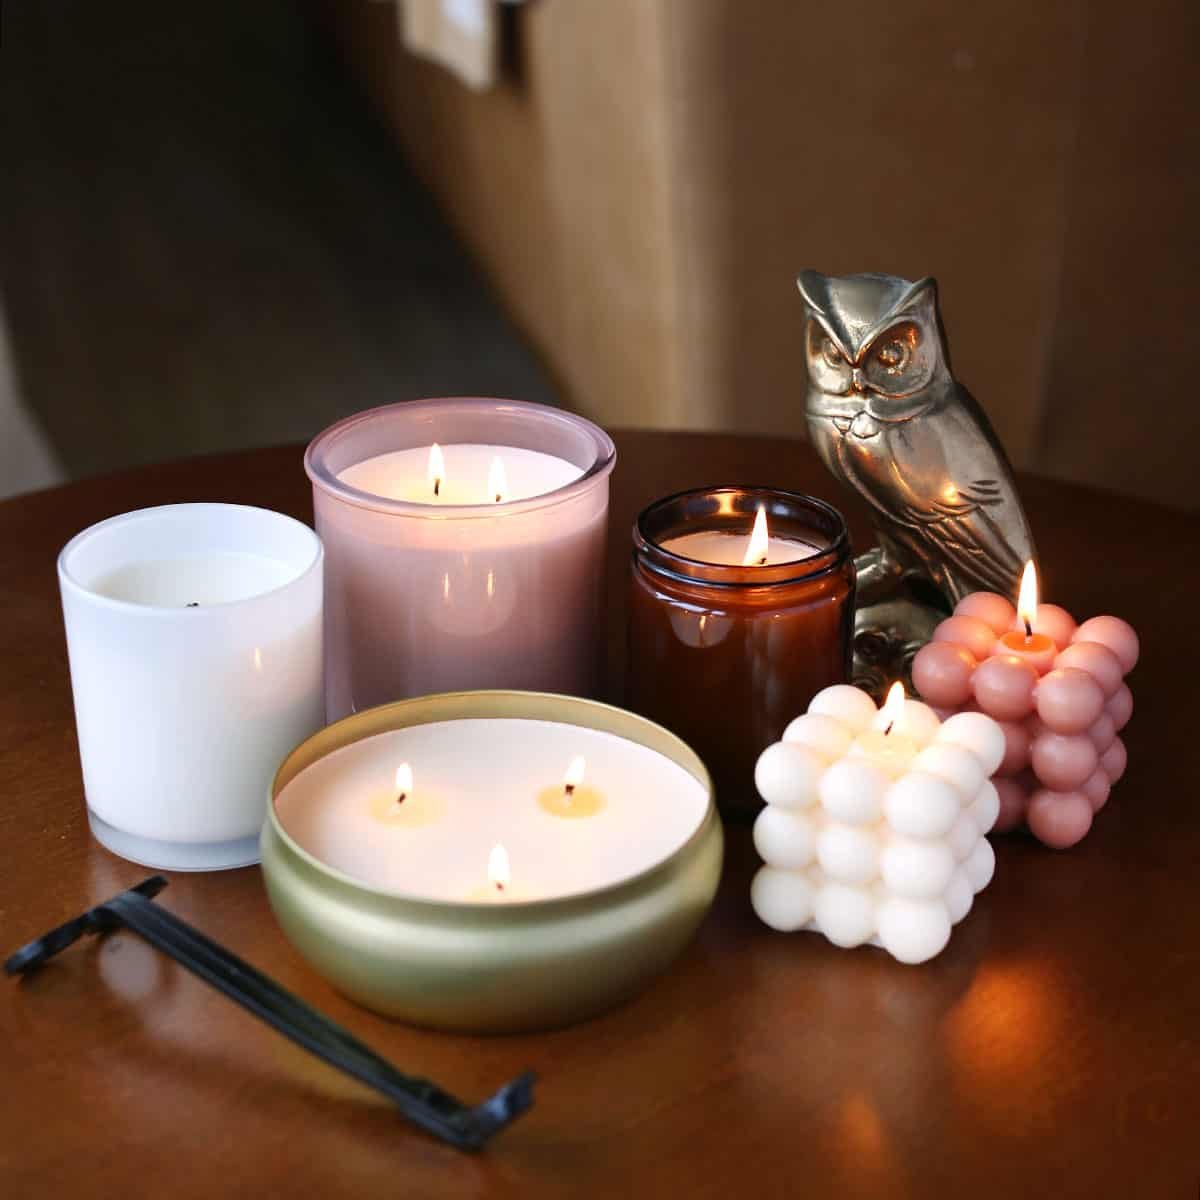
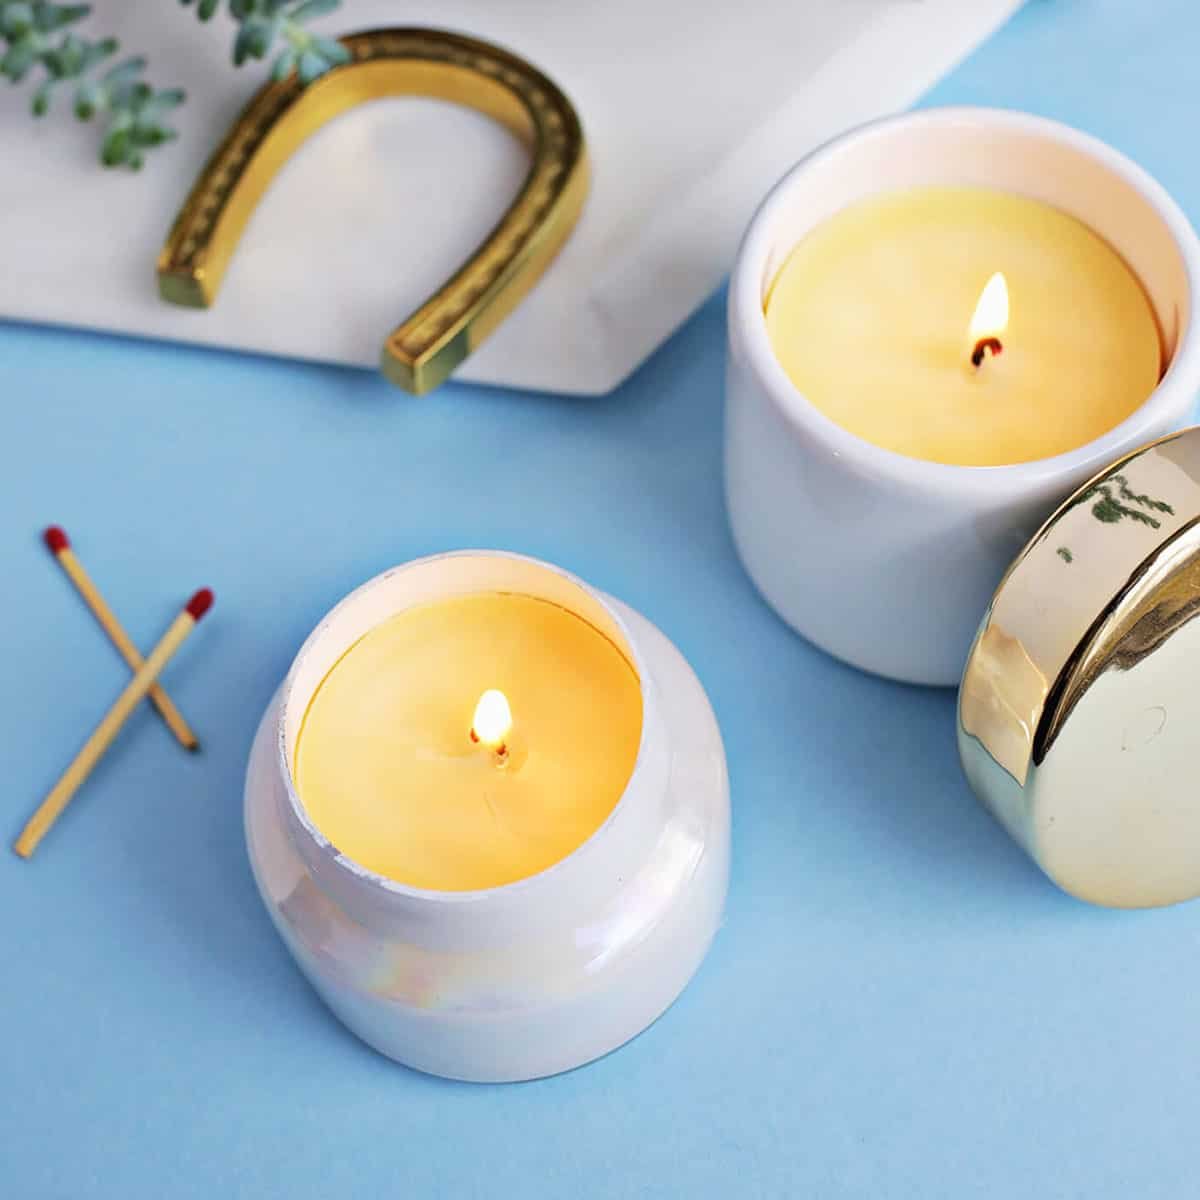
I love to make candles for myself, as I almost always have a candle burning in my kitchen every evening. I also love to give homemade candles as gifts.
A DIY candle makes a great housewarming gift, wedding gift, birthday, Mother’s Day, or holiday gift. Or at least I think so, as I LOVE candles!
Table of Contents
Candle Making Supplies – Basics
- Wax – beeswax, soy, paraffin, palm, or gel
- Wick – ECO wicks, hemp, or wood (different sizes based on how thick your candle will be)
- Wick stickers or hot glue and glue gun
- Scent – essential oils or blends
- Containers/vessels
- Melting pot and larger pot – to create a double boiler
- Kitchen thermometer
- Measuring cups and spoons
- Mixing spoon
- Clothespin or other stick to hold wick in place (pencils, skewers, chopsticks, etc.)
- Candle wick trimmer or scissors
- Kitchen scale (optional but helpful)
How to Make a Candle – the Basics
- Measure out your wax. The easiest way to do this is to fill your container that will become your candle with the wax pellets. Then, use your kitchen scale to find the weight so you know how much scent oil to use.
- In your melting pot, add the wax.
- In your larger pot, add enough water so it will cover your melting pot at least halfway.
- Heat the larger pot with the water and melting pot over medium heat. This is essentially a double boiler, like you might use to melt chocolate. While you can melt the wax in the melting pot directly, using a double boiler ensures the wax doesn’t overheat.
- Heat the wax to 185°F. Use your thermometer to check.
- Stir in the scent oil so it gets well distributed.
- Turn off the heat and allow your wax mixture to cool to 125°F before pouring.
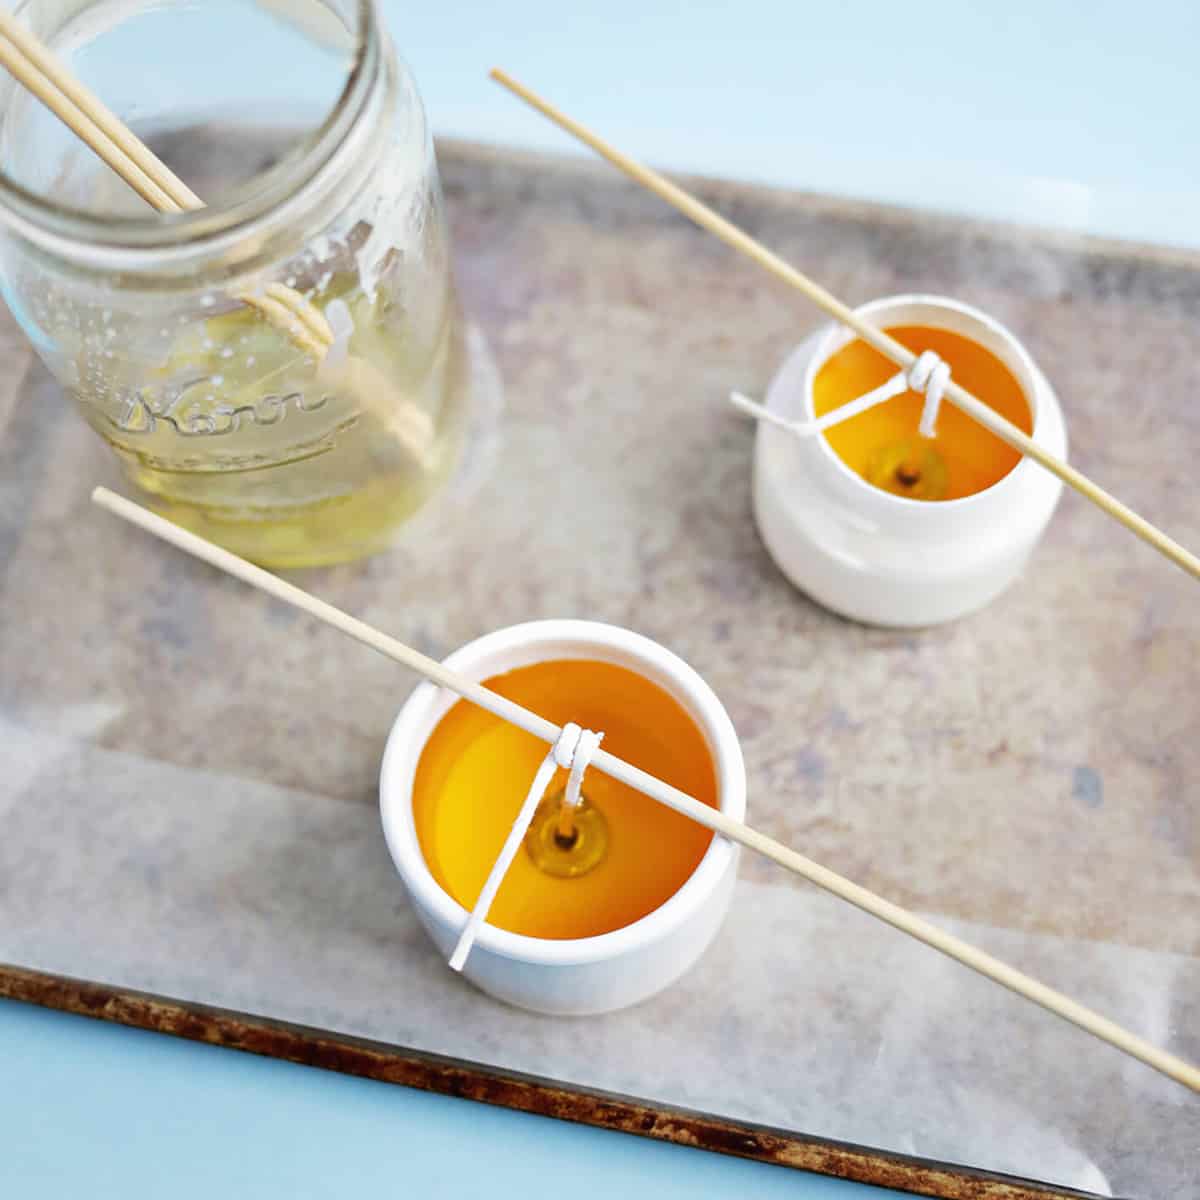
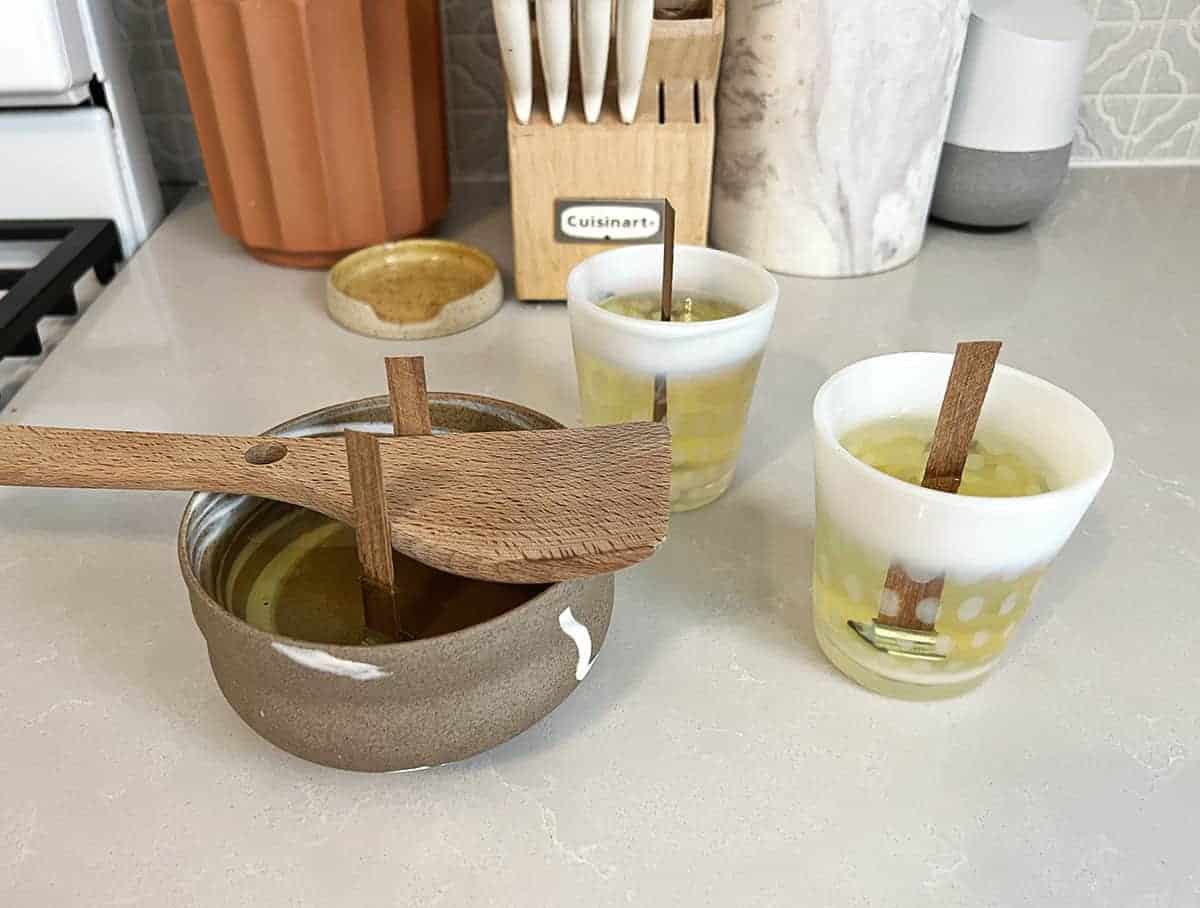
- While the wax melts (or as it cools off), add your wick to the container. Use a wick sticker or hot glue to stick the metal bottom of the wick to the bottom center of the container. Then, use a clothespin or stick to wrap the top of the wick around so it will stay center once you pour in the wax.
- Pour the wax into your container. If the wick shifts around, fix it while the wax is still hot and very liquid.
- Once your candle hardens, you’re ready to trim the wick and use it!
Types of Wax & Wicks
- Beeswax – natural, has a subtle sweet fragrance without adding oil, but can be more expensive. See how to make your own beeswax candles.
- Soy wax – natural, but often a blend so check the label. Usually more affordable than beeswax. See how to make soy candles.
- Paraffin wax – most economical but the least natural of these options
- ECO wicks – made from cotton and paper
- Hemp wicks – made from hemp
- Wood wicks – check out DIY wood wick candles to learn more
While there are other types of waxes and wicks beyond those listed above, these are likely what you will want to use as a beginner.
What is Scent Throw?
Scent throw is exactly what it sounds like; it is the radius around your candle where the scent will reach as it burns. There are four factors that affect scent throw:
- The type of wax
- Thickness of the wick
- Amount of scent oil used
- Temperature of the wax when you add the scent oil
While you may want to use different types of waxes for cost or health reasons, just know that generally the hotter the melting point of the wax the smaller the scent throw will be.
As far as how much scent oil to add, you may think adding more will always mean a larger scent throw. Not true. If you add too much oil, it can weigh down in the wax.
You should aim for 1 ounce of scent oil for every 1 pound of wax (generally). This is why you may want to use a kitchen scale once you’ve measured how much wax will fit your container so you can best calculate how much scent oil to use.
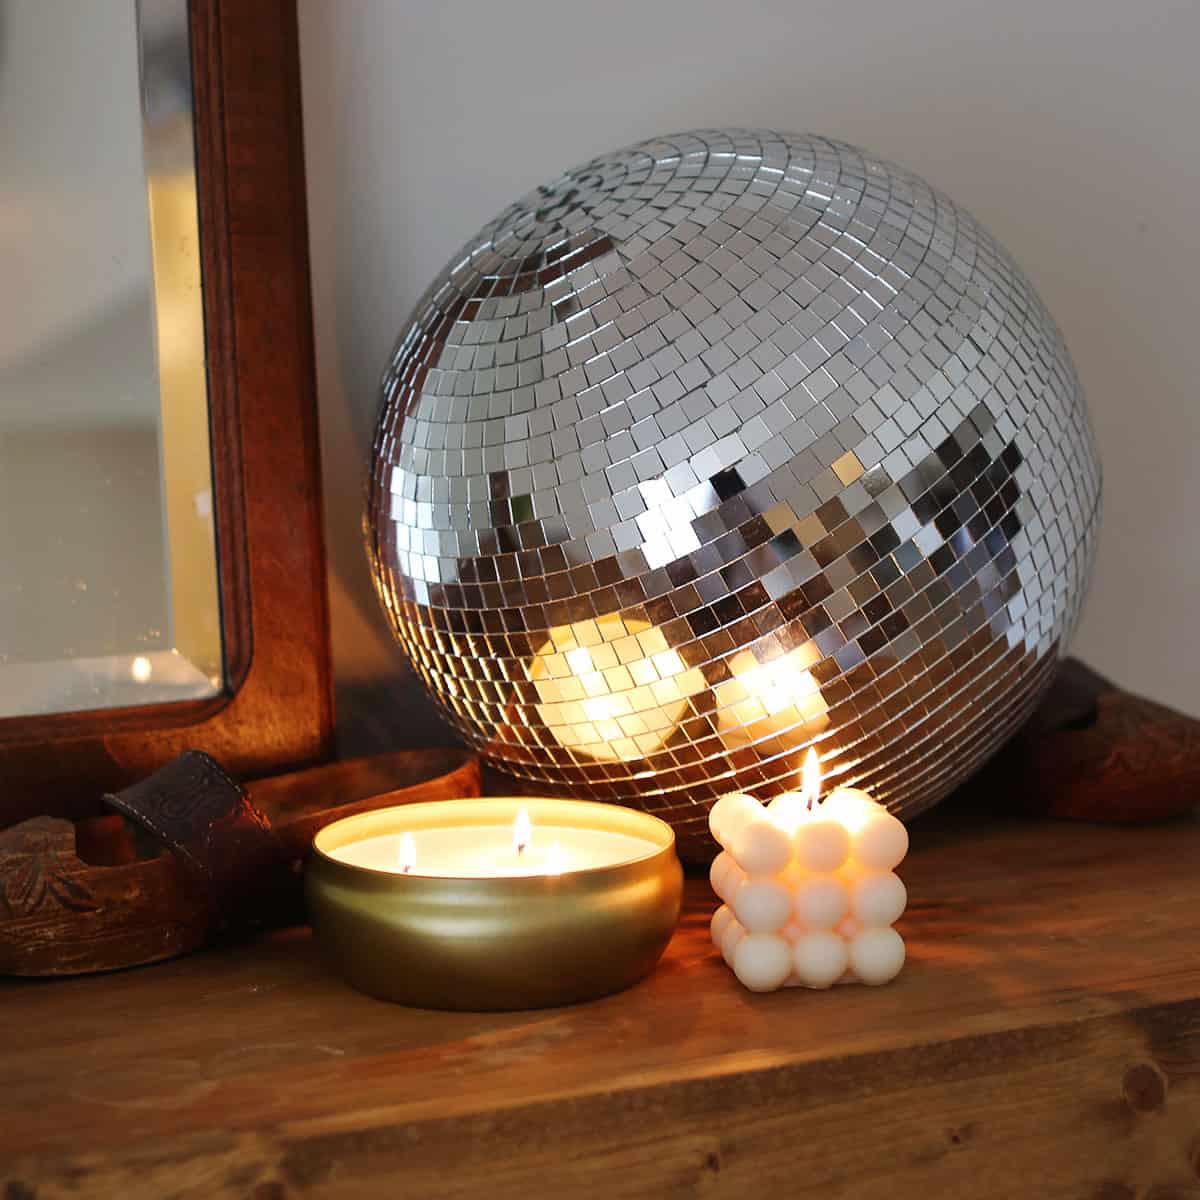
How to Make Molded Candles
Making a candle in a mold is a little different because you will not need a container. You can reuse molds over and over if you care for them. See this tutorial for a flower pillar candle DIY for step-by-step instructions and tips for success.
Here are some cute molds:
Where to Buy Containers:
- Used: thrift stores, cleaned out food containers like pickle jars, or other used glass or porcelain containers you may have. Do not use containers that can melt or catch fire, like plastic.
- New: pretty pink glasses, colorful handblown glass, a footed planter
- See how to easily remove candle wax from used candle containers so you can reuse them again!

How to Make Candles: Beginner’s Guide
Equipment
- melting pot
- larger pot
- kitchen thermometer
- measuring cups and spoons
- mixing spoon
- clothespin or sticks or holding wick
- wick trimmer or scissors
- kitchen scale optional
Ingredients
- wax
- wick
- wick stickers or hot glue
- scent oil or blend
- container or mold
Instructions
- Measure out your wax – the easiest way to do this is to fill your container that will become your candle with the wax pellets. Then, use your kitchen scale to find the weight so you know how much scent oil to use.
- In your melting pot, add the wax.
- In your larger pot, add enough water so it will cover your melting pot at least halfway.
- Heat the larger pot with the water and melting pot over medium heat. This is essentially a double boiler, like you might use to melt chocolate. While you can melt the wax in the melting pot directly, using a double boiler ensures the wax doesn’t overheat.
- Heat the wax to 185°F. Use your thermometer to check.
- Stir in the scent oil so it gets well distributed.
- Turn off the heat and allow your wax mixture to cool to 125°F before pouring.
- While the wax melts (or as it cools off), add your wick to the container. Use a wick sticker or hot glue to stick the metal bottom of the wick to the bottom center of the container. Then, use a clothespin or stick to wrap the top of the wick around so it will stay center once you pour in the wax.
- Pour the wax into your container. If the wick shifts around, fix it while the wax is still hot and very liquid.
- Once your candle hardens, you’re ready to trim the wick and use it!
Looking for more holiday ideas? Christmas Cake Pops, Melted Snowman Cookies, Christmas Nail Ideas.
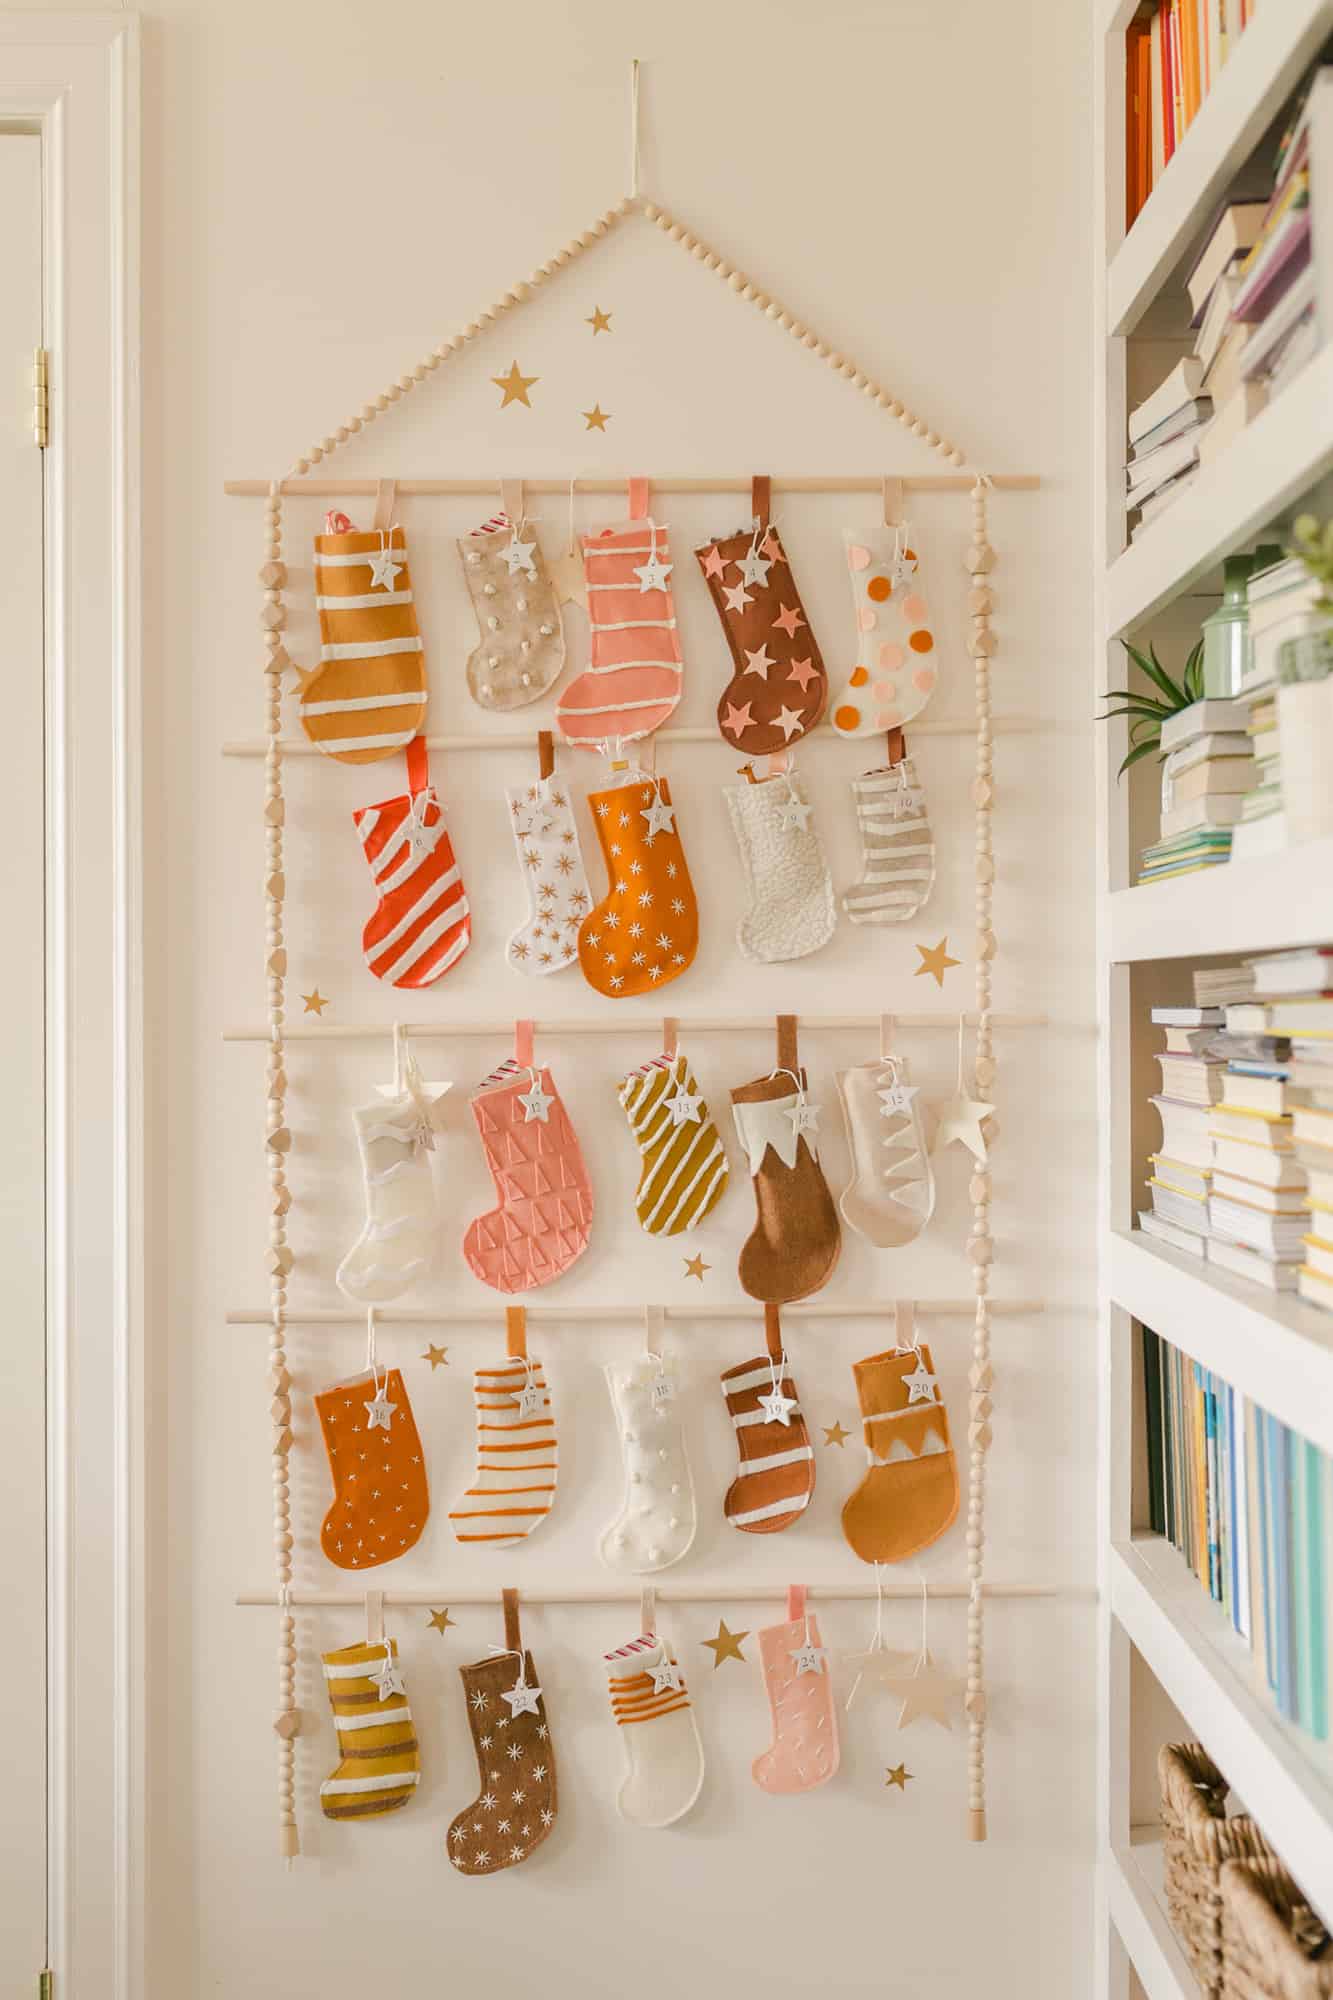
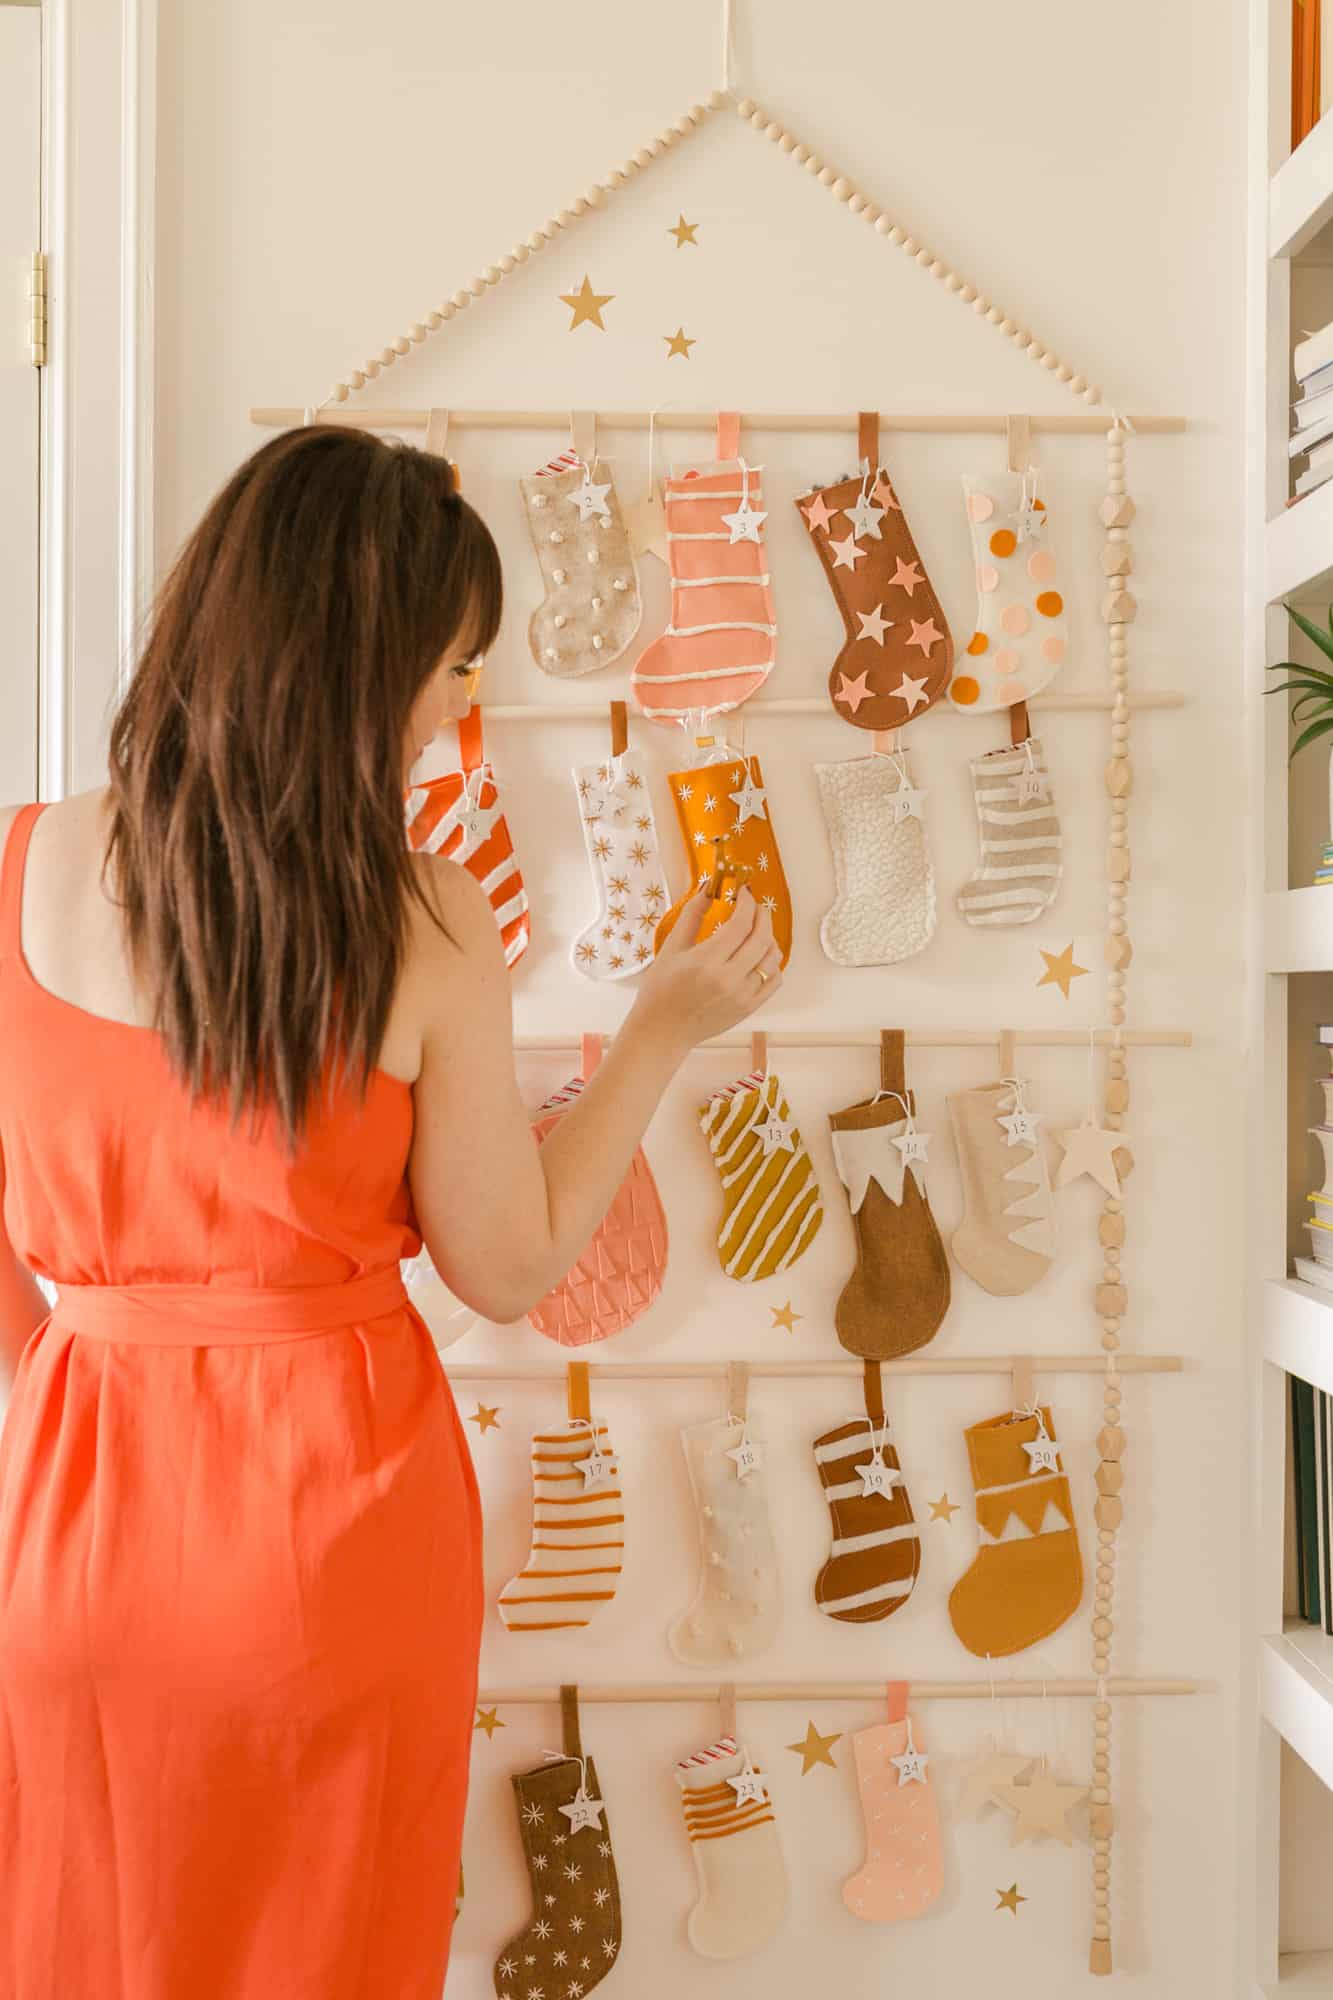
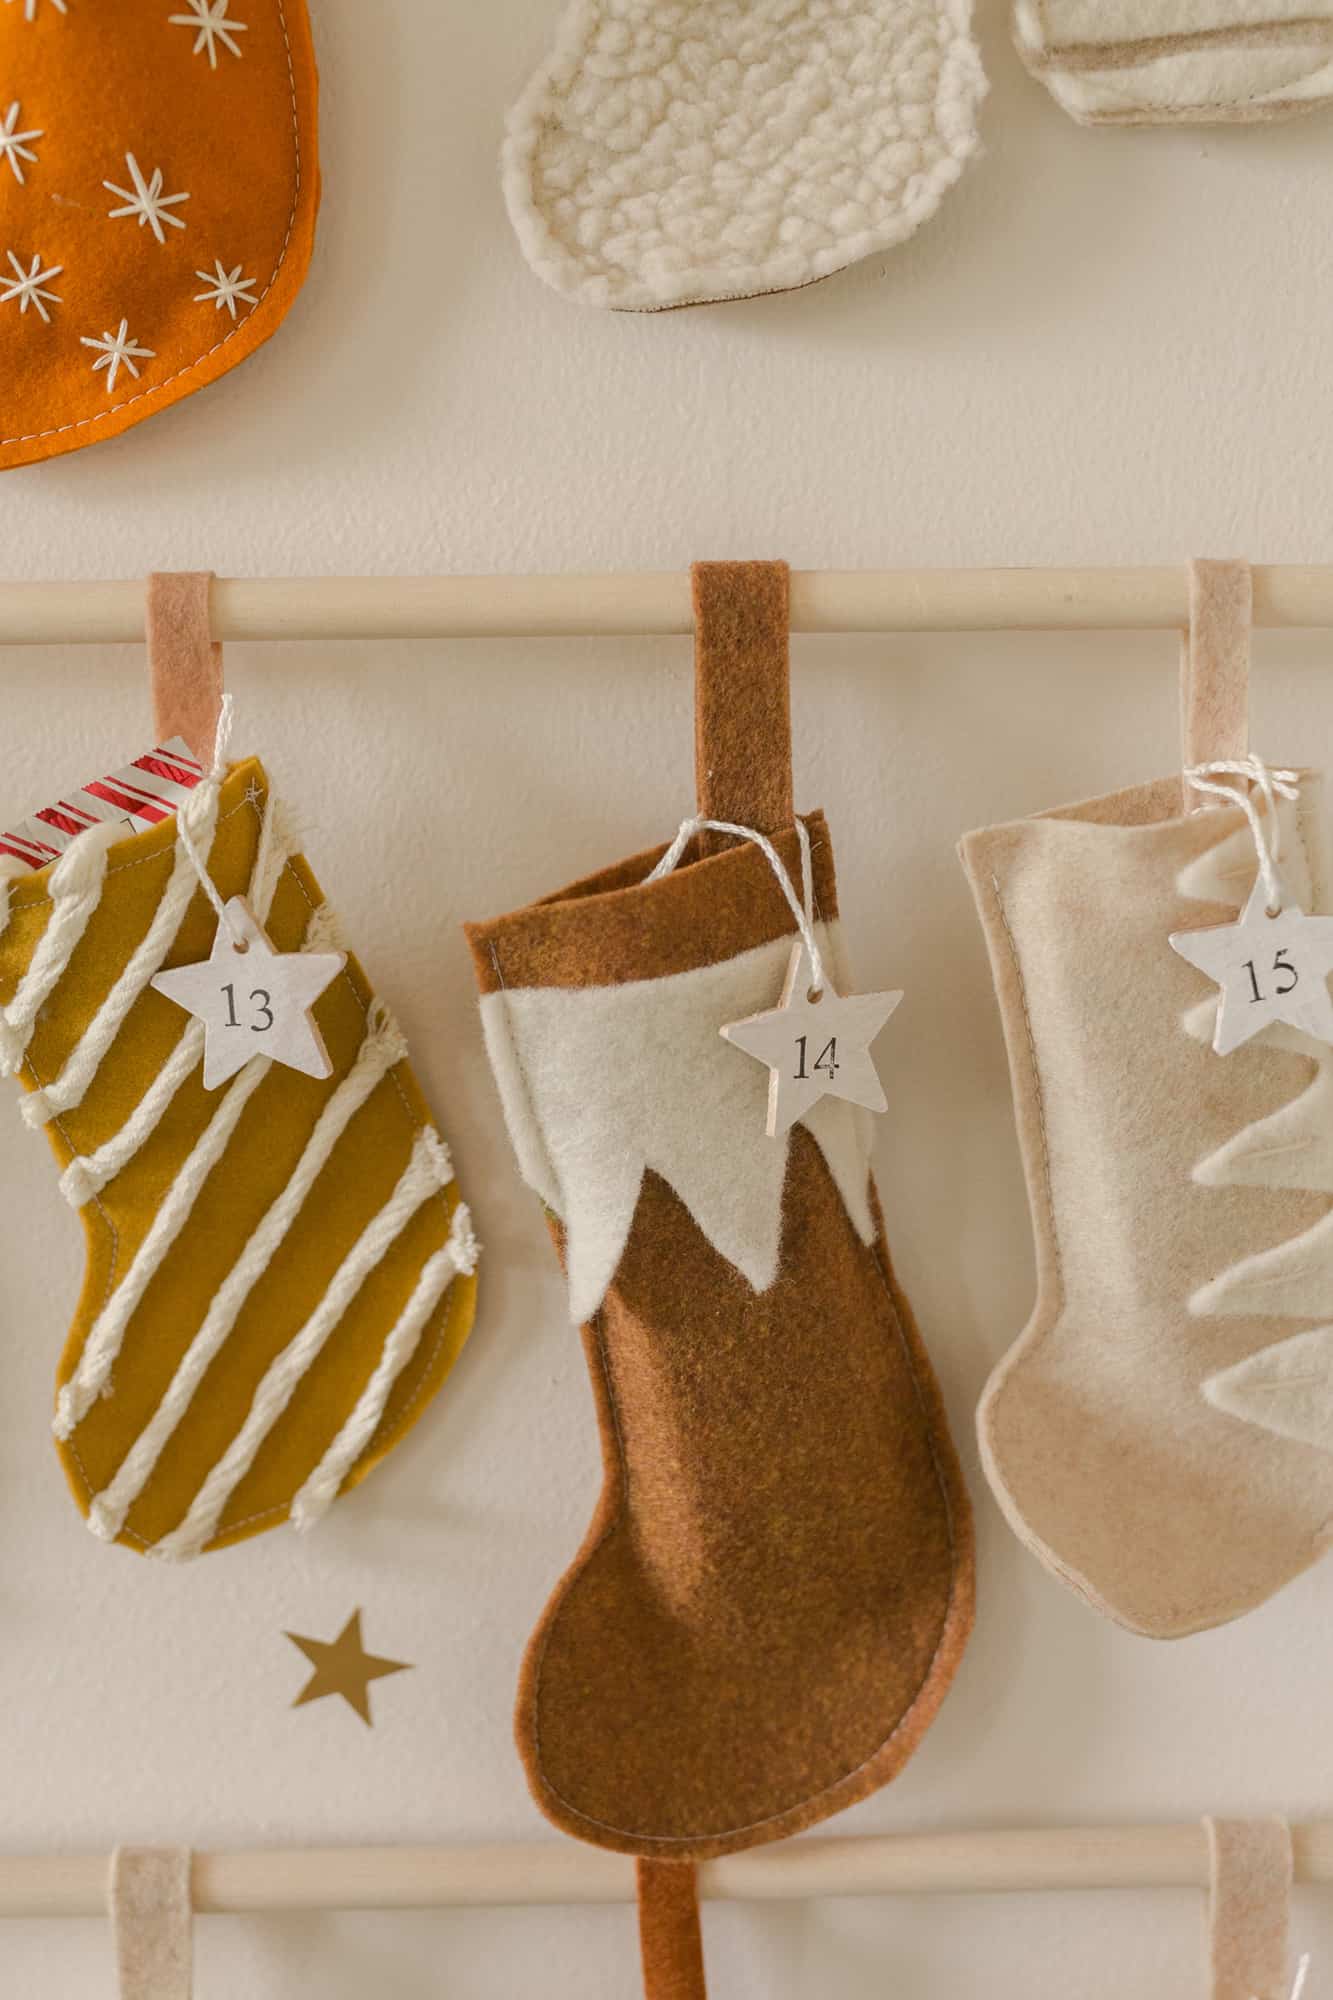
Homemade Advent Calendar
As children, we loved the tradition of an advent calendar counting down the days until Christmas. Today, I’m going to teach you how I made a reusable advent calendar for my kids.
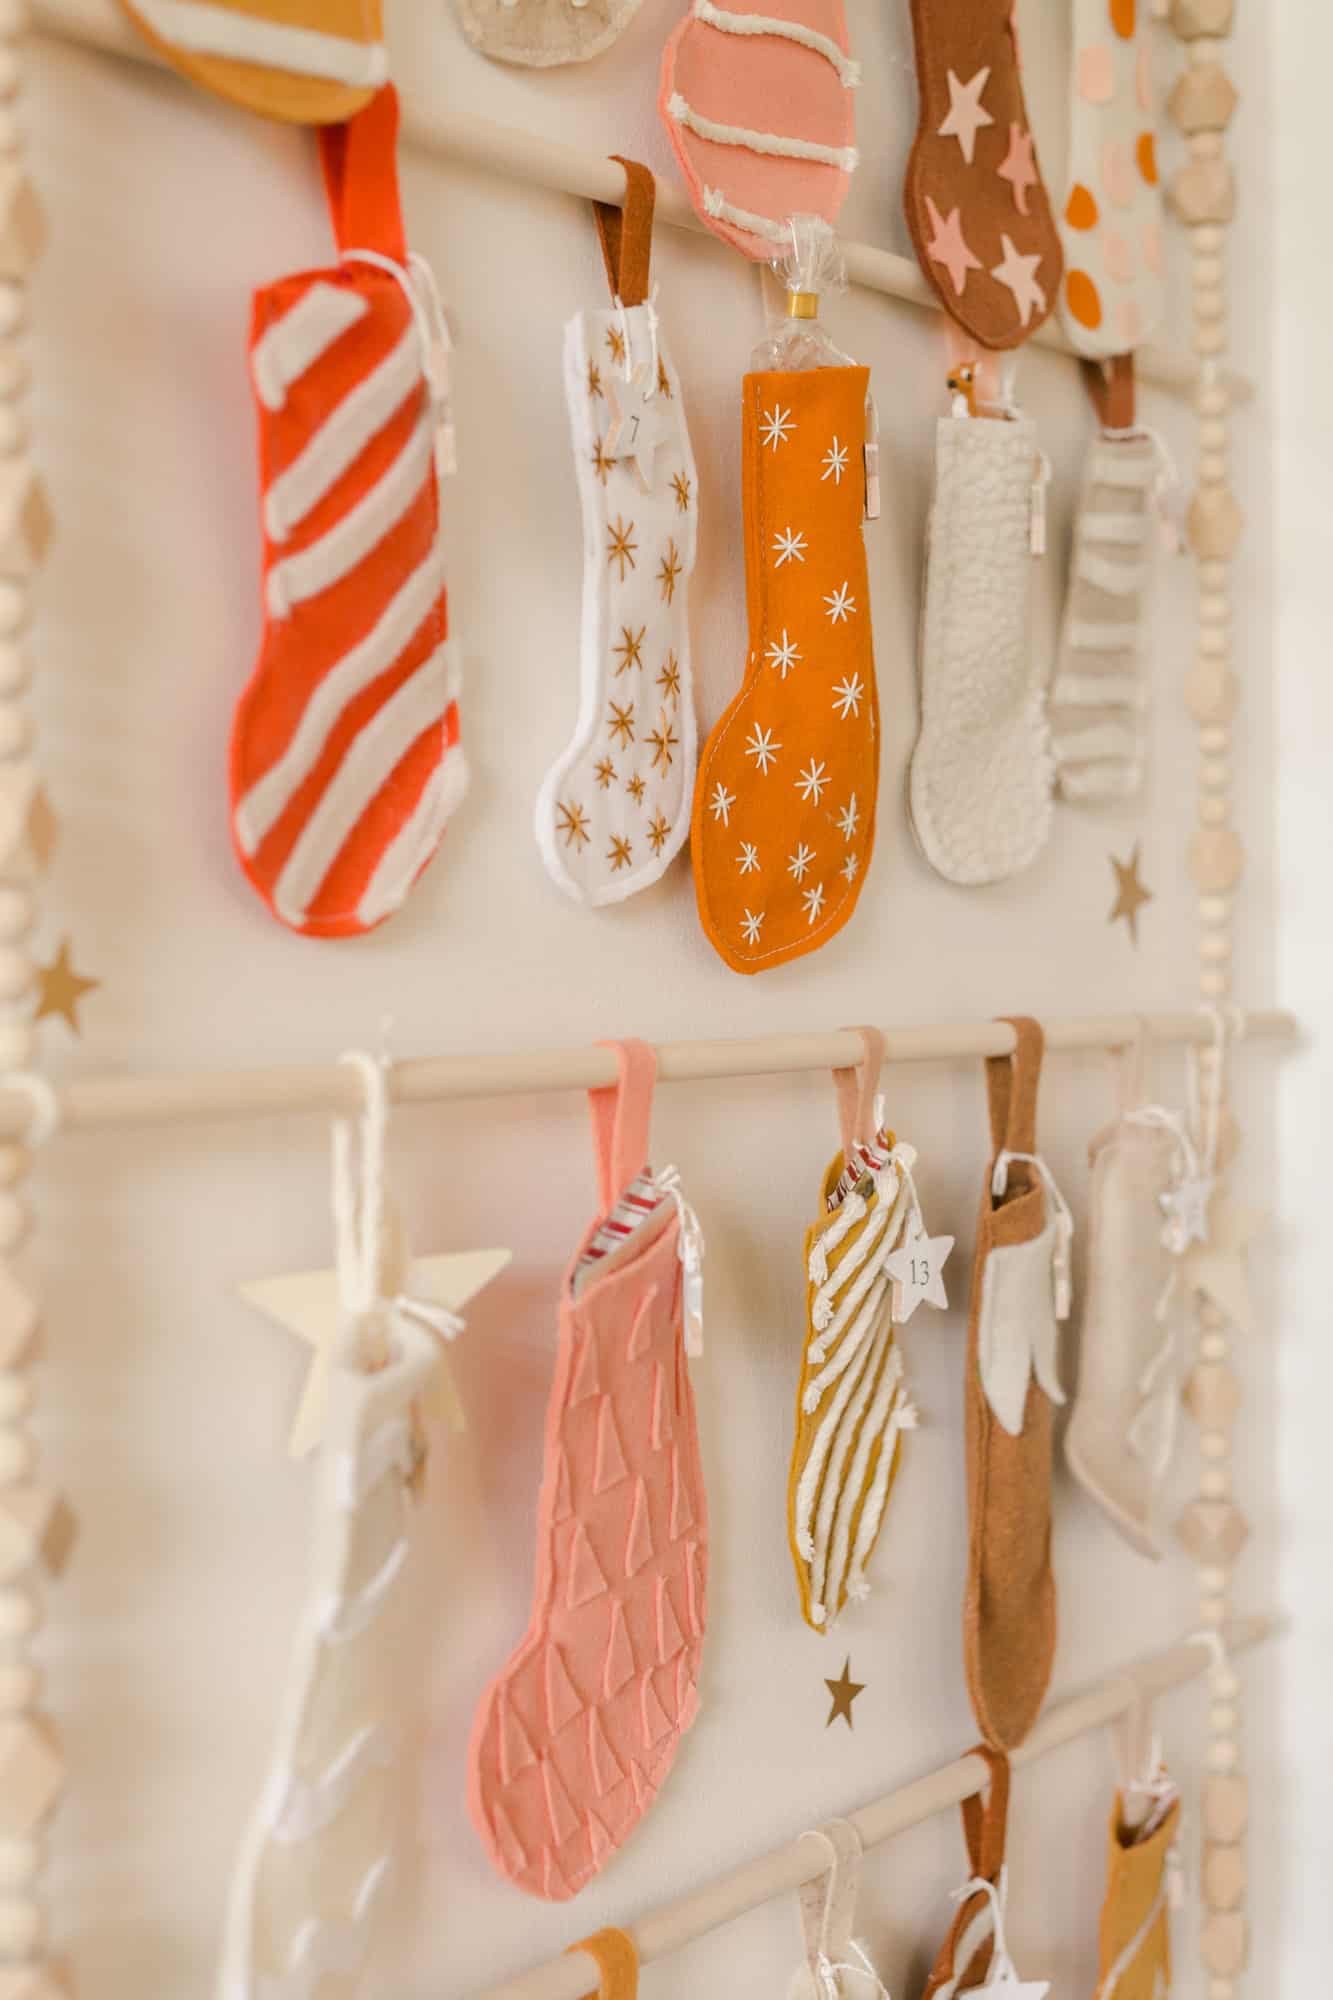
Ideas for Advent Stuffers
Much like stocking stuffers, we like to stuff our advent with a variety of candies, small toys and trinkets and activity ideas.
Candies – For our advent, I like to get a couple bags of pre-packed holiday candies and spread them out randomly through the month. I suggest getting one bag of chocolate candies and one bag of gummy candies.
Toys and Trinkets – Try a new toothbrush, matchbox cars, Lego characters and bookmarks make great gift ideas.
Activities Print – A sheet of fun to-do items and and pack the weekends with fun activities such as watching holiday movies, driving around to see lights on people’s houses or visiting shops to buy gifts for friends and family.
It took me around a week to complete my advent calendar. If you want to save a lot of time, choose pre-made mini stockings.
Instructions
Let’s talk about the DIY steps. This is E-A-S-Y. There’s nothing in this that you can’t just see from the photos, but I will still explain all the steps just in case you’re curious about exactly how I did it.
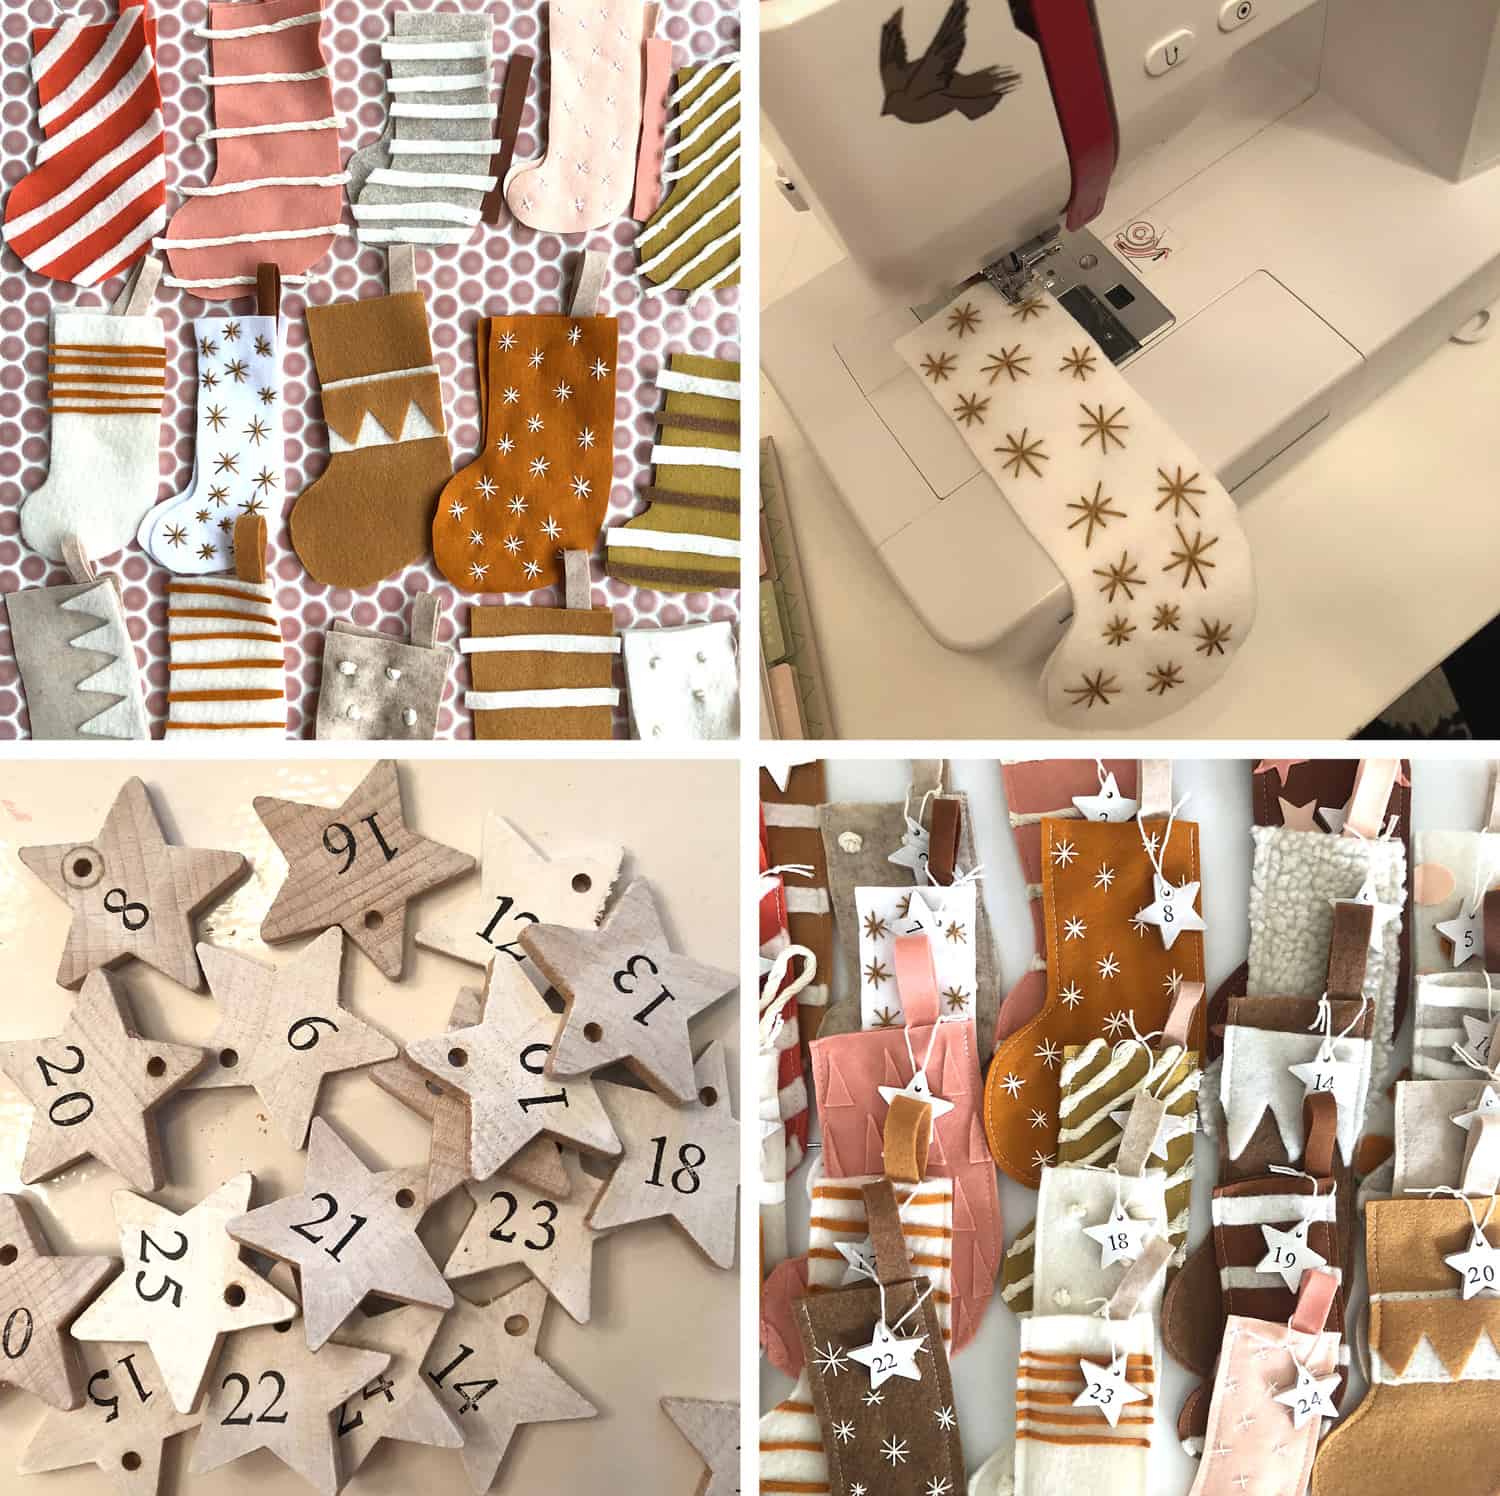
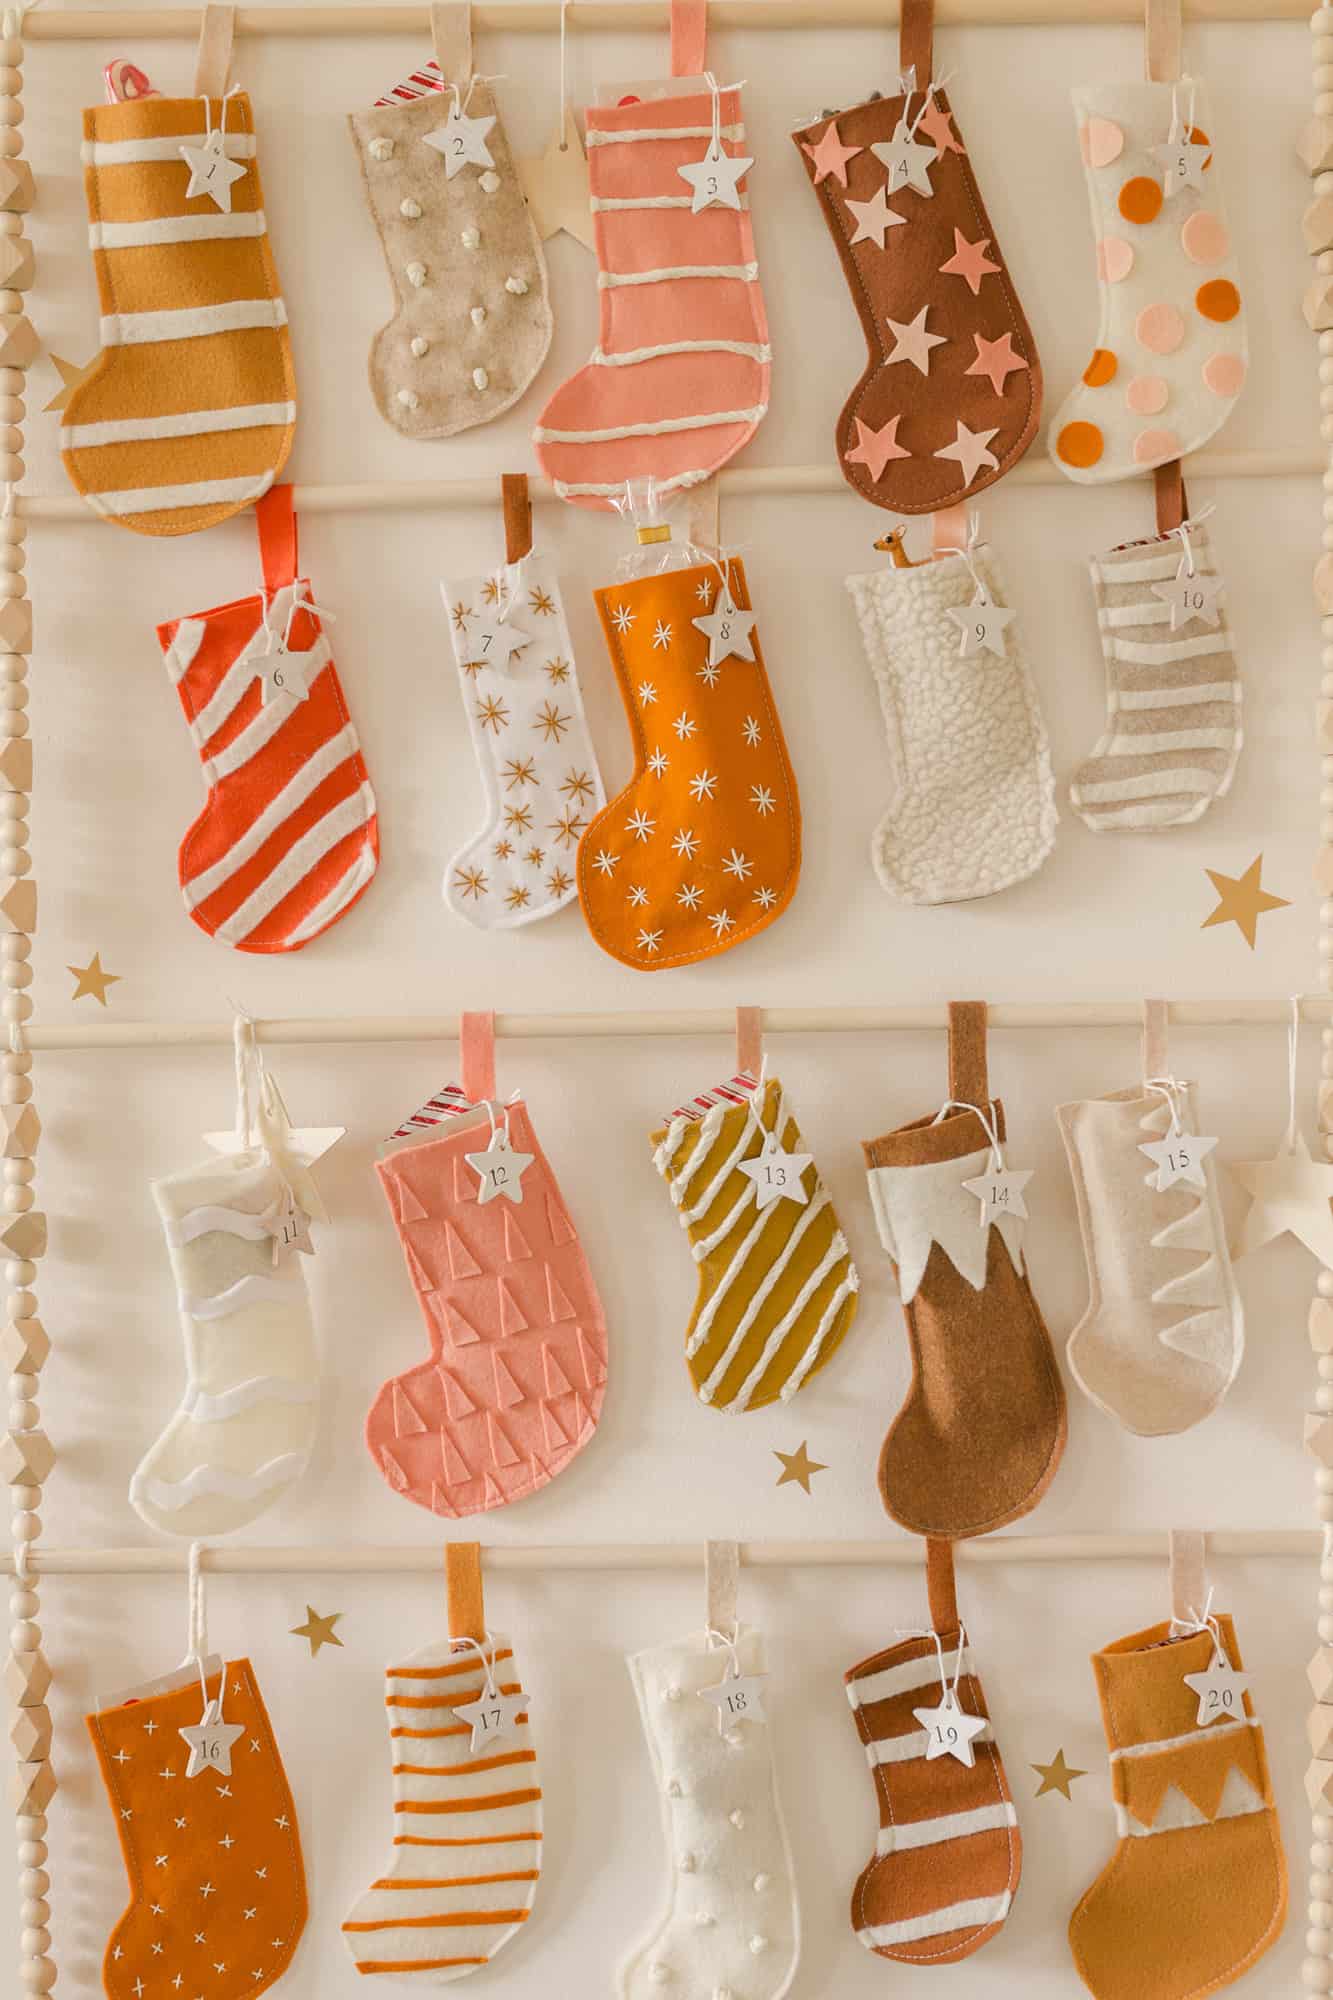
1. First, cut out 24 stockings from felt. I mainly used felt I already had, so it’s a mix between high and low quality (and I’m a-OK with that!). I made a few paper templates for stocking shapes and used them to cut out all the stockings.
I didn’t want mine to be exactly the same shapes and sizes, but you can do that if you want a more unified look. Next, embellish each stocking on the top side with hand embroidery and/or by gluing things onto the stockings.
2. Machine stitch or hand-stitch each stocking. Then, add a loop to the top of each stocking with felt or yarn (something to hang them from).
3. Paint small wood stars white and drill or punch holes. Use a stamp set to add numbers one through 24.
4. Add the stars to the stockings with string.
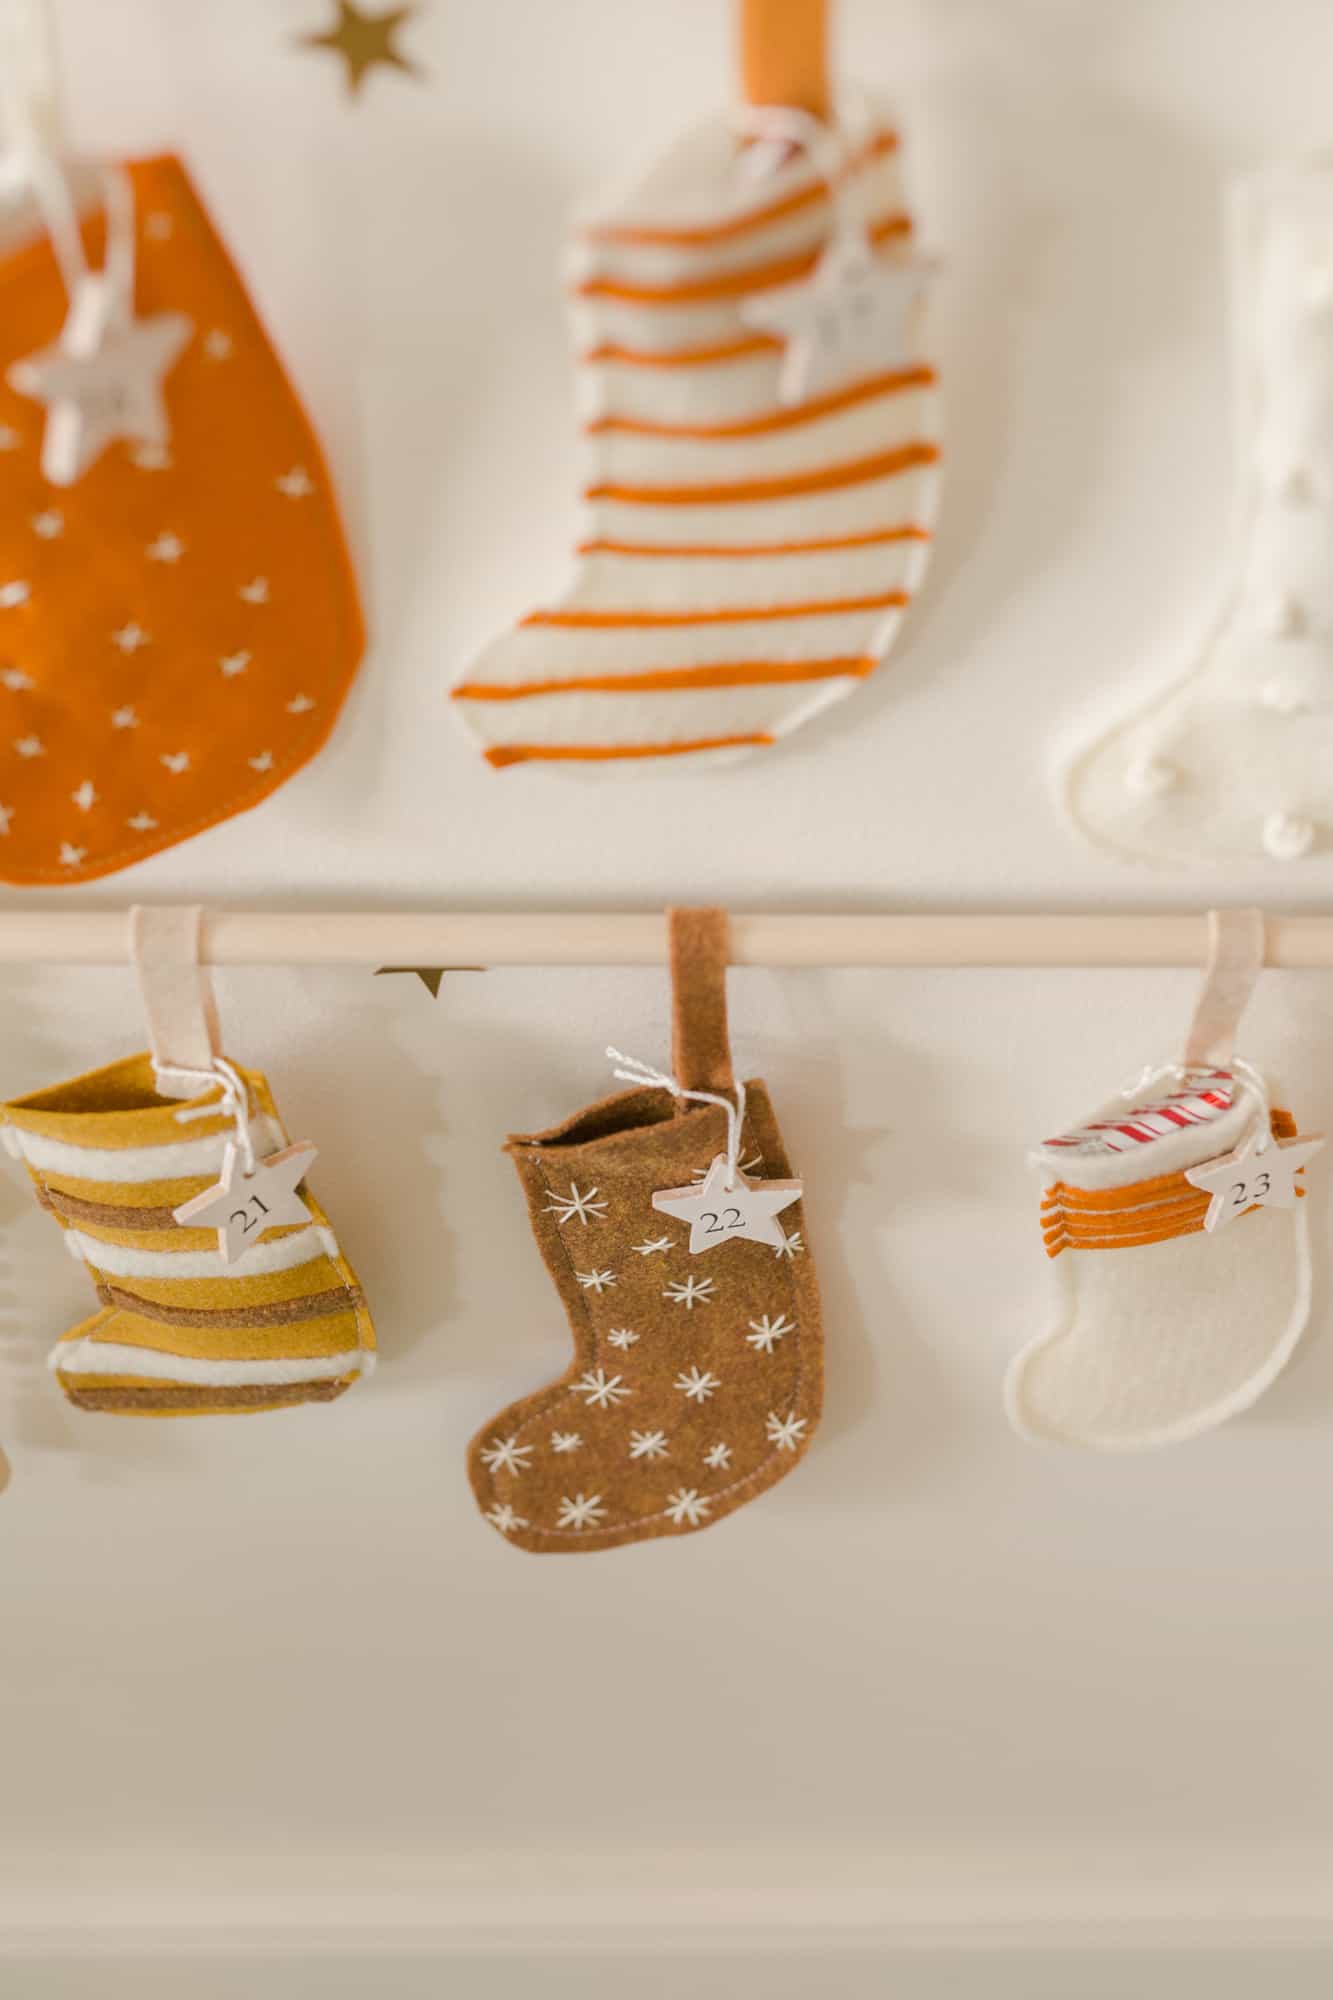
5. Use wooden rods, yarn, and wood beads to make the hanging structure. You can see below that my stockings are permanently attached to the rods, but you can tie them on instead if you’d like to be able to remove them each day.
Bonus step: After I was done, I wanted to add a little more detail, so I hung a bunch of larger wooden stars on the rods.
6. Fill your stockings with candy, small toys, and notes with fun activities like movies to watch, crafts to do or special places you will go each day.
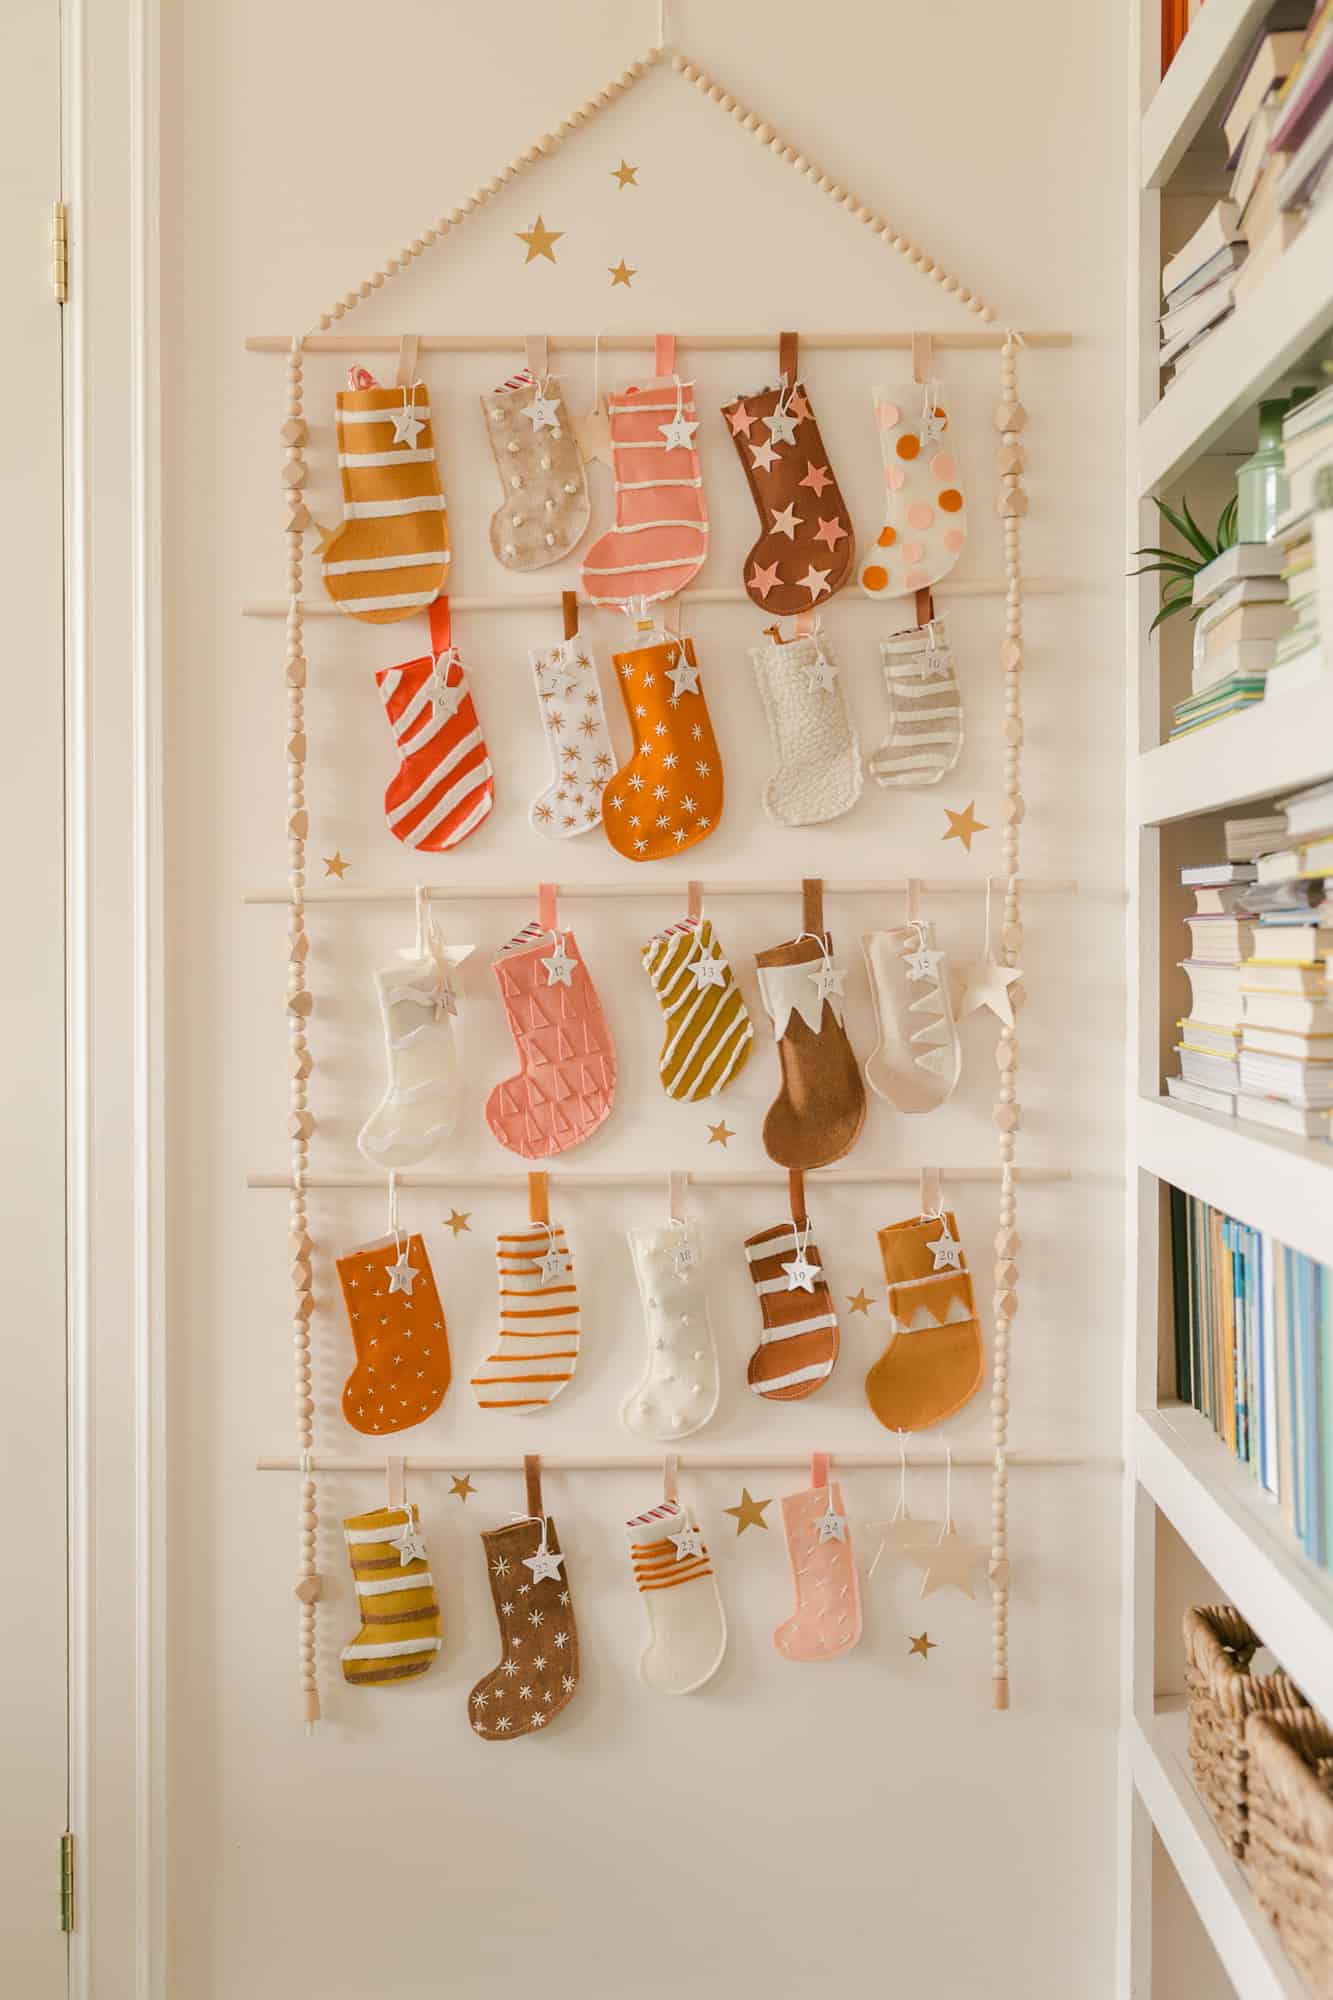
Note: If you don’t have the time to make your own this year, there are lots of cute felt calendars out there, or you can just buy the mini stocking part and go from there to save a little time.

More Holiday Crafts to Try
- Vintage Christmas Tree Marquee
- Oversized Christmas Wreath
- Bottle Brush Christmas Trees
- Holiday Garlands
Holiday Gift DIYS
- Homemade Bath Bombs
- Crystal Soaps
- Marbled Clay Ring Dish
- We’ve also made a few advent calendars over the years here on the blog, so see if one of those seems perfect for you!
Related: Check out our entire Halloween archive of spooky decorations, recipes and more! You’ve Been Booed (with Free Printable), Halloween Cake Pops, Caramel Apples.
 Aunt Emma (as she is known in my house) came up with the idea to make our girls a Halloween countdown calendar. I immediately said “YES, YOU’RE BRILLIANT.”
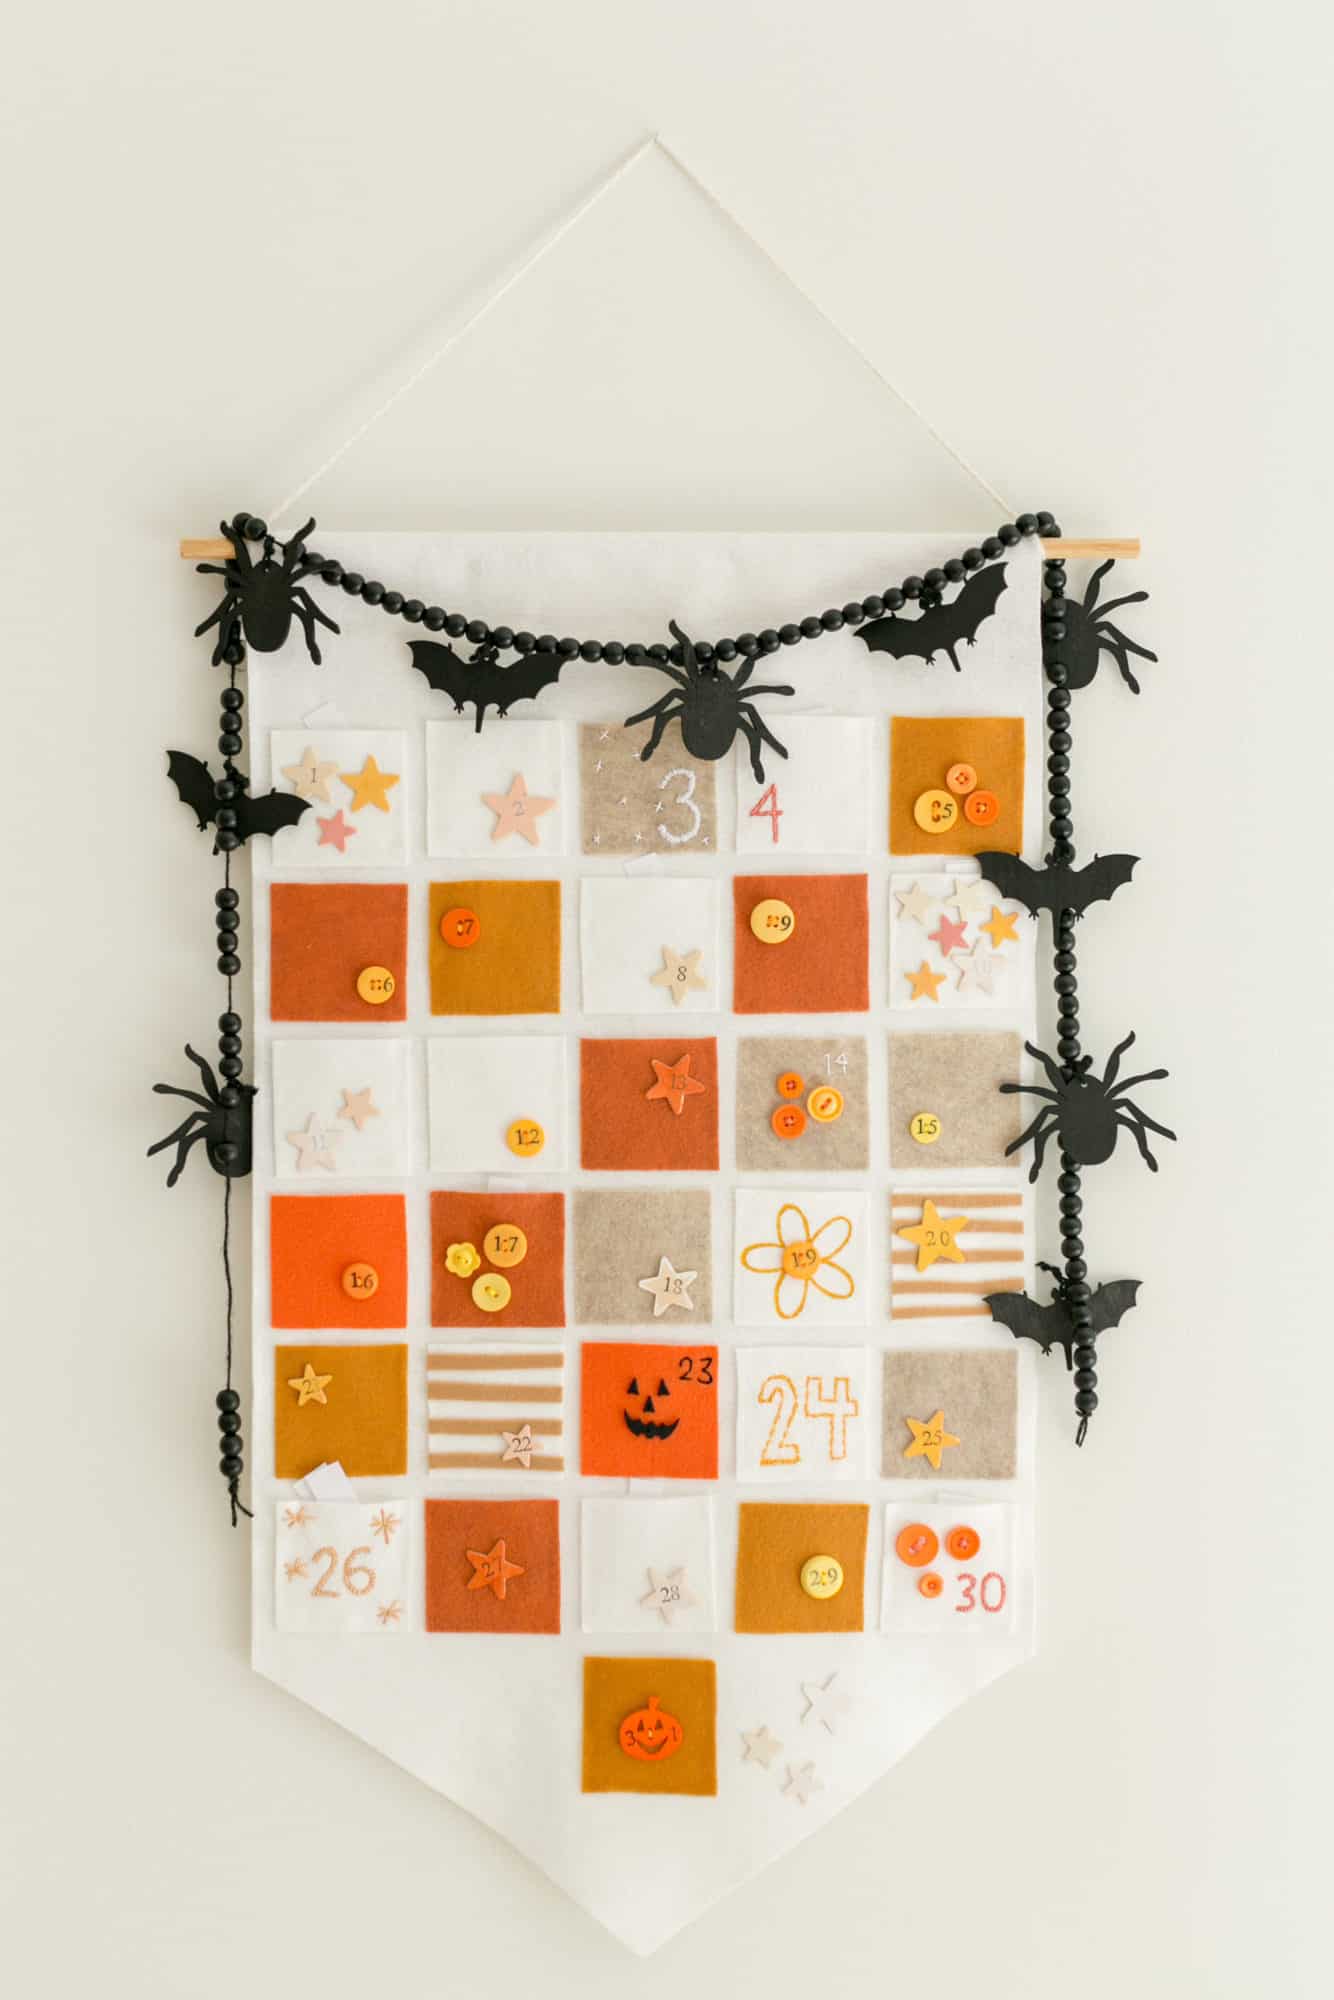
So why not start this fun (and very spooky!) tradition to enjoy a little bit of Halloween magic all month long in October? I pretty much set out to make a Halloween version of our Christmas advent calendar since we love that one so much.
We created this Halloween activity printable. My suggestion is to use a mix of activities and then in some of the days, just put in a candy. And, use a calendar to strategically place the movies on the weekends (or whatever adjustments are best for your family’s routine).
Feel free to add your own activities and traditions. The printable we made is mainly just stuff my little kids would enjoy and nostalgia from my childhood. Other things you can include are stickers or coloring pages. Customize it to fit your kiddos!
As far as the DIY goes, this is a pretty simple project. I completed it over a two-day period. I probably spent about 4-5 hours on it. It would take half the time if you just eliminated the embroidery stitching, but I really enjoy doing that and like the look of it.
Supplies:
-dowel rod
-large piece of felt for banner (I got a half yard at the craft store).
–colored felt for pockets
-embellishments for pockets (I used a lot of buttons, some embroidery, stamps with permanent ink, a bit of paint, and some wooden stars).
My complete banner is 18 inches wide and 32 inches long. Each pocket is 3×3 inches.
 The first step is to cut out your banner and the 31 pockets. I embellished all the pockets before gluing them down. You can also sew them if you like.
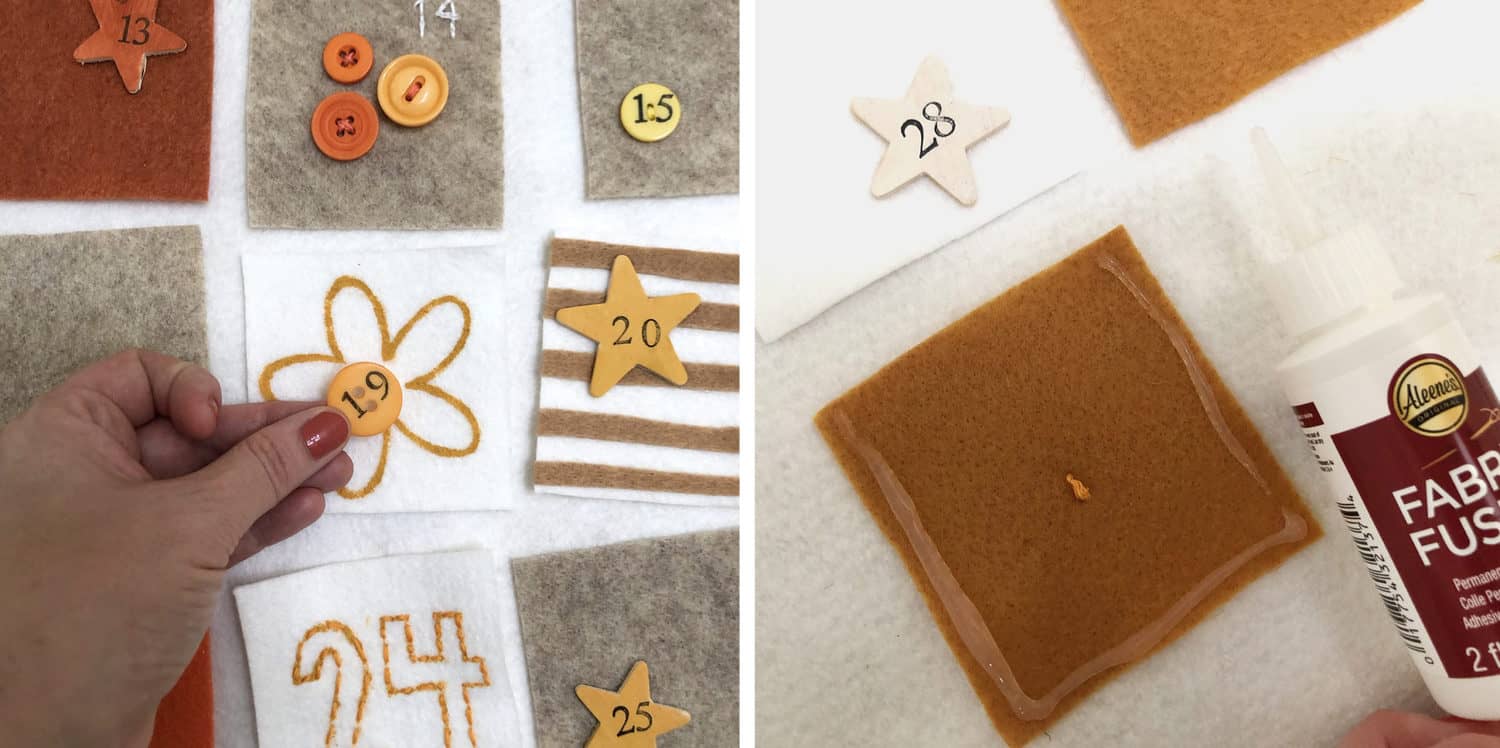
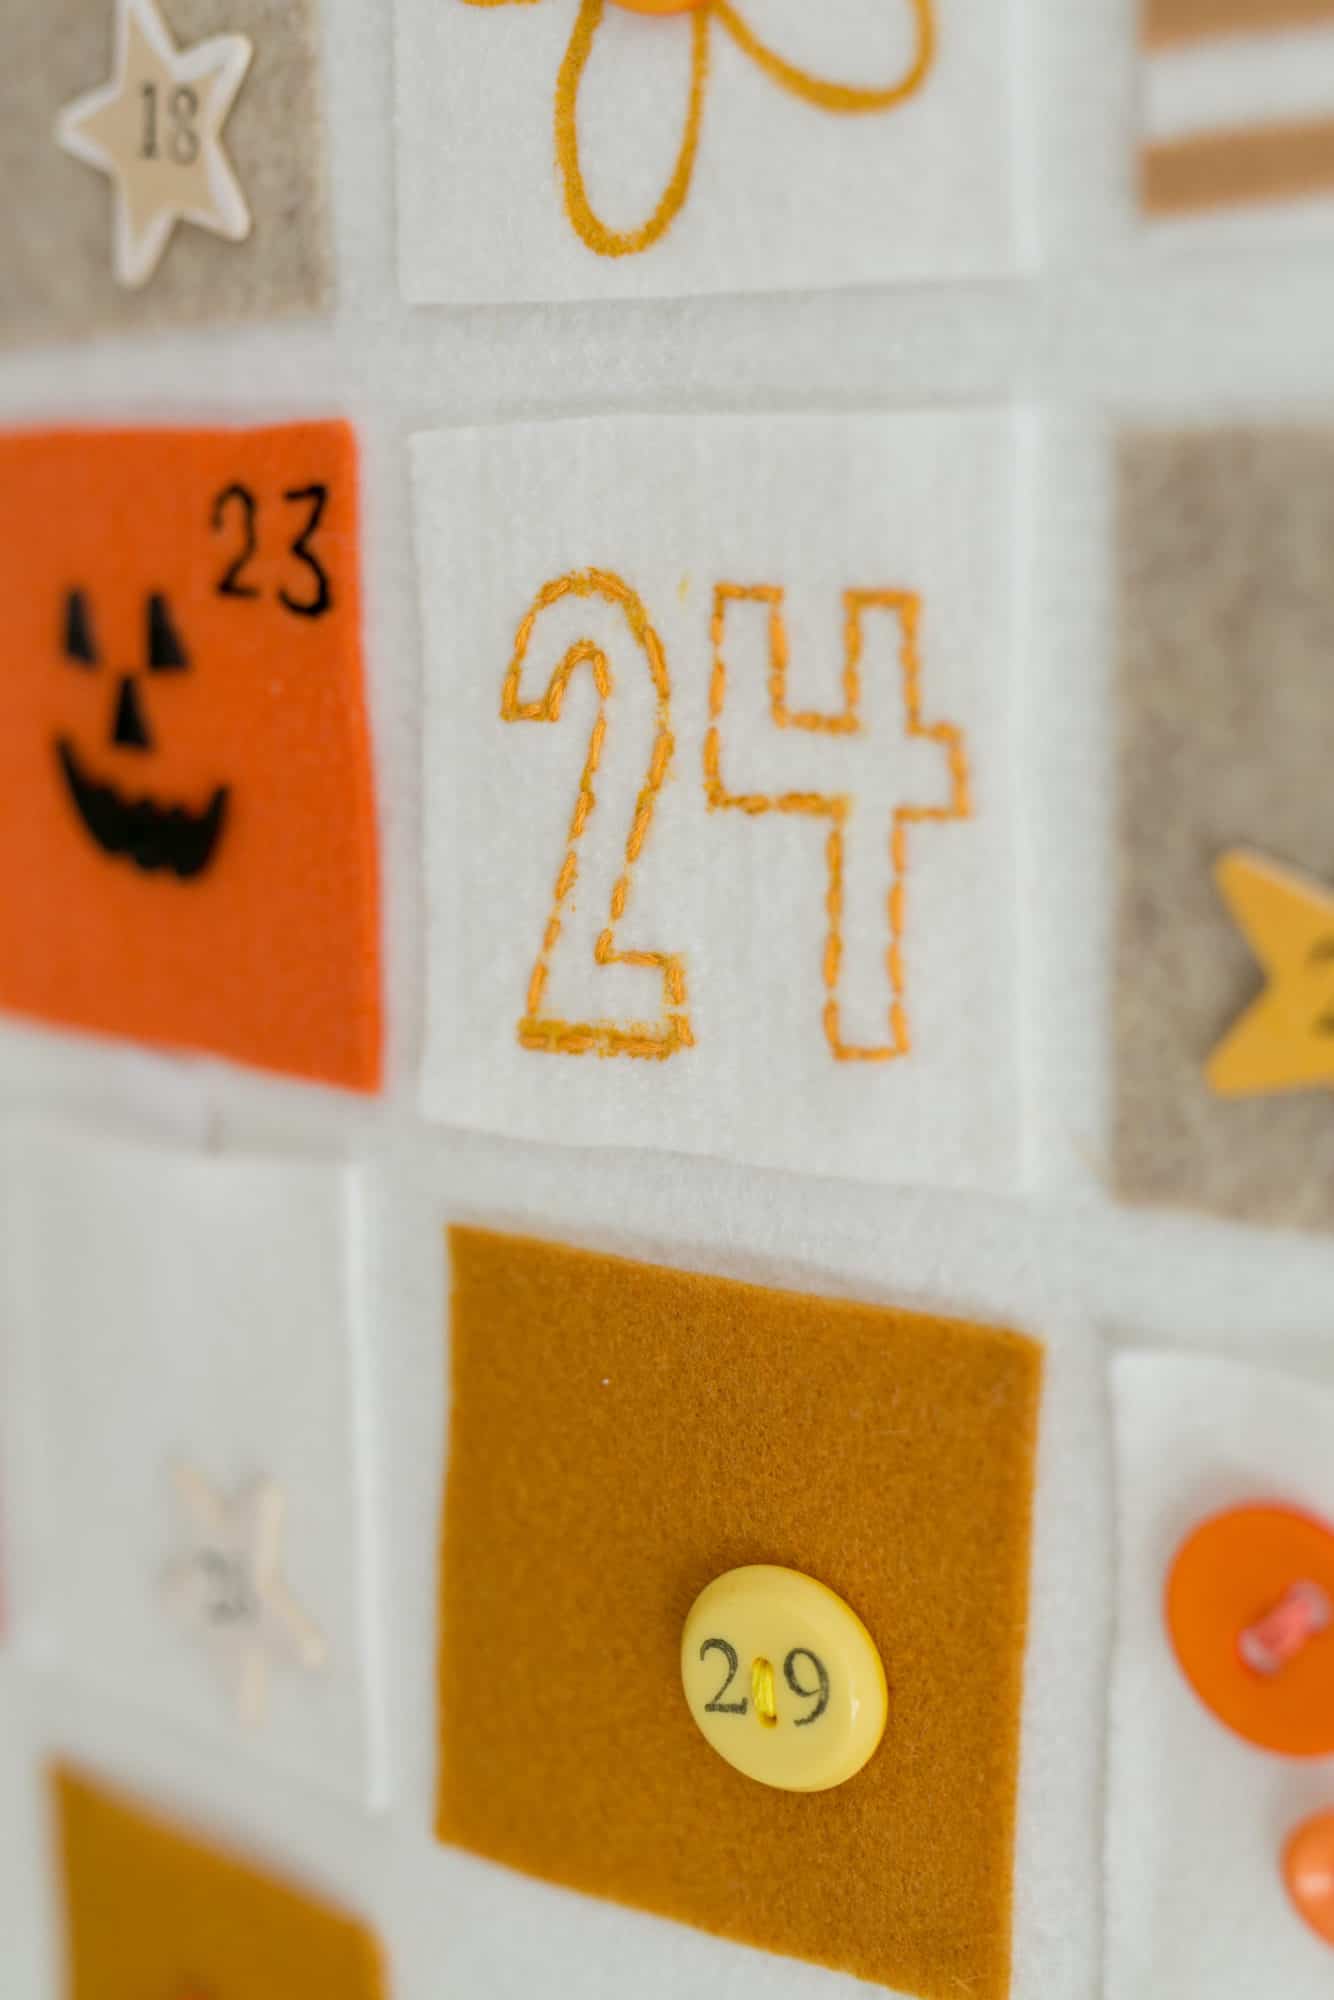
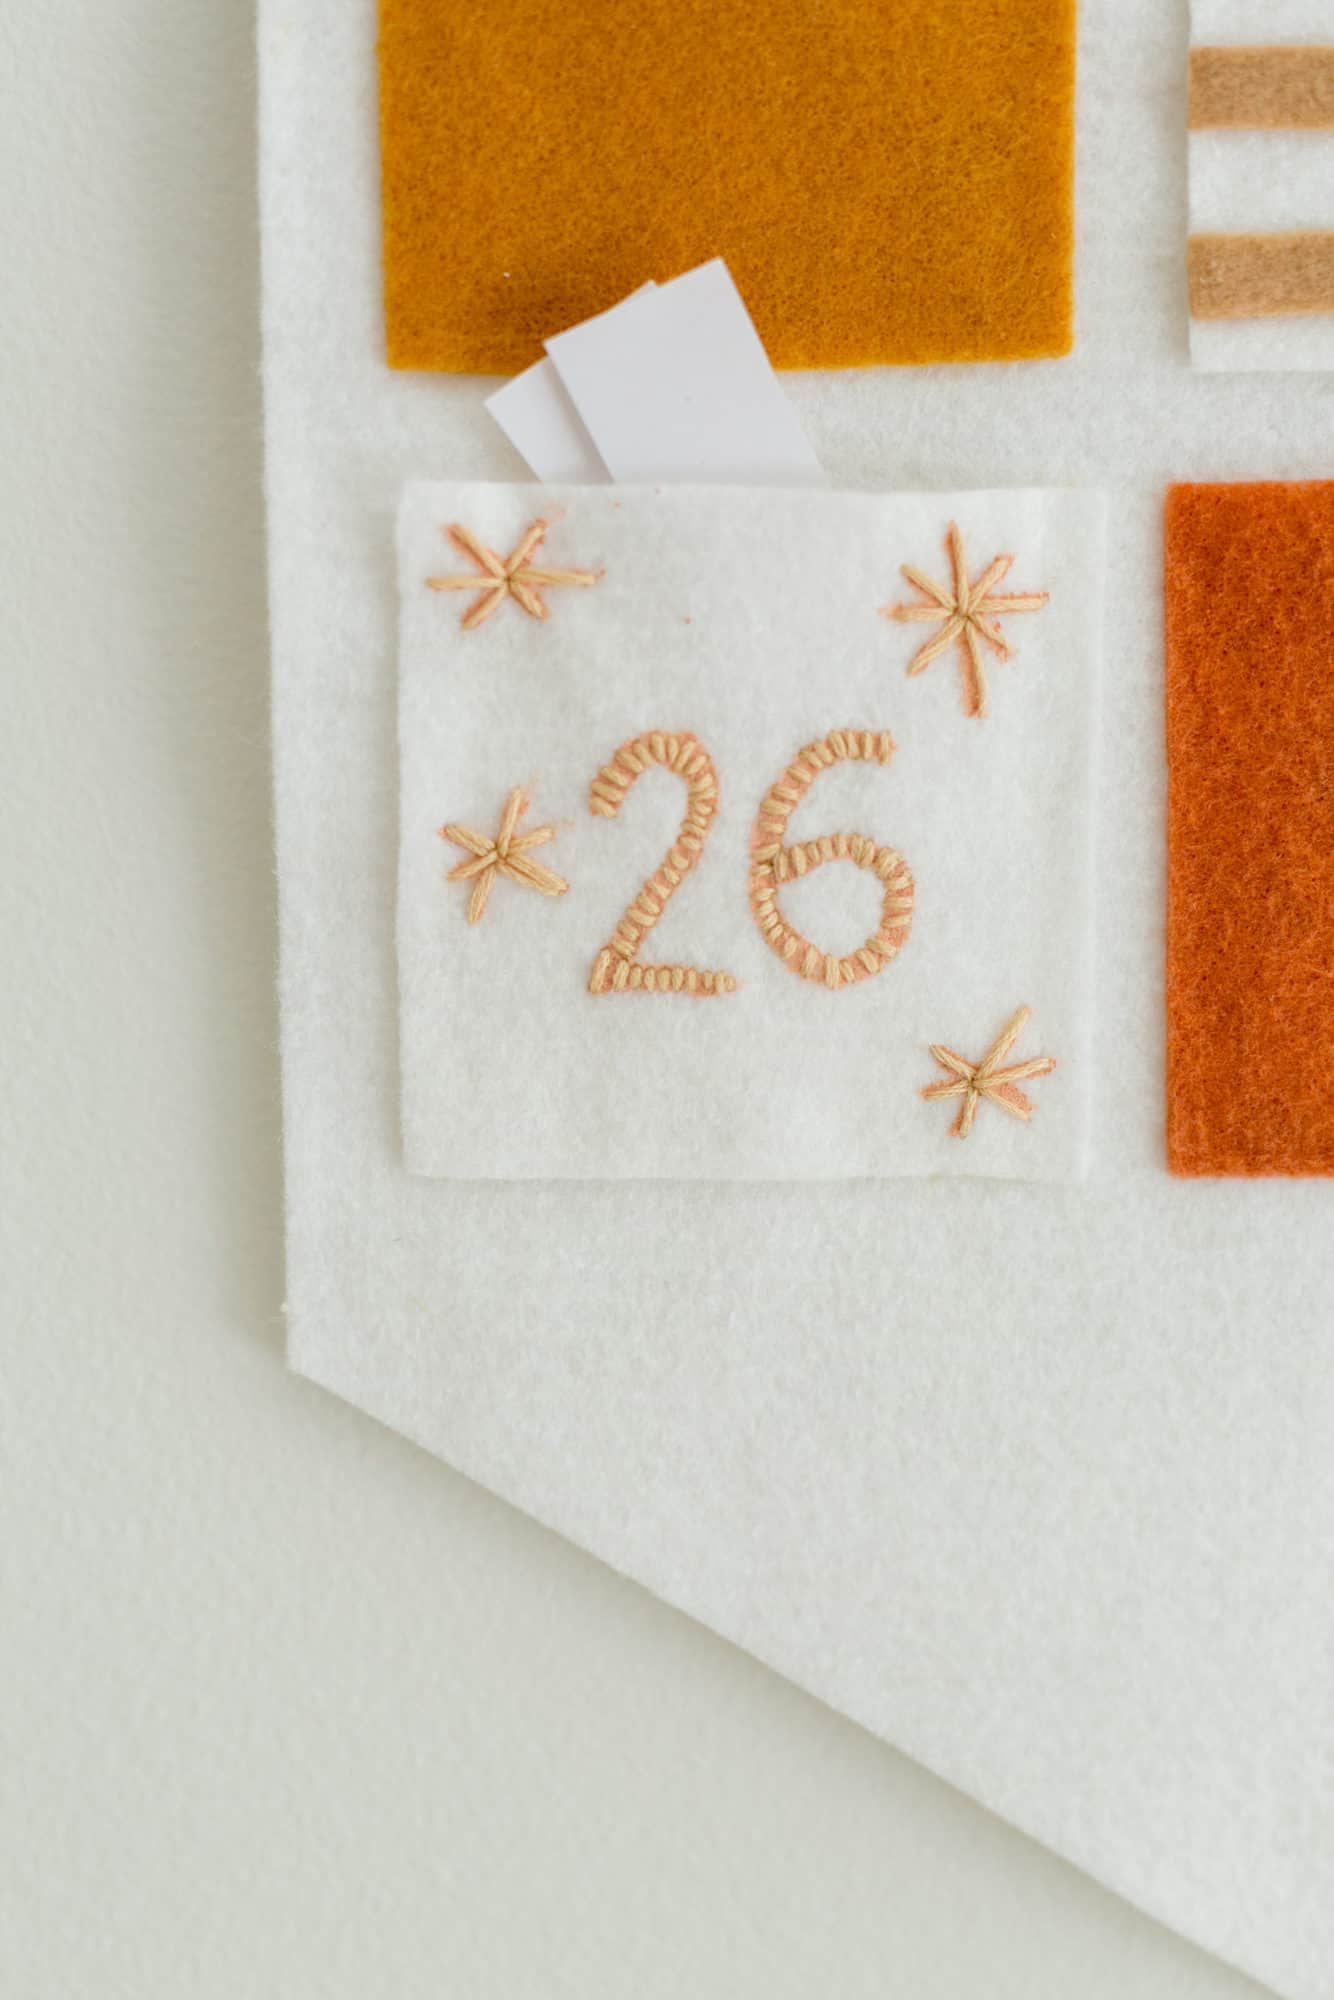
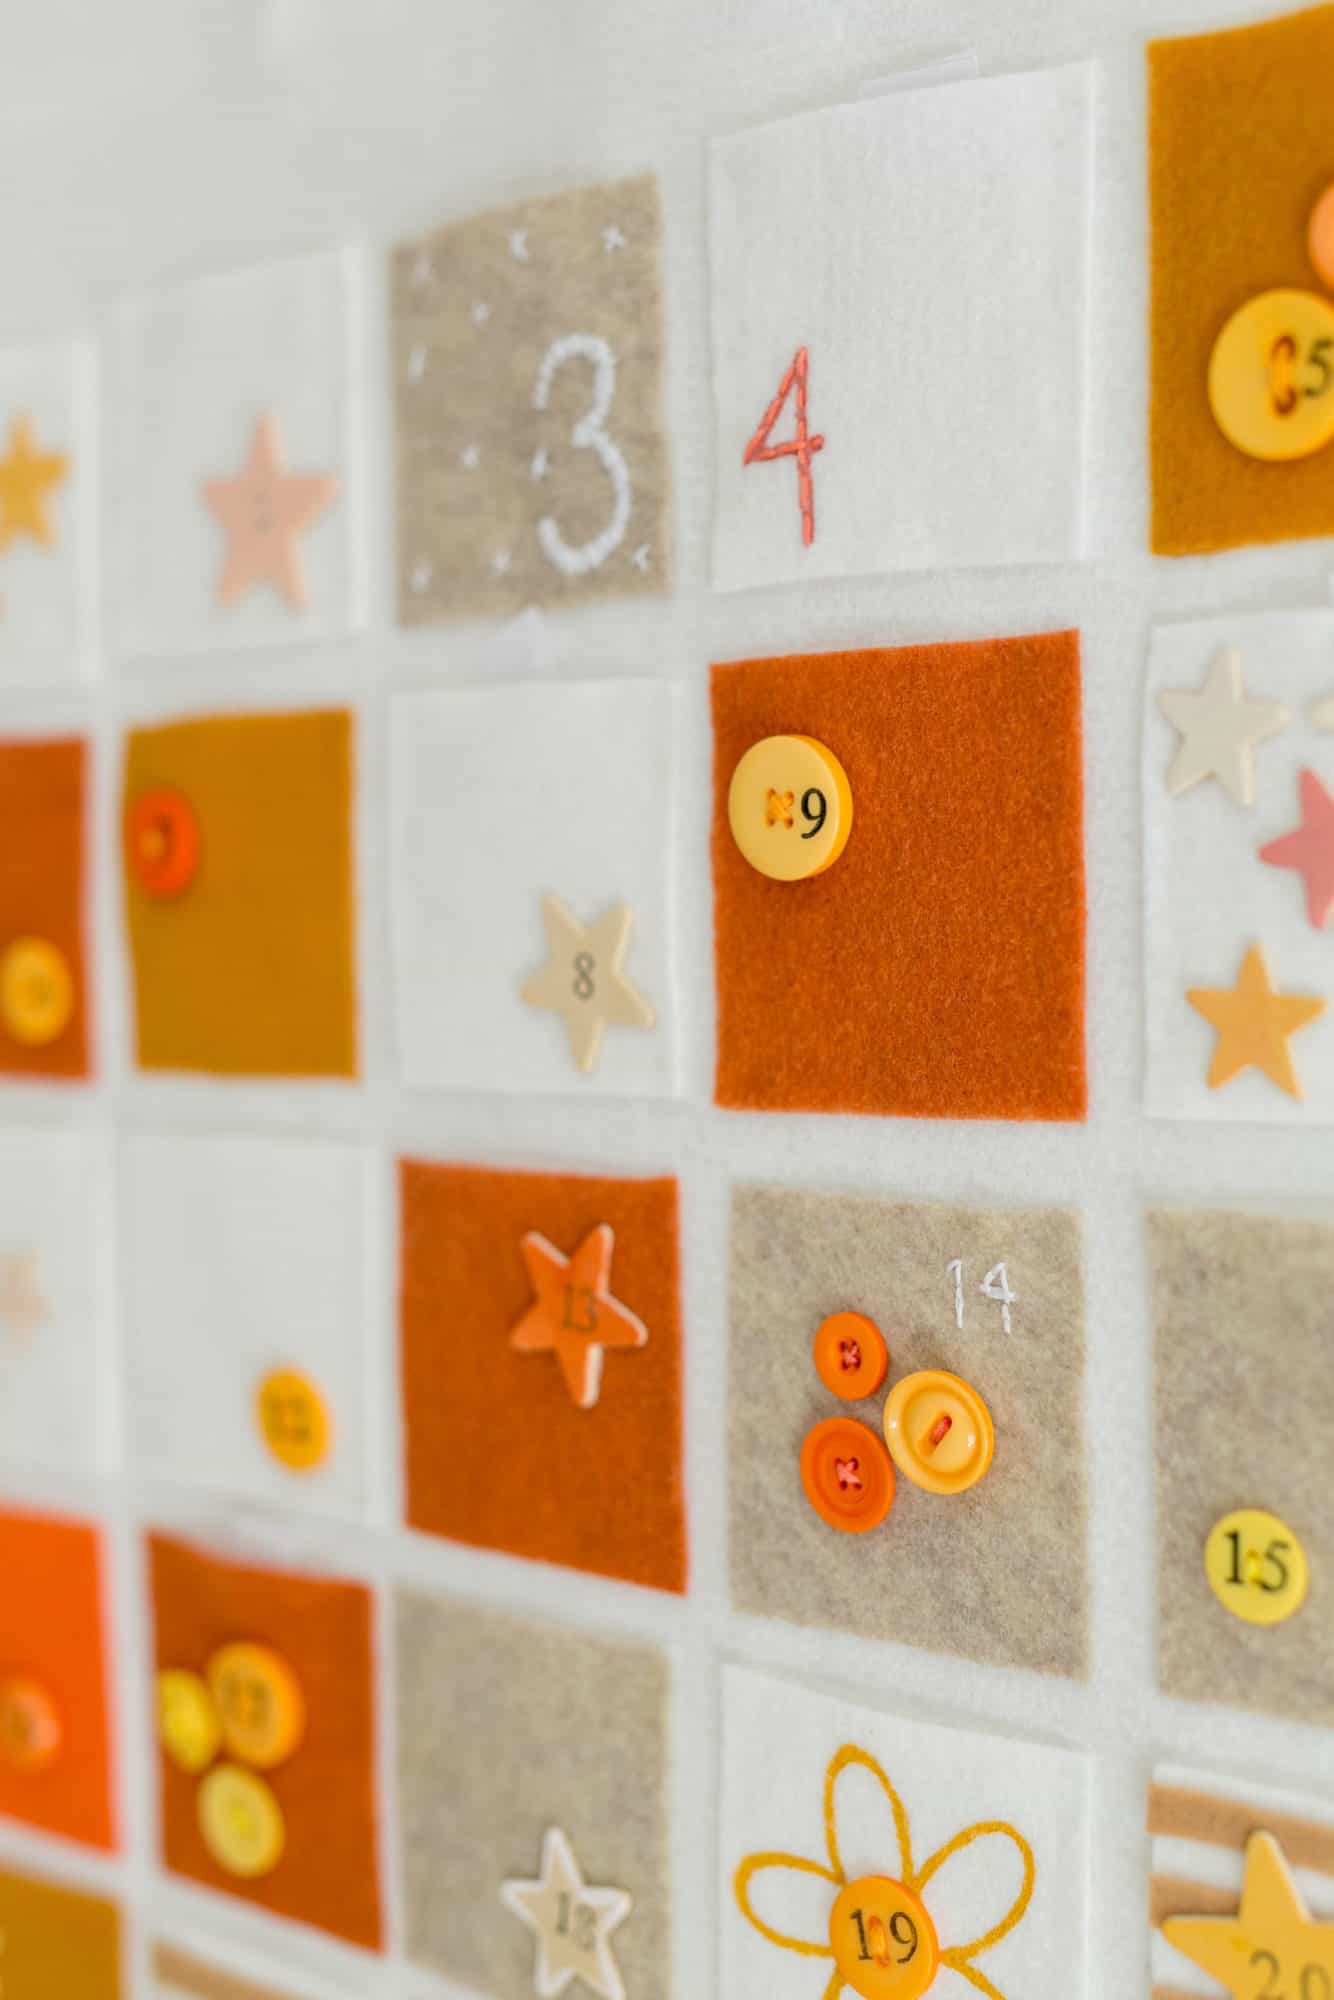
I like to lay them all out and embellish until it feels done. I did a lot of stamped buttons and stars. The buttons are sewn on and the wood stars are glued on.
After all the embellishments were done and dry, I used glue on three sides of each piece of felt to create a pocket.
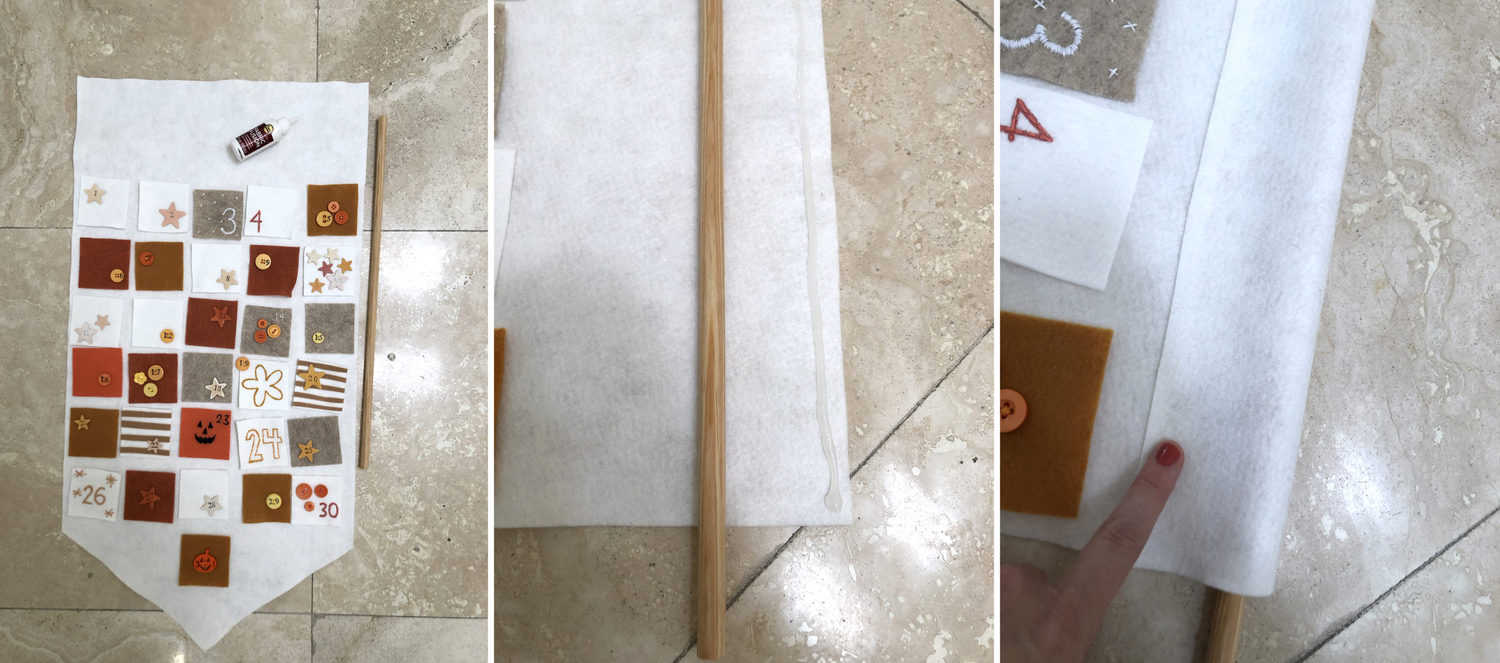 Next, use glue to create a loop that holds your dowel rod in. Then, tie a string to each side of the rod to hang it on the wall.
As you can see in my photos below, I also used halloween garland to make mine a little more spooky. This pumpkin button is so cute, too.
Here’s the completed calendar! I can’t wait for October to start using it with our girls, but I wanted to post it here early enough for you to have time to get all the supplies and make yours before October begins!
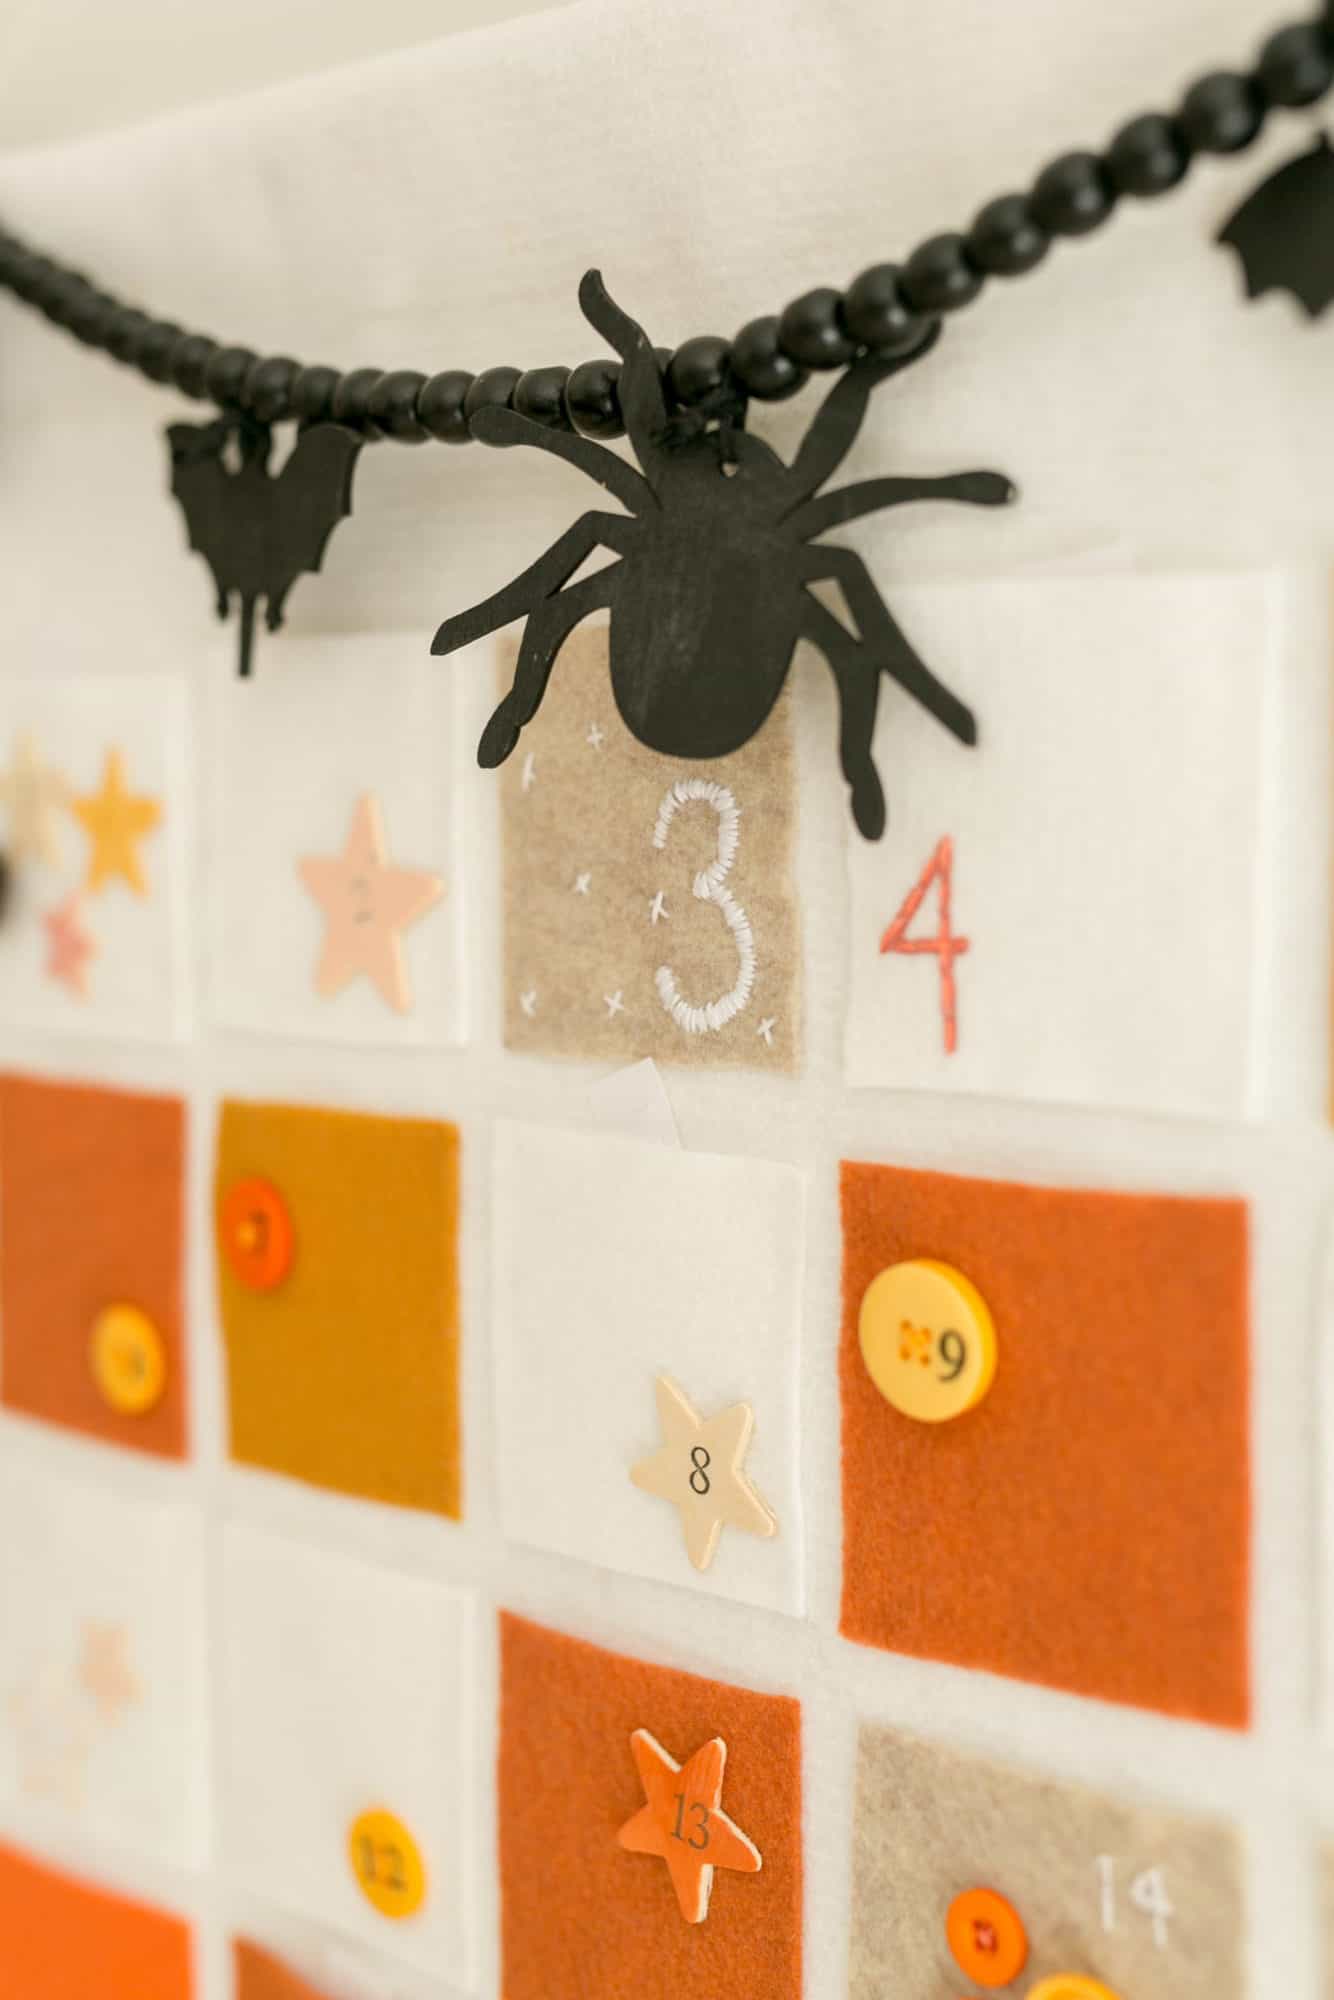

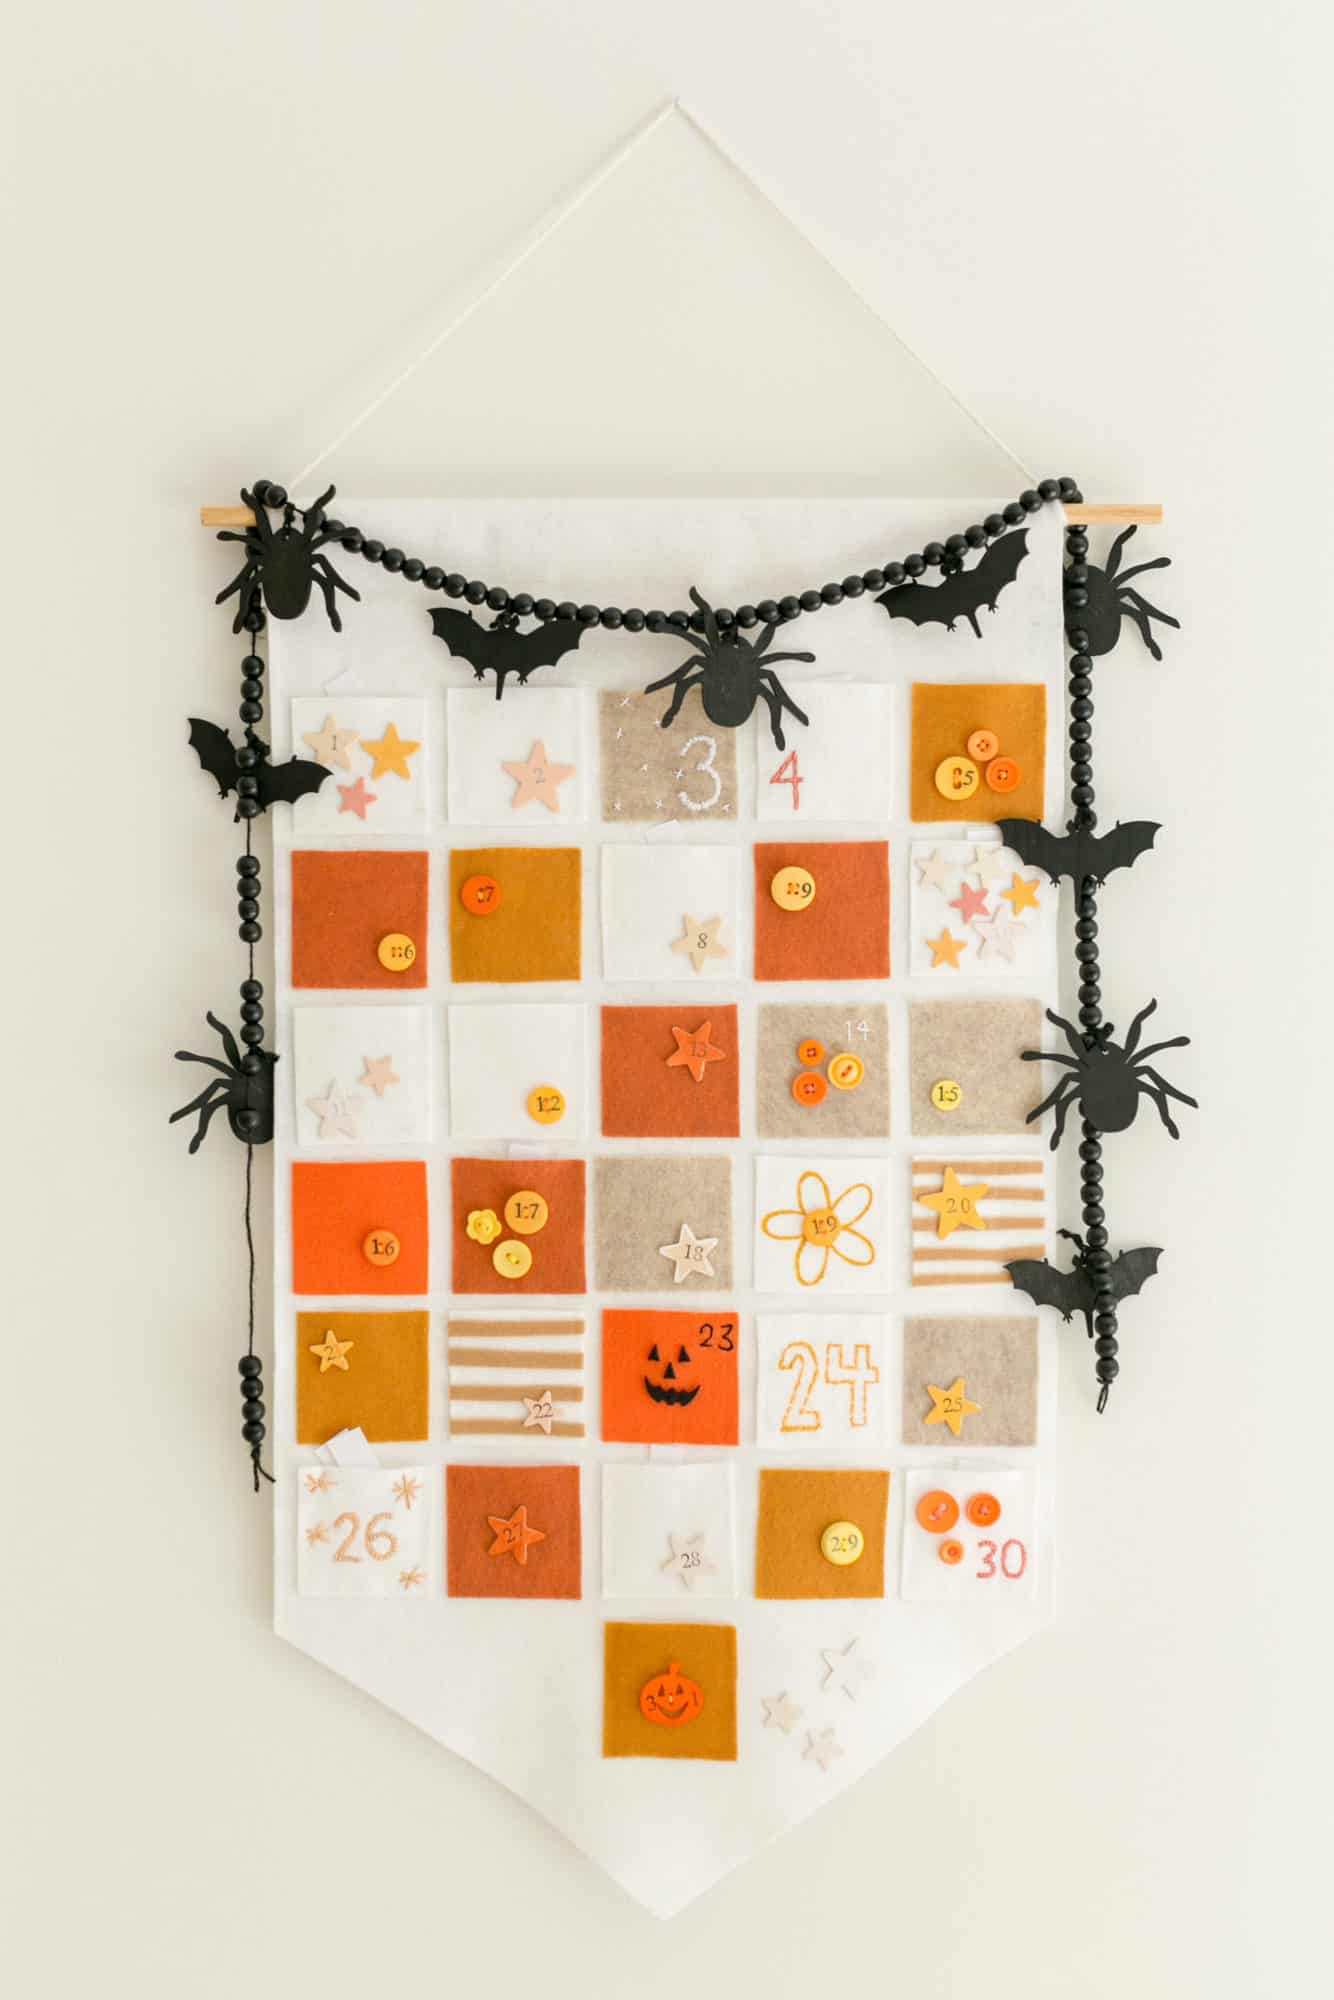
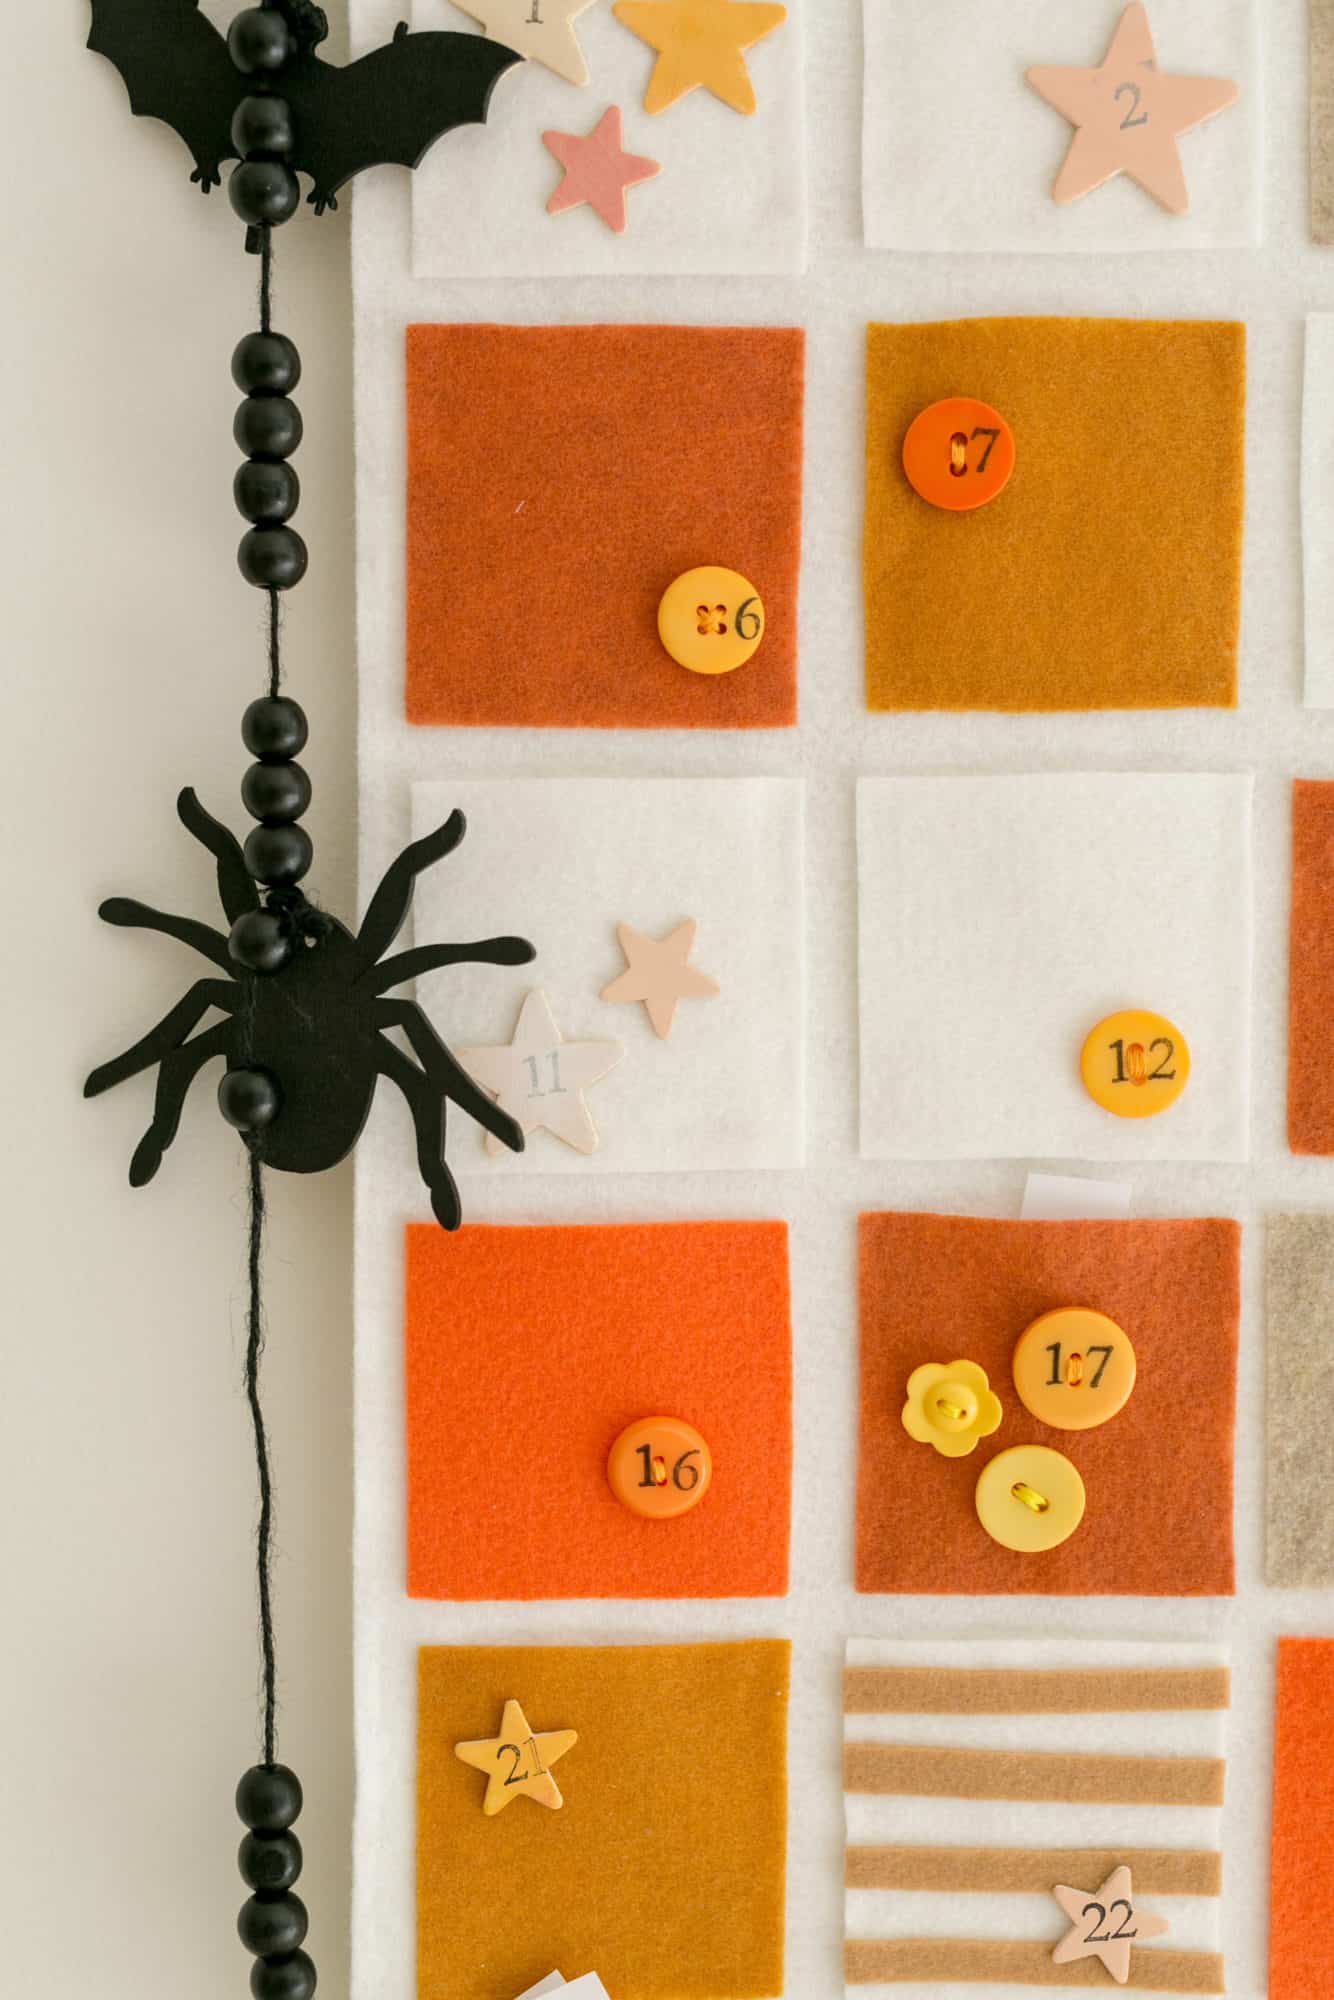
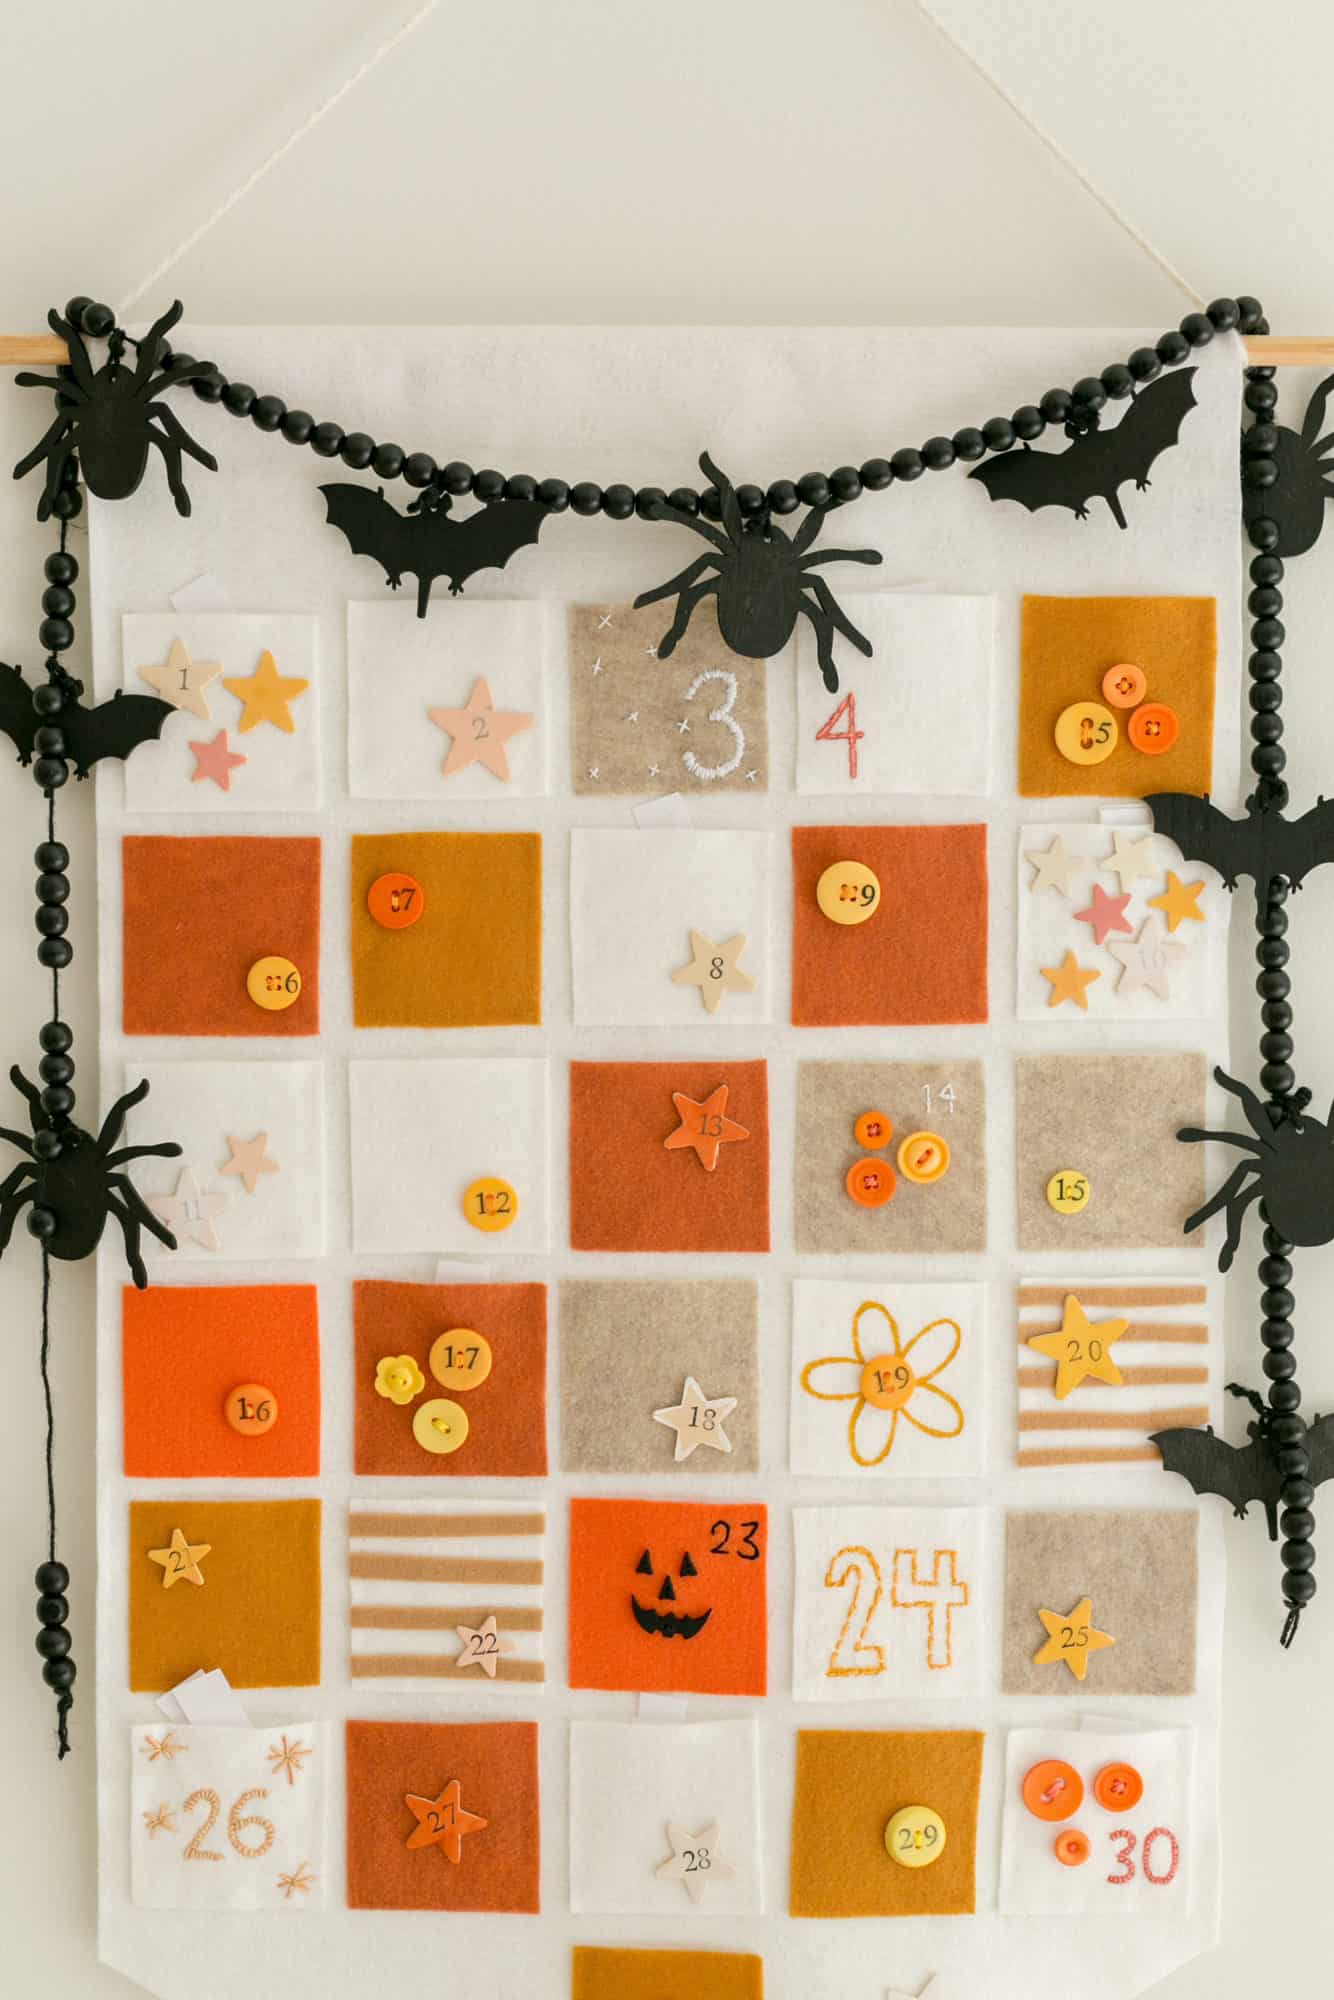
 It looks so cute with a garland hanging around it too (here’s a DIY for a cute wooden spider garland!). Wishing you a magical spooky season. Soak it in! xx. Elsie
More Halloween Ideas
- Halloween activities for children
- Roasted Pumpkin Seeds
- The best Halloween decor for your home
- 15 Easy DIY Halloween Decorations
Halloween Advent Calendar
Ingredients
- dowel rod
- large piece of felt for banner (I got a half yard at the craft store)
- colored felt for pockets
- embellishments for pockets (I used a lot of buttons, some embroidery, stamps with permanent ink, a bit of paint, and wooden starts.
Instructions
- The first step is to cut out your banner and the 31 pockets. I embellished all the pockets before gluing them down (you can also sew them down, but I just moved and I don’t even know where my sewing machine is at the moment).
- I like to lay them all out and embellish until it feels done. I did a lot of stamped buttons and stars. The buttons are sewn on and the wood stars are glued on.After all the embellishments were done and dry, I used glue on three sides of each piece of felt to create a pocket.
- Next, use glue to create a loop that holds your dowel rod in. Then, tie a string to each side of the rod to hang it on the wall.
Related: Elsie’s Historic Home Tour, Removable Wallpaper, Floral Wallpaper.

This first selection, for our bedroom, is Katherine Sage Wallpaper by Lulie Wallace. It also comes in dusty blue, which is so pretty.

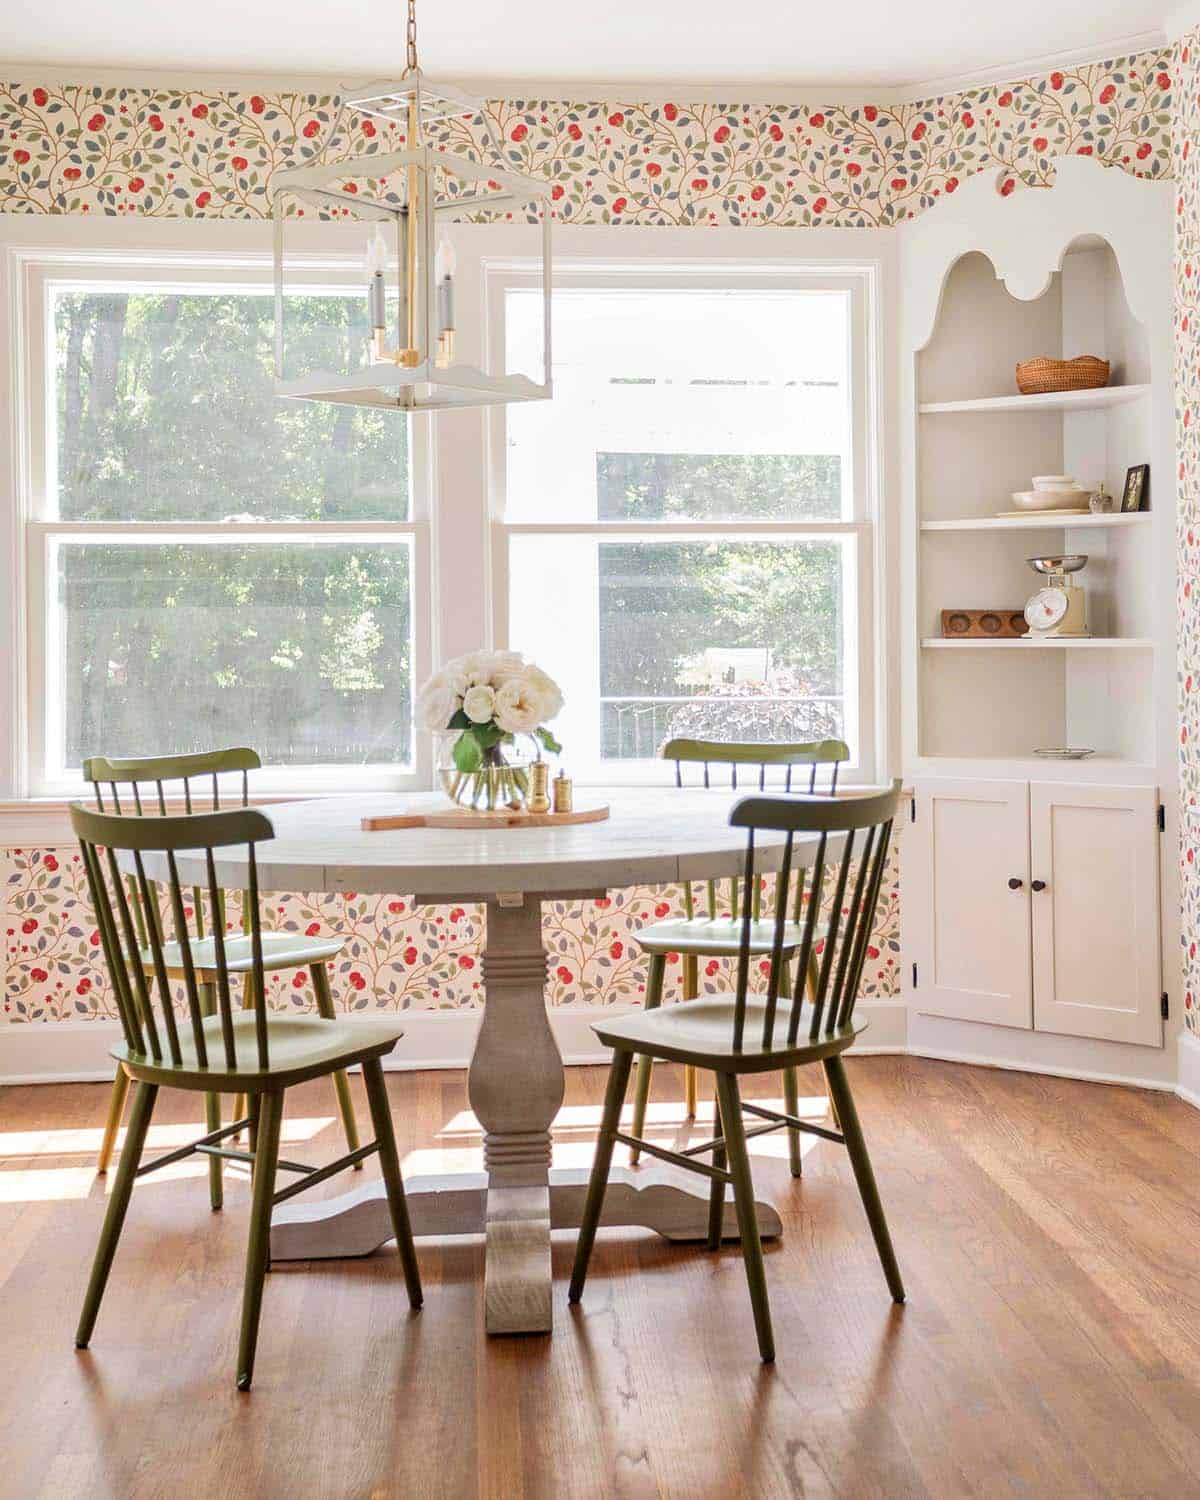
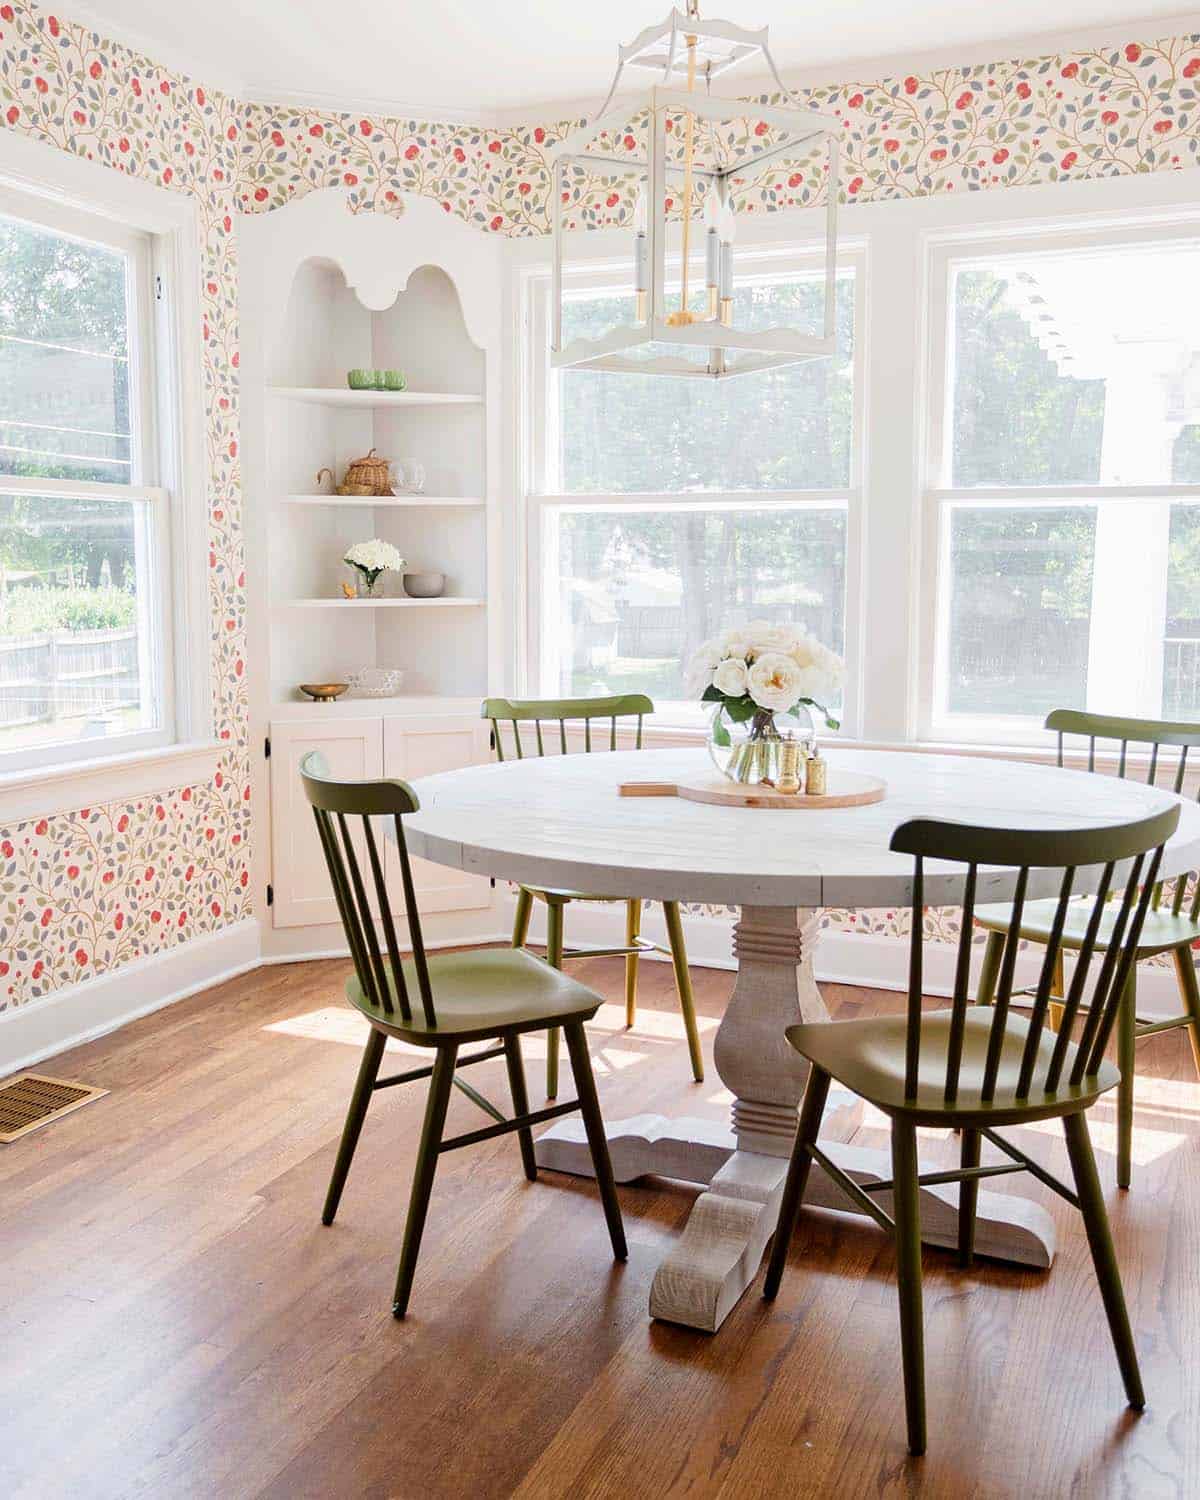
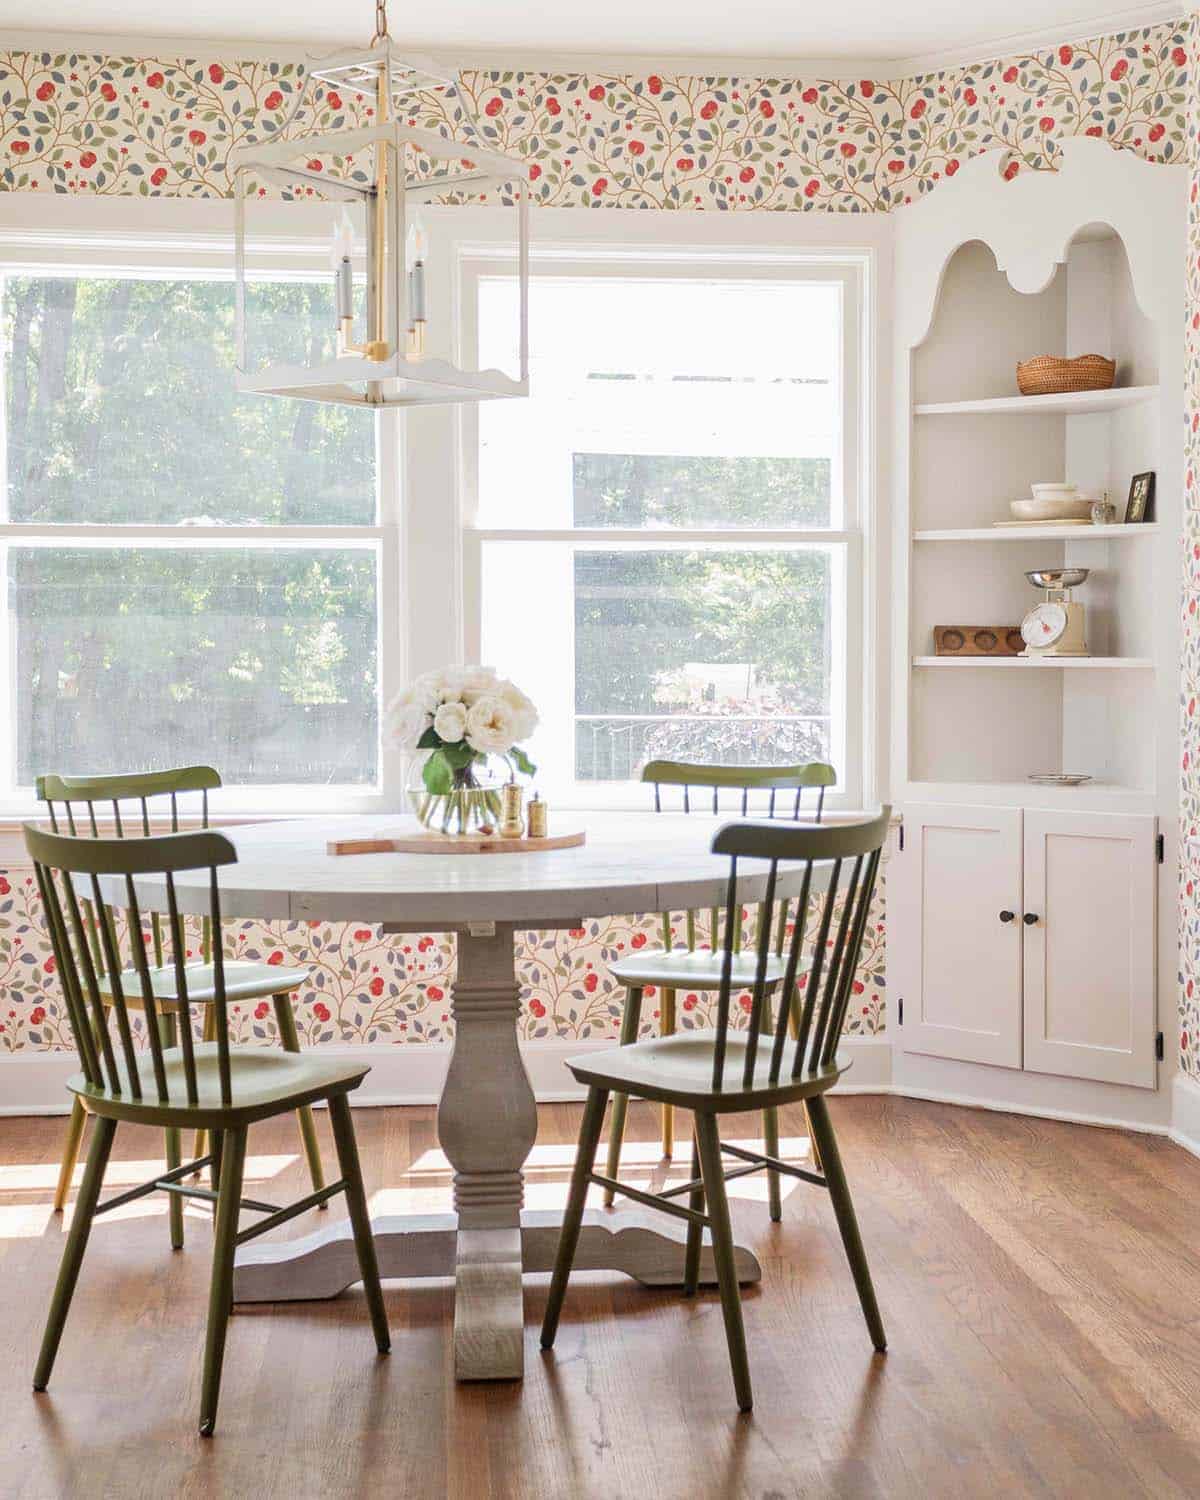
Medlar Wallpaper. In this breakfast nook, adjacent to our kitchen, I wanted a pattern that felt cozy and homey in all four seasons. We’ve had this up more than a year now and it’s absolutely perfect. My only regret is that I want to repaint the built-ins a dusty blue to match the blue in the wallpaper print.

Butterflies Wallpaper in Parchment. This window little nook is on the third floor in our home library. The entire room is painted the moody trim color (including the ceiling) except for this nook. Originally, I thought about doing a mural in this space, but then I fell in love with this butterflies pattern and the rest is history! I’m absolutely in love with it!

Saint Sebastian by Rebel Walls. I love this soft, low-contract treescape. I think it looks very authentic to the era our home was built. Again, my big focus was finding the perfect paper that I could imagine in all four seasons. How the papers go with Halloween and Christmas decor or a kids birthday party is a big deal to me.

Storyline Wallpaper in Delft Blue. This is my second Hygge & West design in our home. I’ve used this one in a previous home (in a lighter color). You know it’s a really good design when you come back for it a second time!
What I love about this design is that it’s subtle, but there are a dozen cute character like swans or pigs to find within the pattern.

Morris Wallpapers Fruit Design in Wine. I love this deep, moody pattern. So far every time I choose a darker print it turns out to be my favorite spot in the home!

House of Hackney London Rose Wallpaper in Smoke Grey. I also considered this paper in pink. This print has been around for a very long time and I have always absolutely loved it. I’m so happy I finally found a space in my own home to use it. This is our guest bedroom.
More Wallpapers I Love:
- Somerton Wallpaper
- Mind The Gap Luggage Car Wallpaper
- Embroidered Fruit Vines Wallpaper
- Labyrinth Wallpaper
Frequently Asked Questions
What affordable wallpaper do you recommend?
I get this question most often and honestly—there is no “cheap” wallpaper. It’s a line item that adds up (especially with installation added). We have dozens of DIYs on this blog that simulate the look of wallpaper on a budget.
Do you install the wallpaper yourself?
I always hire a professional wallpaper installer. I find this to be worth it to me because I am not a perfectionist and wallpaper really needs to be installed with a reasonable level of precision. I find that the installation is often about the same price as the wallpaper. I also always let my installer measure how many rolls I need to avoid needing to reorder.
What do you think about removable wallpaper?
Personally, I have experienced “removable” wallpaper that damaged my walls and traditional wallpaper that was so easy to remove. Since they are both $$$, I now only choose traditional wallpaper. If you are a renter and want to try removable, I suggest trying a test area first to make sure it doesn’t rip your walls up.
Let me know if you have any questions in the comments! xx- Elsie
]]>
Let’s begin with the exterior. I have always oohed-and-ahhed over this home for as long as I can remember (since high school age when I first got my driver’s license). I have always had feelings about this home, so when we decided to move back to our hometown we wrote a letter to the owners asking if there was any chance they would sell and they did. We feel incredibly lucky and never looked at any other homes. She’s the one!
The one hesitation I had about this home was that the interior was heavily renovated in a modern way. I wish it had come with more original character, so we vowed to prioritize adding as much antique charm as possible. Recently, we hosted a home tour with hundreds of local people walking through our home. I was so happy that many people assumed the antique-inspired renovations we have done were original to the home. That remains my biggest goal!

Porches – Porches are so romantic to me! I love having my morning coffee on the porch or watching the kids run around with fireflies. It’s the perfect place for popsicles and Halloween decorations alike.
Playhouse – We added a playhouse. It’s actually in our front yard (you can see it in the corner of the first pic above). We have a large lot and a ton of trees and our house is very set back from the street (so it is charming and not obtrusive). But I will say, it’s the most I’ve ever enjoyed not having an HOA. I can’t wait to decorate the playhouse for Halloween and Christmas.

Landscaping – In this photo, you can see a bit of our front yard. We’ve worked really hard on the yard since owning this home. I’ll have to show you more in the future. Last fall, we added two apple trees, two cherry trees and a fig tree. We are planning to make a few improvements each year until it’s our perfect secret garden space.
We added a magnolia tree as I was reading Magic Lessons at the time and I became obsessed trying to incorporate inspiration from the book into my home.

Daybed Swing – People always ask us if we really use the hanging daybed and the answer is yes, all the time. My husband likes to sneak out there to watch baseball on his phone and I snuggle the girls there all the time. Our favorite time to lay on the daybed is when it’s raining outside.
Sources: Patio Rug, Round Table, Bistro Chairs, Hanging Plant (similar), White Chairs.

Entry – From this angle, you can’t see that the other side of the door is a warm pink, but you can see my bat door knocker. And our cute little pug, Pumpkin.

Diamond Wood Floors – I’m SO glad we chose the two-tone floors. I will be honest, I was nervous! I LOVE how they turned out. The dark color is the color for our entire home and the light color is used on in this space for the pattern. They were done by a wood floors company at the same time we refinished the floors throughout the home.
For the round crystal chandelier, we found it from Pottery Barn. It looks just like an antique (with much simpler install). We ended up using the smaller size in the entry and the larger size at the top of the stairs.

Swans – I have started many vintage and antique collections since moving to this home. Swans are a big one. I love how they are both beautiful and creepy. I collect a lot of brass items including candlesticks, butterflies, bells and boxes.

Stairs – I spent a very long time choosing the art for the stairwell. What do you think? The portrait is a pastel and I love her so much. The little ting piece above is by Esther Pearl Watson, one of my favorite folk artists.
For the runner, I went with this light colored runner because it was the best choice at the carpet store we went to. In hindsight, I wish I had gone with antique runners and one day if these need to be replaced I probably will. For now, we are loving the light colored runner.

Seating – In the front section of our living room, there was a little extra room so we added a checker and chess game table along with antique chairs. Turns out my children LOVE checkers and all my bad karma from being too competitive as a child is coming back to haunt me.
The bench is super special to me because it came from my grandmother’s home. I have thought about painting it since it’s lighter than the entry table it sits beside, but so far I have left it alone. What would you do?

Living Room Decor – I absolutely love our living room. We use it so much and in so many ways beyond simply watching TV. We went with a frame TV this time and I’m always surprised when people really think it’s a painting.
When we first moved in, we did a short round of renovations that primarily included practical fixes and decor. This room got a lot of love. We added a new antique-inspired fireplace, pressed ceiling tiles, dentil moulding and a ton of oil paintings.
Sources: Chesterfield Sofa, Pink Velvet Chairs, Rug (similar), Floor Lamp.

Fireplace Renovation – For the fireplace, I knew I wanted to go with electric fireplaces because I wanted something we could use in all seasons (with and without heat) to add a cozy glow to the room. We went with this fireplace insert (we used it three times in the living room, our bedroom and my husband’s office). Love it!
The paint color we used in our living room is Oyster Bay by Sherwin Williams and the tile color on the fireplace surround is Oyster Shell by Fireclay Tile.
Fireplace Insert We used the Dimplex Revillusion fireplace insert three times in our home. It’s an electric fireplace insert with a cute chevron brick pattern. It has the option to provide heat (or not) so we use it year-round. I am planning to share a full review soon, but we love it! Note- the glass cover is a separate purchase and we purchased ours directly from Dimplex.

Antique Collections – Since curating a layered look takes a long time, I decided to start with the first floor and work my way up. SO currently our living spaces downstairs are very full of art and antique finds that bring me joy. Over time I plan to add more. This is a plan that can take years, but I enjoy it a lot of prefer not to rush it.

Powder Bathroom – Our powder bathroom on the first floor is the one most often seen by guests so I decided to go all-in—filling it with paintings from floor to ceiling. The woman in the center-right in the yellow blouse is my grandmother Corina and for sure she’s the inspiration for the whole space.

Bar Cart – I currently work as a cocktail writer most weeks (see our cocktail recipes) and in doing so for more than a year I have amassed a huge liquor collection. It’s split between here and the dollhouse bar (below). Learning new cocktail recipes is one of my passions. I found this art piece at Scout Design Studio and the wooden swan shelf is an eBay find.

Green Paint – I love the color in this room- it’s Farrow & Ball’s Green Smoke. It’s such a unique, moody green and notice how it looks wildly different from photo to photo.

Art Collection – This photo by Julie Blackmon started it all for me, as far as my art collection goes. My sister purchased it for me, as a gift, a couple years ago right before we found this home. Since then, I have been steadily building an art collection.
Fun fact: 75% of the furniture in our home is antique that we sourced locally. The flea markets in this part of the country are incredible. I have always admired antique furniture and having the chance to build our space based on it has been really fulfilling.

Dollhouse Bar Cabinet – The dollhouse bar has a fun story behind it. One night, I was rewatching my favorite movie “Knives Out,” and I noticed that the giant dollhouse in his living room was actually a bar. I looked them up immediately finding that they run between $6,000 and $20,000 (I know, right??!). The next day, I found one on an estate sale auction and was able to win it for a fraction of the retail price. To me, this is the best evidence I’ve found that we’re living in a simulation designed in our imaginations. Dream big, dream weird, friends! I’m kidding/not kidding.

Kitchen Island – Our kitchen is the main room we have not renovated, aside from matching the hardwoods and adding this 10-foot island. I found the green stools from Schoolhouse Electric. I am mulling over design ideas slowly and we plan to complete it in the next few years.
This kitchen was very spare on storage, but had a lot of extra wall space so we added some white storage cabinets. That has been a big help.

Hidden Trash Can – Here you can see the part of the kitchen we kept as is, and a solution we came up with to make it more functional for phase one. We added this double trash can and built out the counter to make it deep enough to accommodate our coffee gear. Above that, I added a brass pot rail to store our copper pots.

Breakfast Nook – This little breakfast room right off the kitchen was such a fun jewel box to decorate. I do the majority of my food blogging in this space since the lighting is usually best in here. The built in corner cabinets are my favorite original feature.

Stairway Landing – Now, we’re moving up to the second floor. This landing at the top of the stairway goes all the way around to access our bedrooms, the laundry room and my office. I decorated it with vintage mirrors all the way around.

Bedroom Fireplace – In our bedroom, we added a fireplace. For the design, I pulled inspiration from my favorite horror movie, Rosemary’s Baby. We built this fireplace as a replica to the one in her apartment from the movie. When building new pieces, I find it really helps to reference a historic photo and stay as close to it as possible.
The wallpaper and painting in this room are from artist Lulie Wallace. I’ve been a fan of hers for more than a decade and have loved every evolution of her work. The painting makes me smile every day.
The biggest departure we took from the movie design is instead of a black marble surround I chose a tile that coordinated with our wallpaper. We used Fireclay Tile in the color Peabody.

Antique Lighting – Lighting was a huge project for me this year. The home only came with a few chandeliers that were antiques from the early 1900s when it was built, but we added dozens more. I will be honest, it’s almost always more steps and sometimes antiques even need a full rewiring. To me, it is worth it and a major way we added charm back into the home.

Kids Bedrooms – Our girls are old enough to choose their own bedroom themes now. Nova chose a space and science theme. Marigold chose a princess bedroom.
This photo shows my favorite peek through of the house with a floor to ceiling kids library for our 8-year-old daughter.

Kids Bathroom – This is a children’s bathroom. We are still in the process of decorating it. The wallpaper is Hygge & West Storyline in the color Delft Blue. The paint color is Farrow & Ball’s Breakfast Room Green.

Moody Office – My office is the most moody space in our home and since it’s a very small room, the wallpaper and intense red paint color made a huge impact. I found this rolltop desk from Marketplace.
The display of small gold frames is the first spot in our home where I decorated with family photos. I hope to add a few more moments like this.

My snake is by Paige Dorsey Barnes. I commissioned her through Liz Lidgett gallery. Someone remarked that it looks like “Adam and Eve” theme, which was not what I was going for, but I love it.

Guest Bedroom – We are moving up to the third floor now. This floor consists of two guest bedrooms (we have a lot of family and friends with young kids), a full bathroom, a lot of bookshelves and a bit of living space.
The guest room has a lot of angles so I knew I wanted to use a busy wallpaper. I chose the London Rose Wallpaper which is an OG. The paint color is Foxy Brown by Benjamin Moore. We used this jute rug with flowers.

My favorite wallpaper and color combination in the whole house!

The kids guest room is set up, but not very decorated yet. We chose Setting Plaster by Farrow & Ball, which is a soft beige pink. The twin beds look antique, but they are from Chris Loves Julia’s PB for kids line.
Sources: Beds, Rug, Quilt, Chandelier.

Saved the best for last. I am thrilled with how this sweet little nook turned out. It’s surrounded by our home library and the perfect little tea party spot.
Butterfly Nook – We used the Hygge & West Butterflies wallpaper in the color parchment for this small nook. I am strongly on team when it doubt, wallpaper the ceiling too. I love the cozy, vintage feel it adds to this space.
More Home Posts:
Let me know if you have any questions or need any extra links in the comments! xx- Elsie
]]>Related: How to Propagate Plants, Best Porch Plants, Air Plant Care

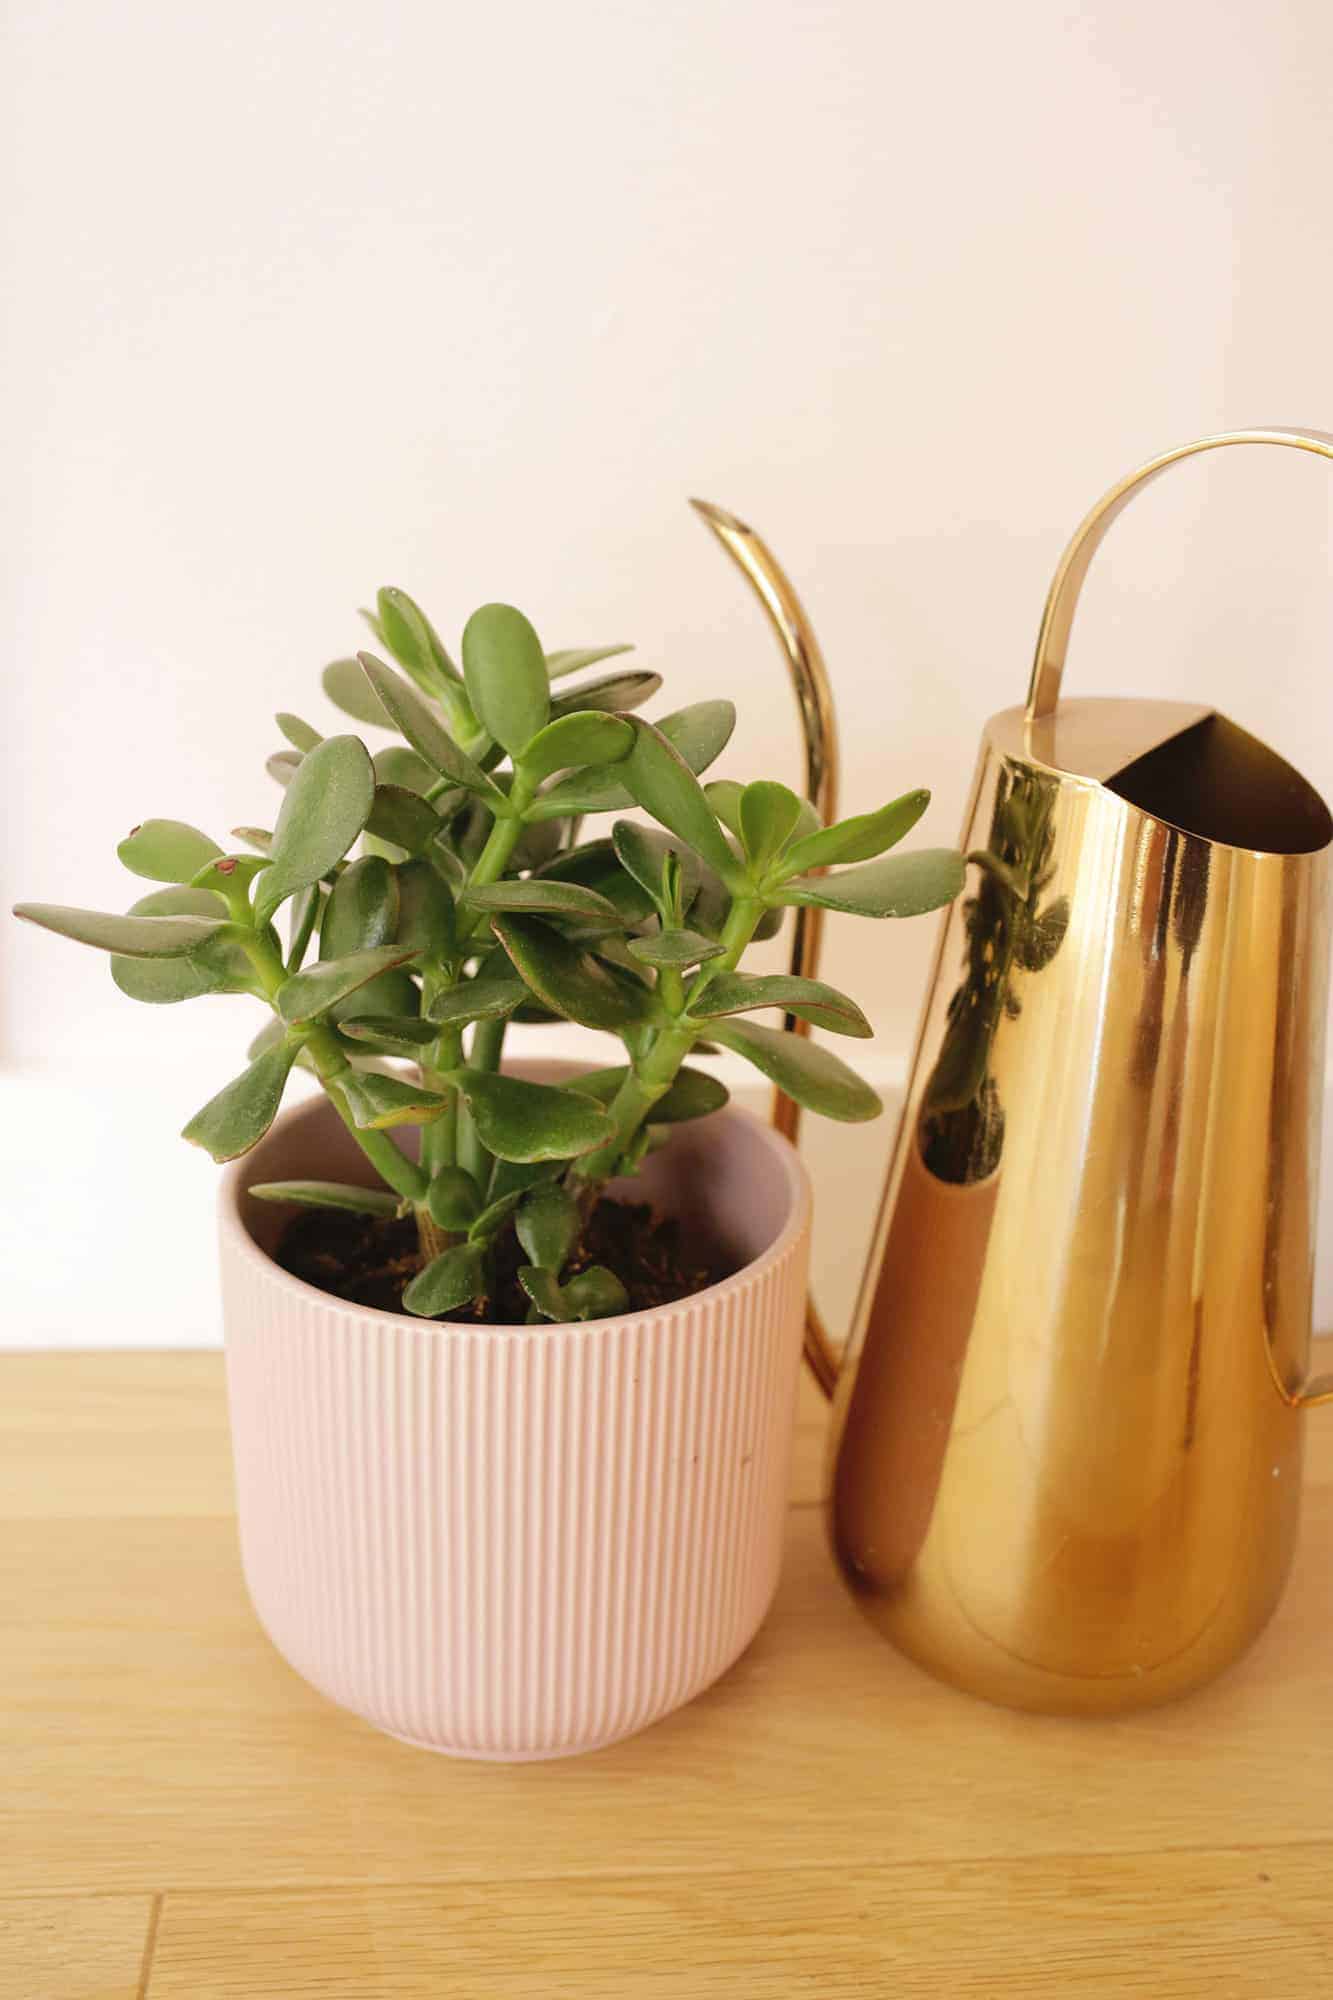
Jade Plant
Jade plants are a popular variety of succulent houseplants. With proper care, these plants can live for 50 or even 100 years. Jade enjoys being in bright light, about 4-6 hours of it a day. Younger jade plants should be in indirect light, but more mature plants can handle some direct sunlight.
Jade plants are said to bring good luck. Place your jade plant indoors in the southeast direction of your hall or living room to welcome wealth luck. Learn more about jade plant care.
Aloe Vera Plant
I love these plants because when I was child my mom taught me to break a piece off and use it for sunburns and burns. They are easy to keep alive, beautiful and useful. Aloe plants enjoy extended sunlight (a minimum of six hours per day) and should be placed by a window where they can bask in the sun.
ZZ Plant (Zamioculcas zamiifolia or Zanzibar gems)
I love these. They are beautiful and extremely easy to care for. They’re a nice alternative to a snake plant if you need something that’s sort of spiky and vertical for a certain spot in your home. These plants thrive in medium to bright indirect light for at least six hours each day.
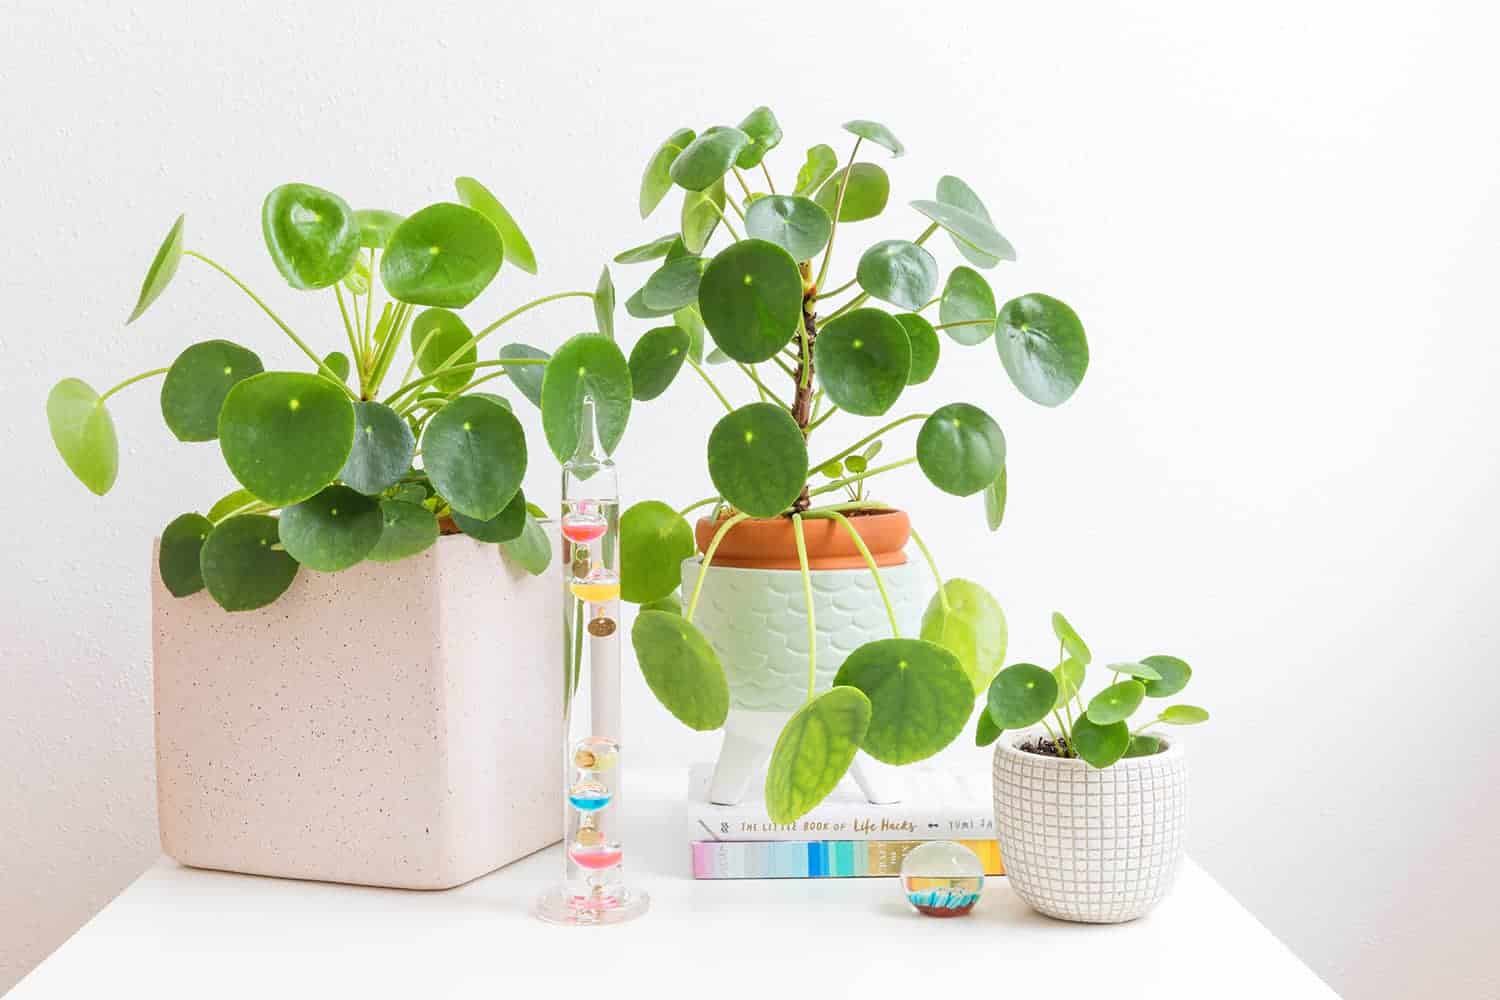
Pilea (Chinese Money Plant)
Pilea plants love light. They do best in bright, indirect sunlight. Sitting by a window is a good choice for these plants. Learn to care for a Chinese Money Plant.
Boston Fern
This fern plant thrives in indirect sunlight. They don’t like to be directly in the sun, but they also won’t grow in total shade.
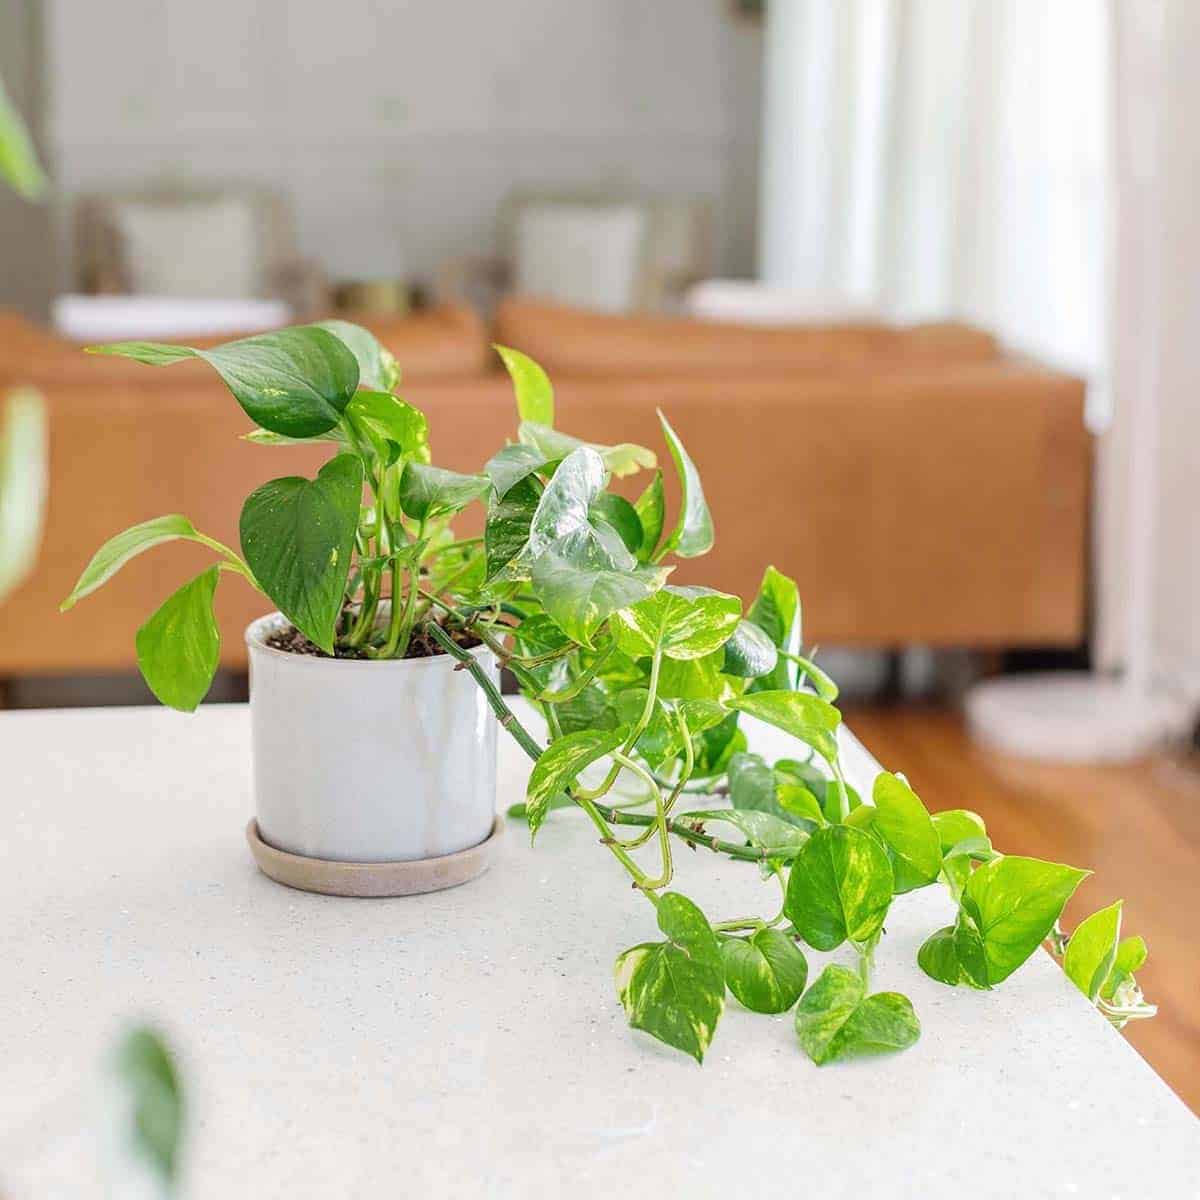
Golden Pothos (Devil’s Ivy)
This plant is super common and easy to find almost anywhere. They are beautiful and easy to keep alive! A golden pothos is an excellent choice for a first plant. Learn to care for a Golden Pothos.
Elephant Ear Plant (Colocasia)
Known for their heart-shaped leaves, these plants love full, indirect sun for at least six hours each day. Choose a pot that is at least 18 inches in diameter, or one gallon.
English Ivy (Hedera helix)
The English Ivy is flexible and can thrive in most lighting conditions. Its favorite is bright light. This plant loves humidity, so misting it daily is a great way to keep it thriving.
String of Pearls
String of Pearls is one of my favorite plants for its beautiful appearance. It’s a unique trailing succulent that looks like a string of peas. They enjoy a bright and sunny location in the home. Learn to care for String of Pearls.
Rubber Plant
A Rubber plant is a beautiful houseplant that I have had great luck keeping alive. A well lit area of your home is crucial to keeping this plant alive. These plant leaves need to be dusted with a damp cloth once in a while. Learn to care for a Rubber Tree.
Peace Lily (Spathiphyllum)
A Peace Lily is easy to care for and blooms flowers starting in early summer. Ideally, peace lilies enjoy bright indirect sunlight, and are a good plant to choose if you have a low light area as they also do well in shade to partial shade. How to Care for a Peace Lily.
Monstera
This plant is very versatile in what lighting conditions it requires. Monsteras like bright indirect light. They can adjust to medium light, but might get leggy in that environment. So, I placed her in a room that has large west-facing windows. How to care for a Monstera plant.

Fiddle Leaf Fig
If you get a fiddle leaf, then find a window with ample light. Be sure that it is bright, indirect light. Don’t stick it in a corner away from the sunlight. These are a type of ficus tree and are native to a tropical environment. How to care for Fiddle Leaf Figs.
Aglaonema (Chinese Evergreen)
Aglaonema plants are known for their hardiness and adaptability to a variety of conditions. They are able to thrive in both bright light and low light situations. These easy houseplants are adaptable even to spaces with little light. These are a great choice for an office or rooms with less natural light.
Parlor Palm (Chamaedorea elegans)
Parlor Palms grow best indoors with bright, indirect sunlight. They can also thrive as a low-light plant. They help to purify the air in your home as well.
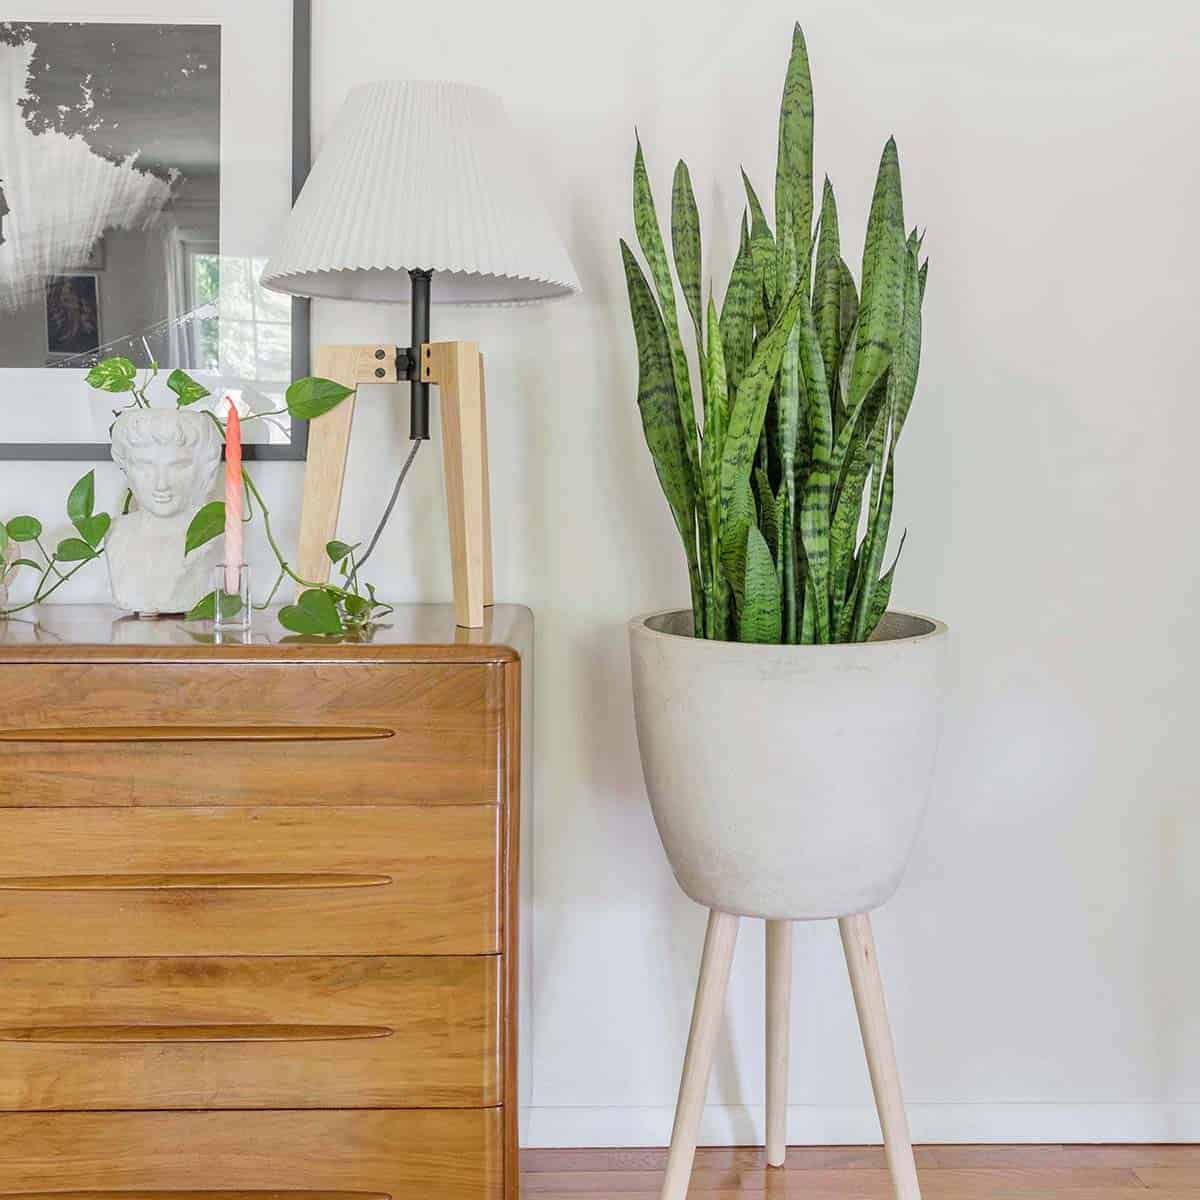
Snake Plant
I love snake plants. I like the look of these and they will survive practically in the dark, but also tolerate the sun. They are adaptable to nearly any environment. Learn to care for a snake plant.
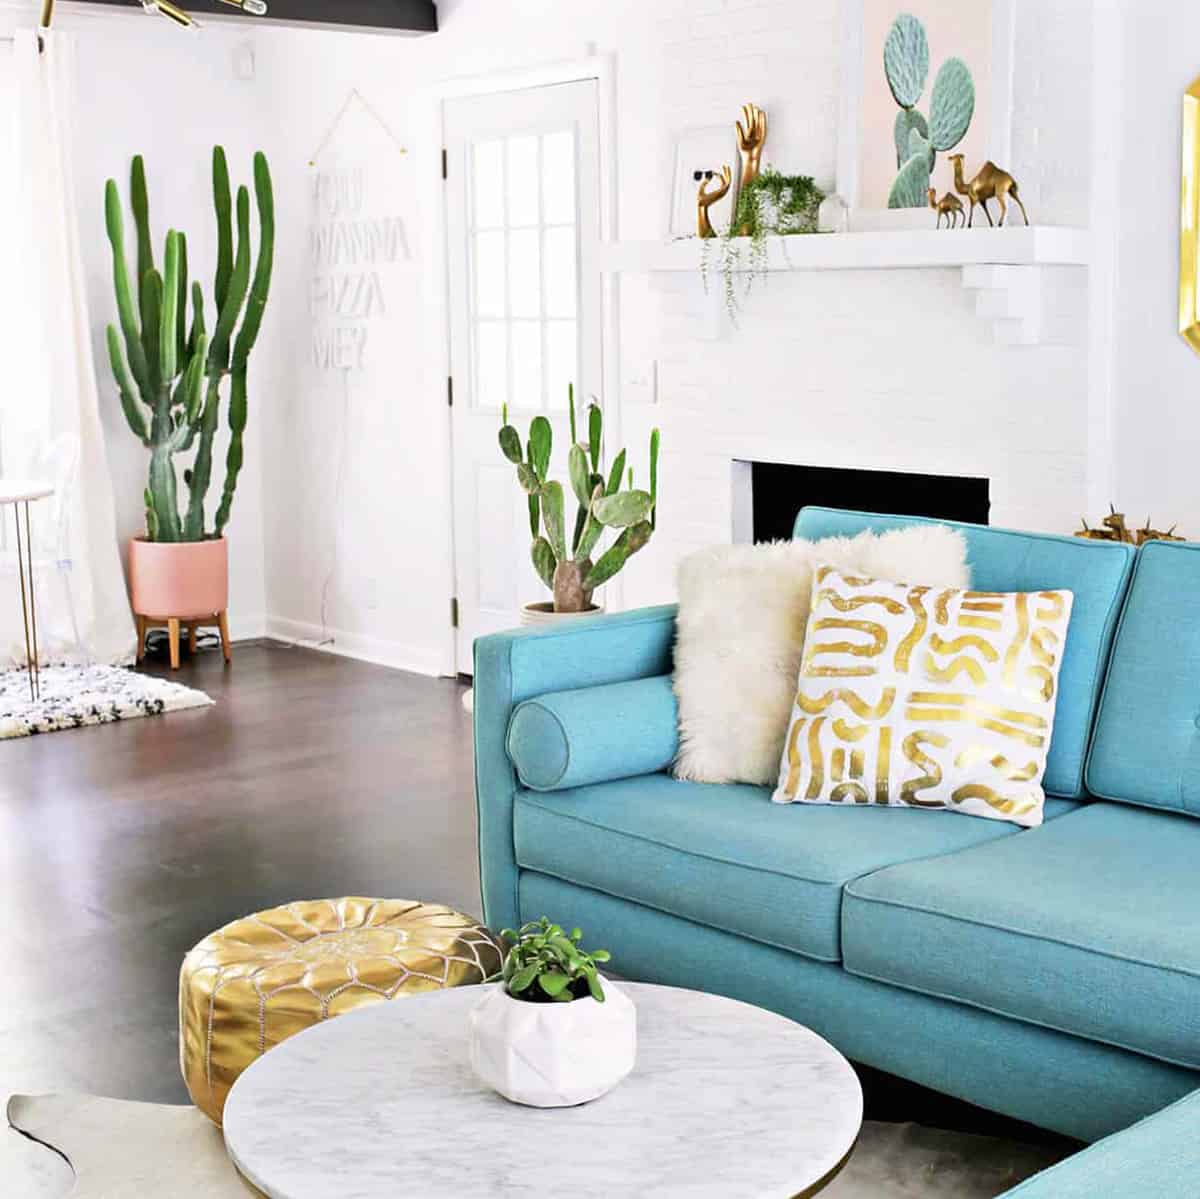
Cacti
Cacti are easy to care for and make great indoor plants. They require less frequent watering than most plants and they thrive in medium to high indirect sunlight. Cacti have a growing season from March to September, where they can grow rapidly. I often take my cacti outdoors during the summer and bring them back inside for the winter. It’s best to let them get very dry between waterings.
Spider Plant (Chlorophytum comosum)
We love spider plants. If you are looking for a natural air purifier, you will want to get a spider plant. A recent study indicates that spider plants removed 95% of toxic formaldehyde from the air in a sealed Plexiglass container over a 24-hour period. The spider plant is one of the most popular houseplants. How to care for a Spider Plant.
Calathea Plant (Prayer Plant)
Calathea Plants are easy to care for and present eye catching patterns on their leaves. Calatheas love to be in medium to bright indirect light. They can handle low light situations well, but their color and pattern may not be as vivid as it would be with more light. How to care for Calathea Plants.
Cast Iron Plant
Cast Iron Plants are easy to care for and thrive in low light. They do great in low or medium light and bright light should be avoided.
If you have a favorite indoor plant, we’d LOVE to hear all about it in the comments.
]]>More children’s rooms: 50 Kids Room (and Nursery) Ideas, Kids Shared Bedroom, Reconfiguring a Closet, Daisy Painted Wallpaper.
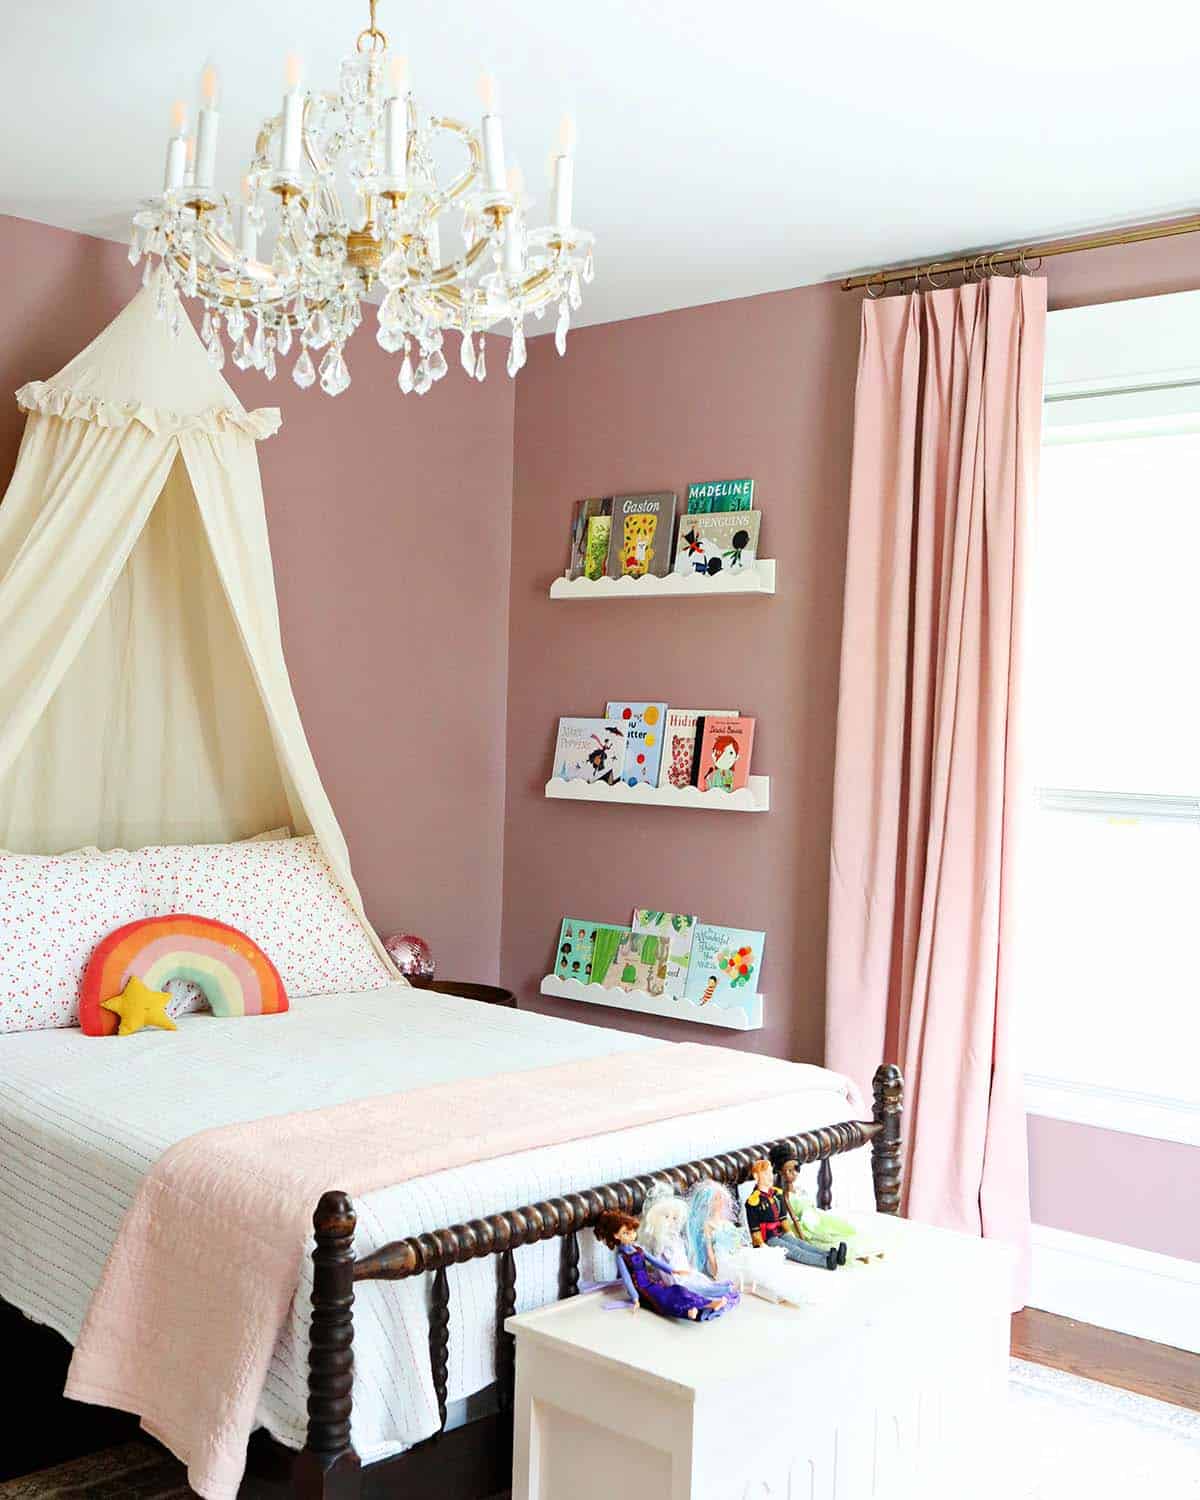
The first thing we did before we moved in was paint the walls pink. We chose the color Sulking Room Pink by Farrow and Ball. At first, I was worried it was too dark (it reads almost brown in certain lights), but once the curtains and other details went in, I knew it was the perfect color. It’s rich and deep and balances a lot of the other uber pink decor.
We found the antique bed locally on Marketplace. The bed canopy is such great quality and comes in a bunch of different colors. For the mattress, we chose an Immunity mattress (Cinnamon) and I’ll be sharing a full review of it in an upcoming post (short story—we love it!).
For curtains, we chose to go with Two Pages Curtains for this room (and our entire home). I love the classic pleated look they have. I ordered a swatch book before choosing colors and it helped SO much. I highly recommend the swatch book if you are choosing colored curtains to coordinate with painted walls.
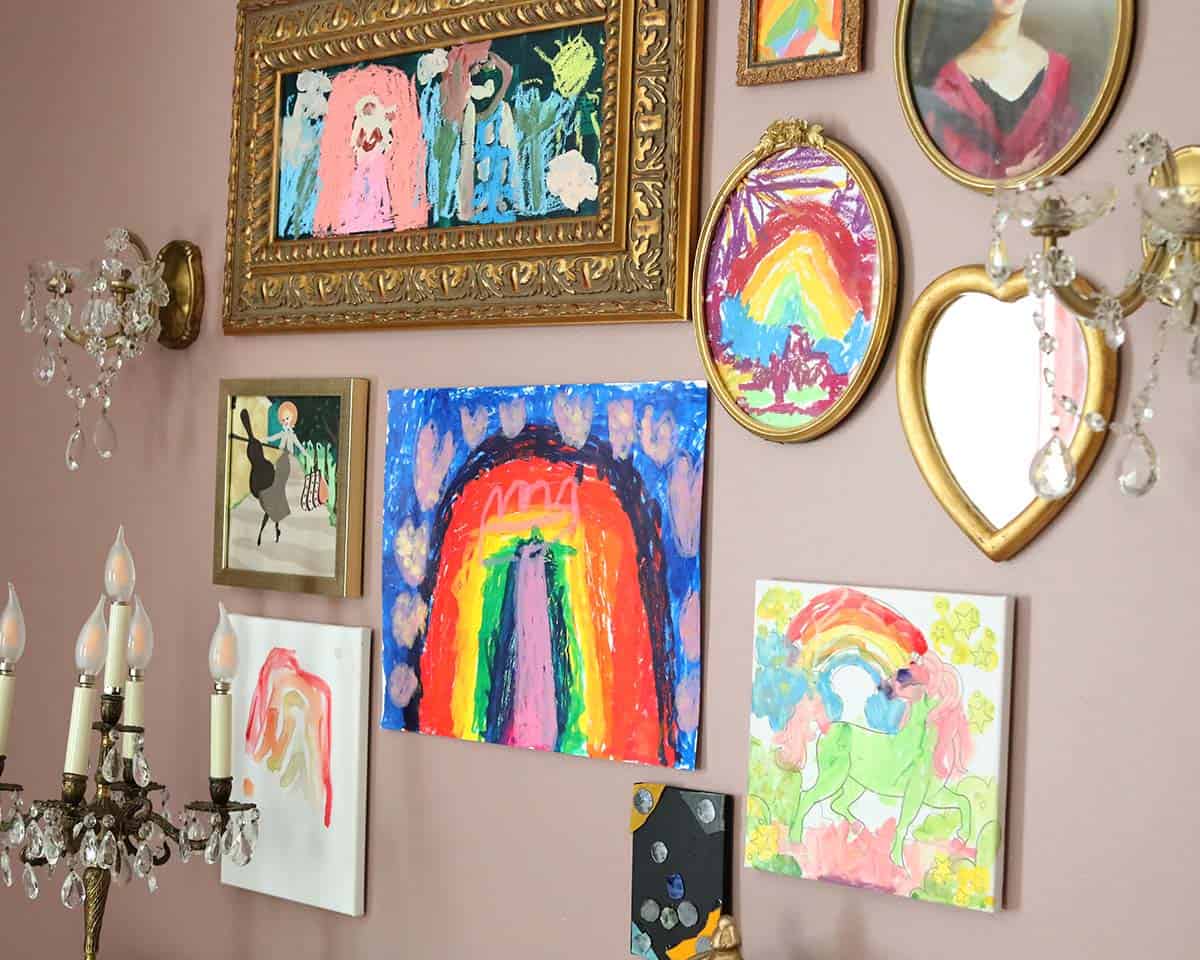
Our daughter is a budding artist, so we decided to create an art gallery in her room! As you can see, it’s comprised mainly of her own art. I plan to add more and swap out over time.
Etsy art included: Julie Andrews Print and the other piece is from Janet Hill.
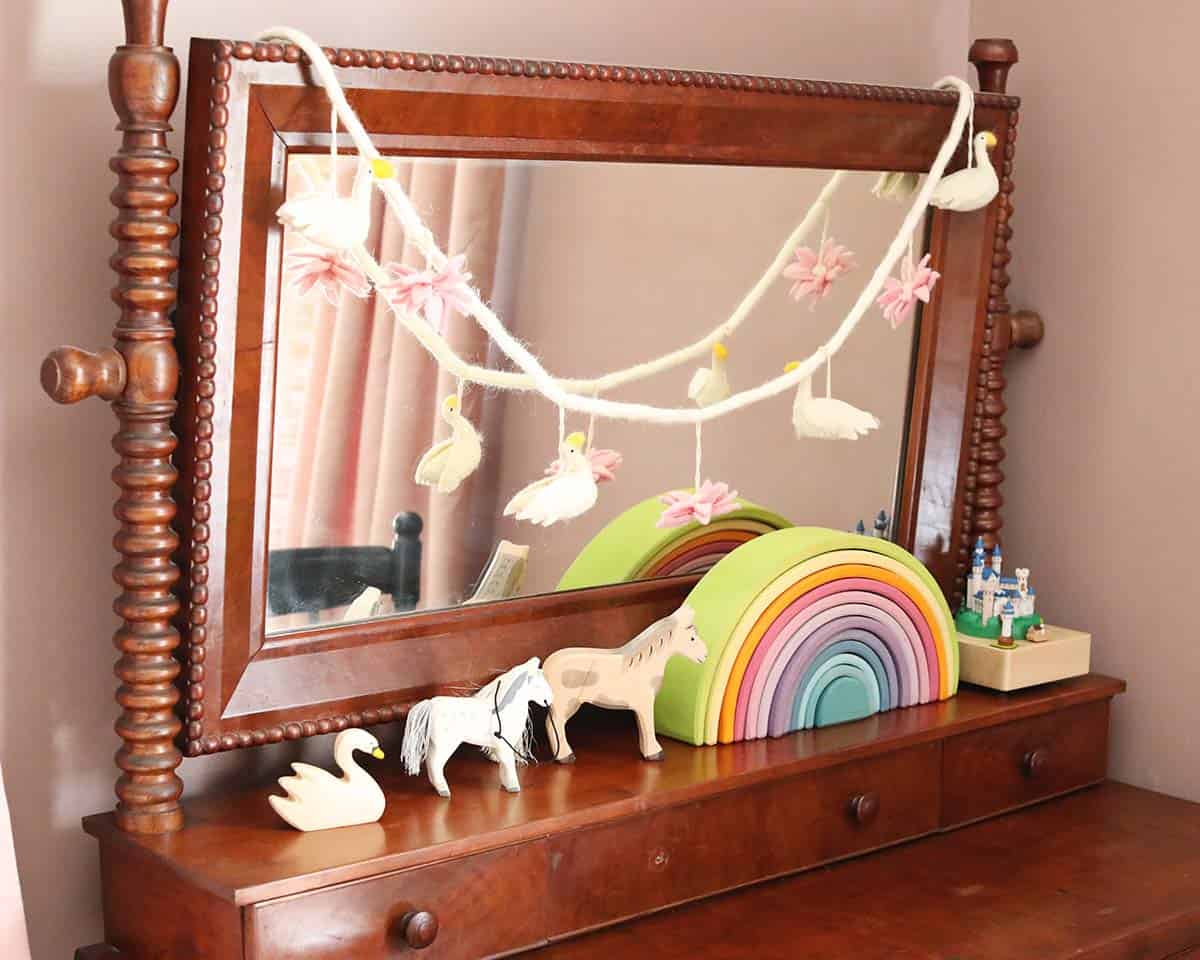
Before we moved, I found this gorgeous antique vanity. She uses it to store all her makeup (I give her my old makeup every time I do a clean out and she squirrels it away and is OBSESSED).
Wood toys we love:
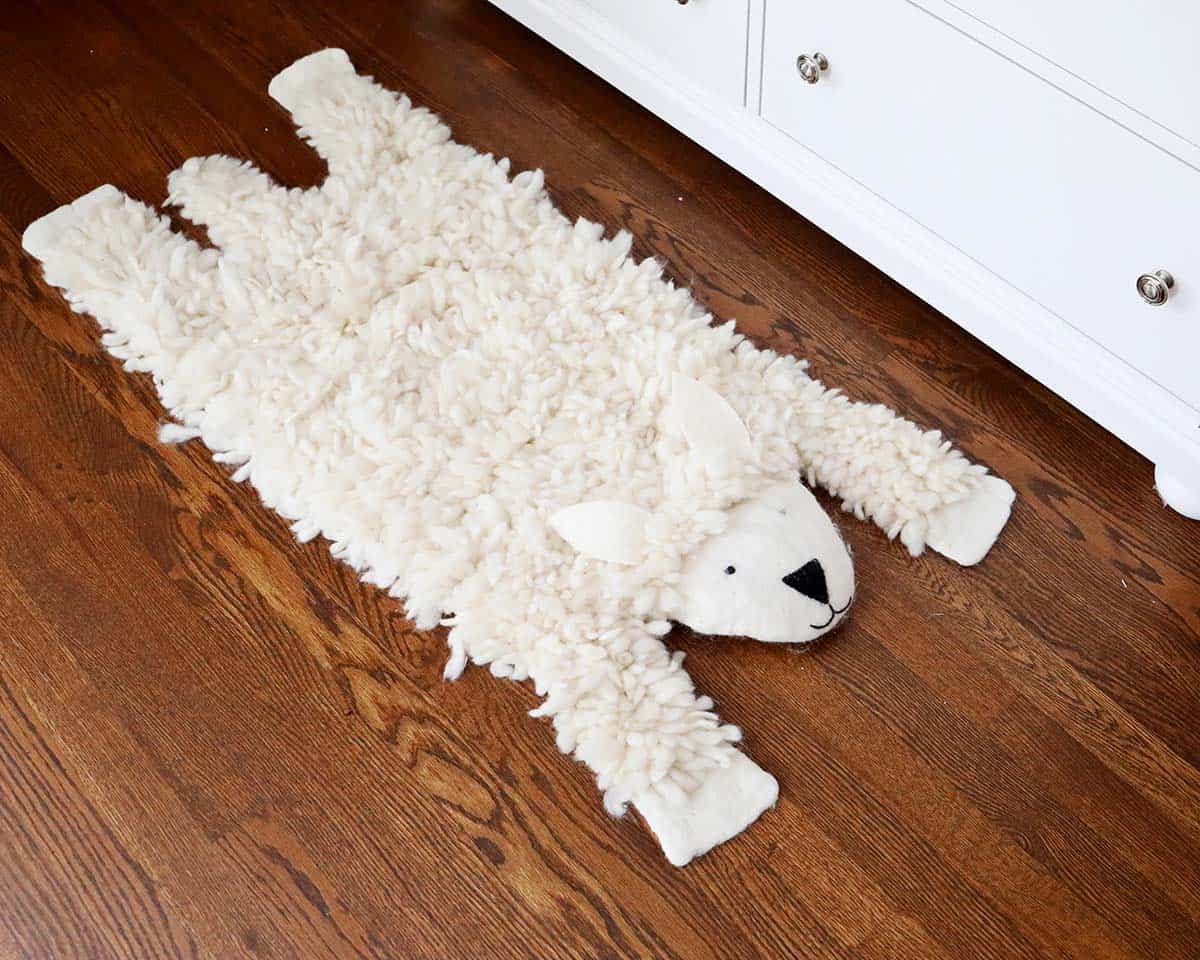
This bear rug from Etsy was the first purchase I made for her new bedroom. I thought it was so cute and charming—and COZY.
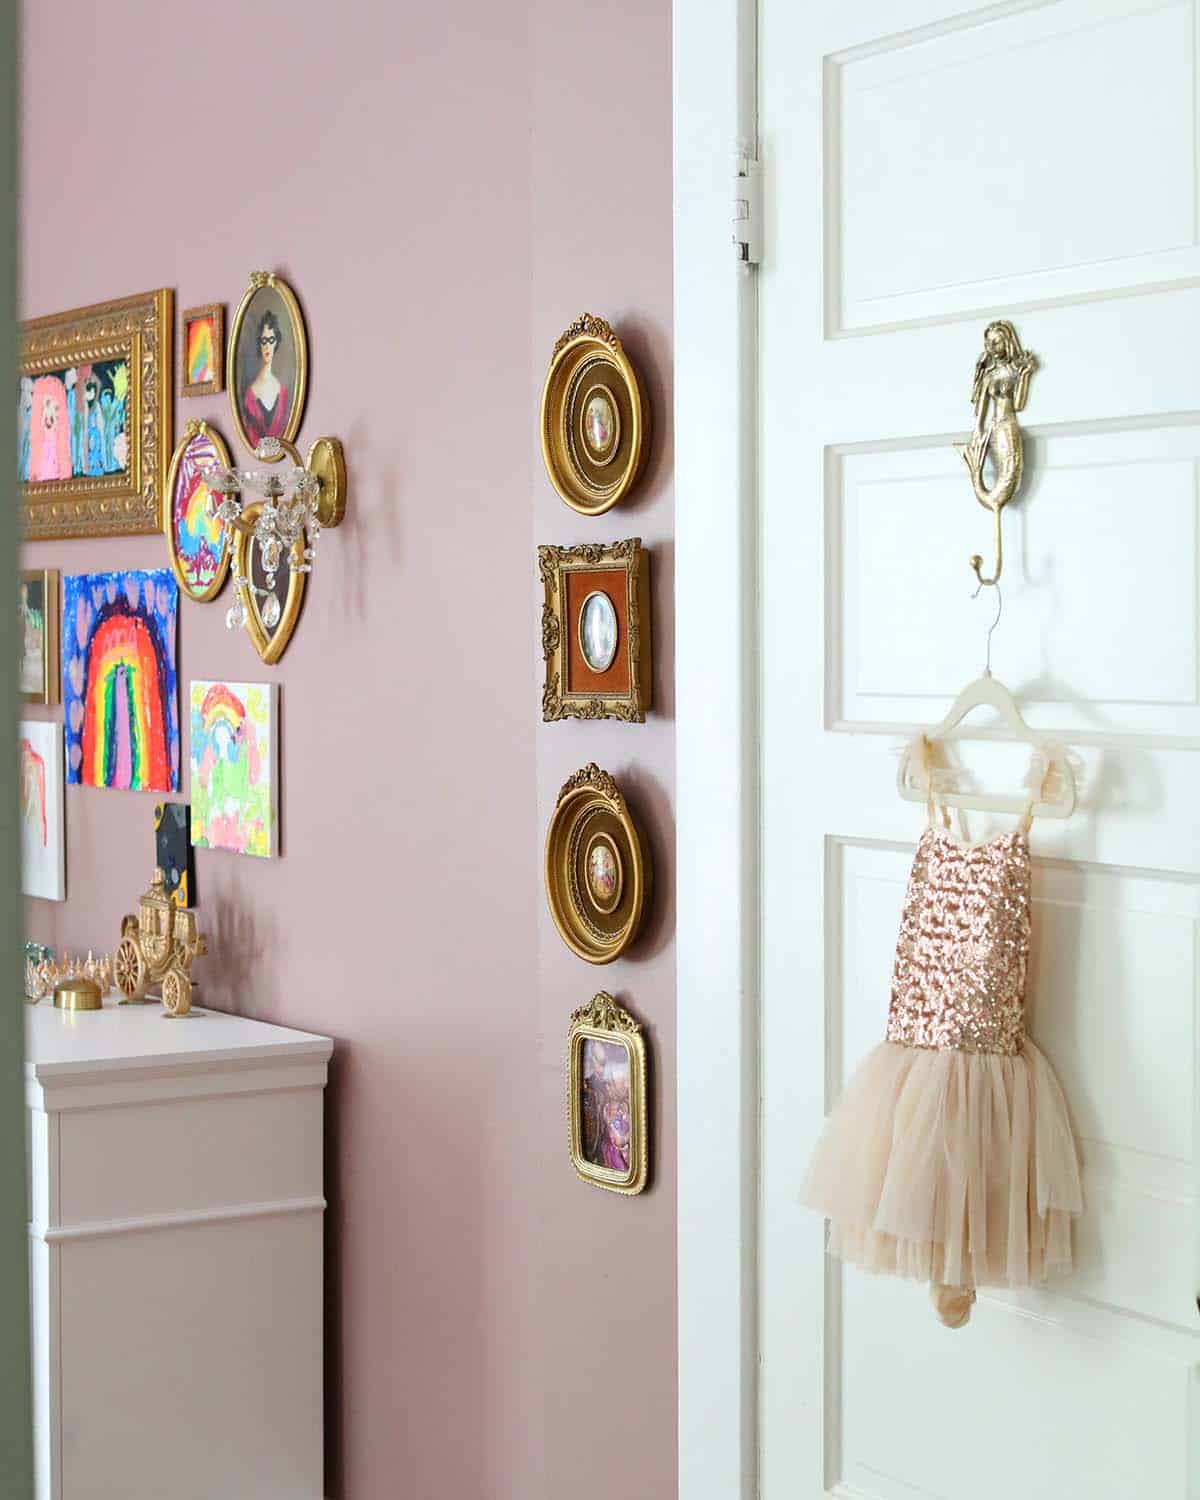
Here you can see a little row of flea market art we have displayed along with one of the kid’s photos from Disney. I love mixing antique gold frame art with photos in ornate gold frames that are new.
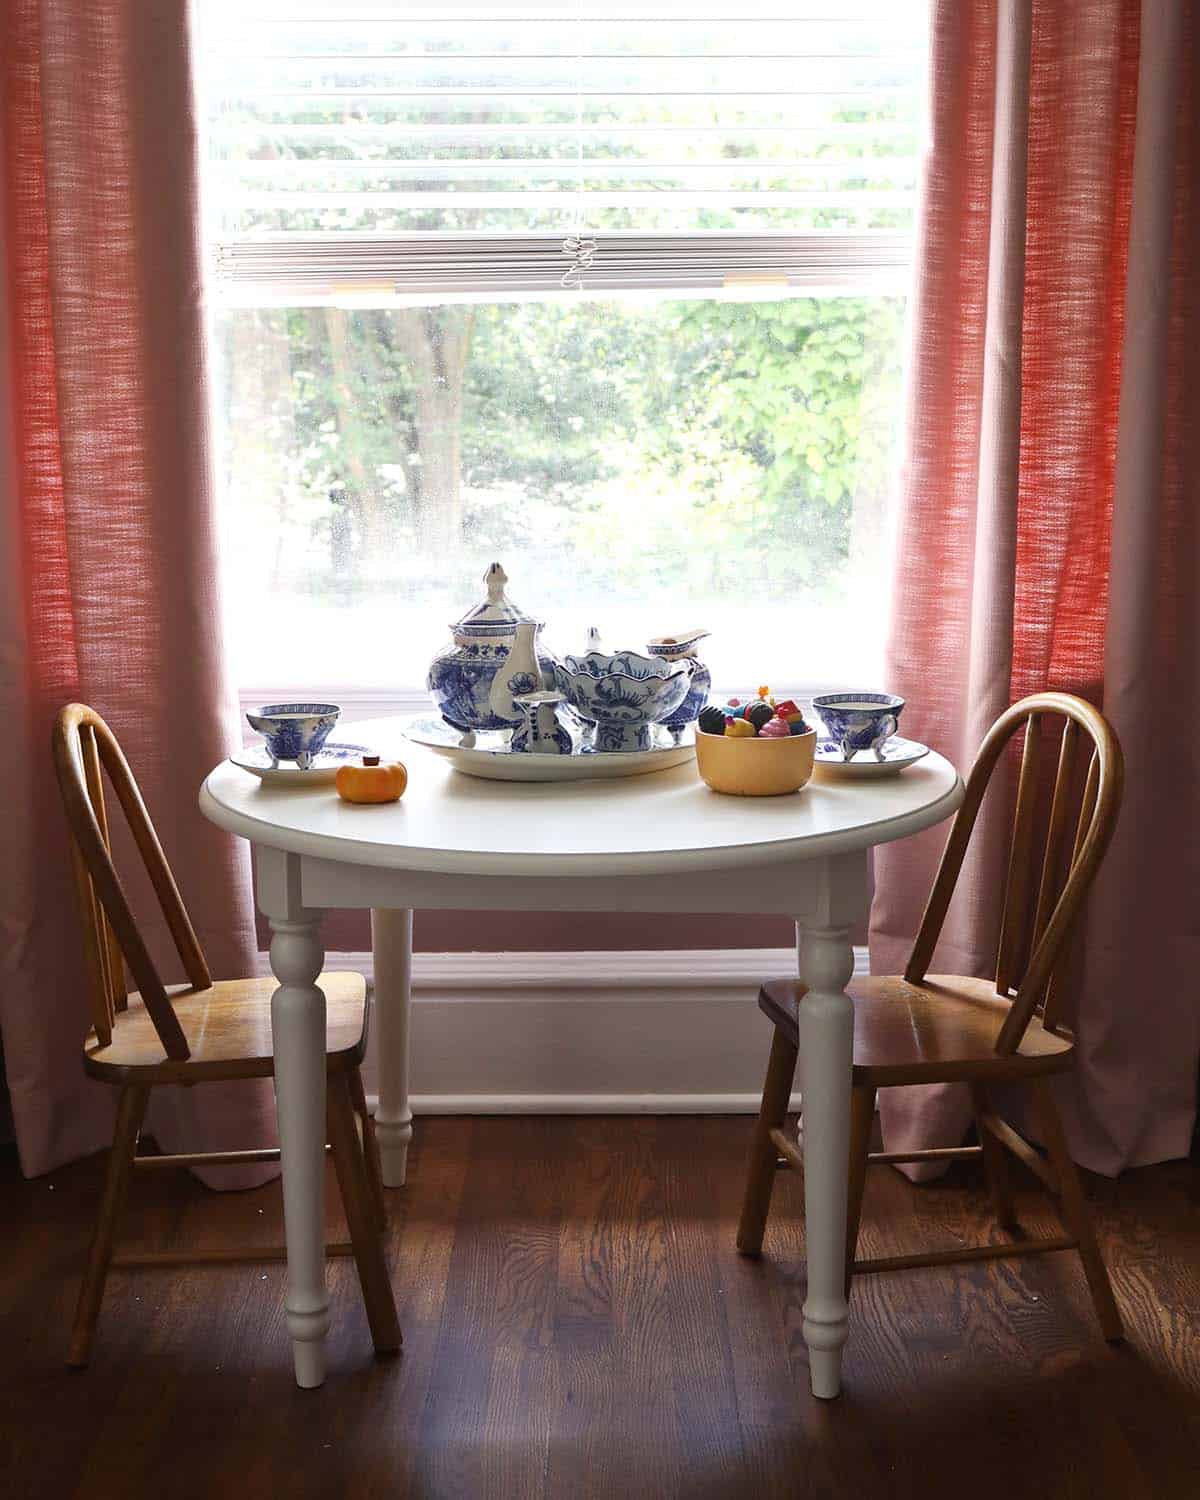
It was our daughter’s dream to have a “real” tea set, so I started collecting blue china and have created a mix and match collection for her to play with. She spends so much time decorating and redecorating her table, I absolutely love these memories for her! The white table is new and the rest are flea market finds.
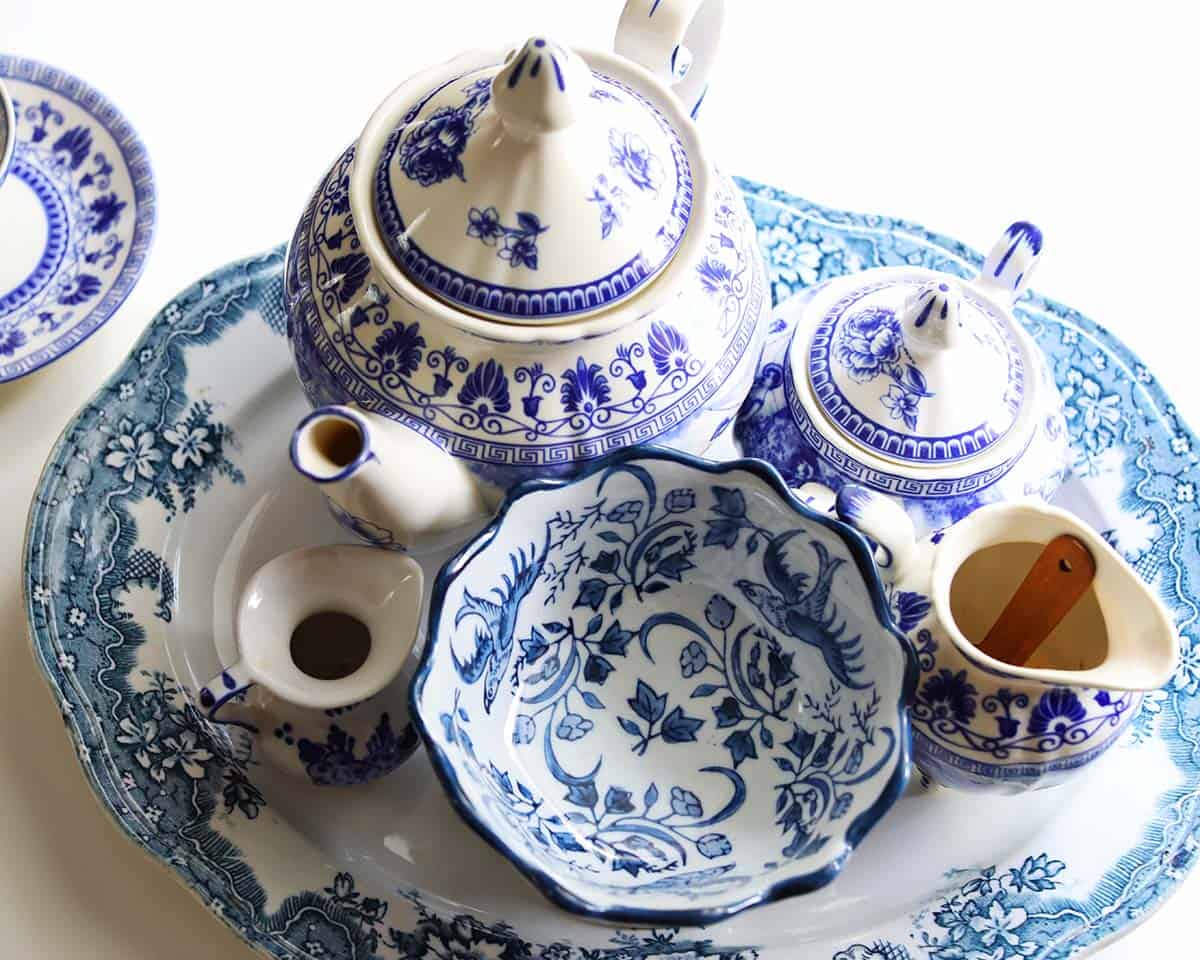
Can’t you just taste the (pretend) tea and cakes?
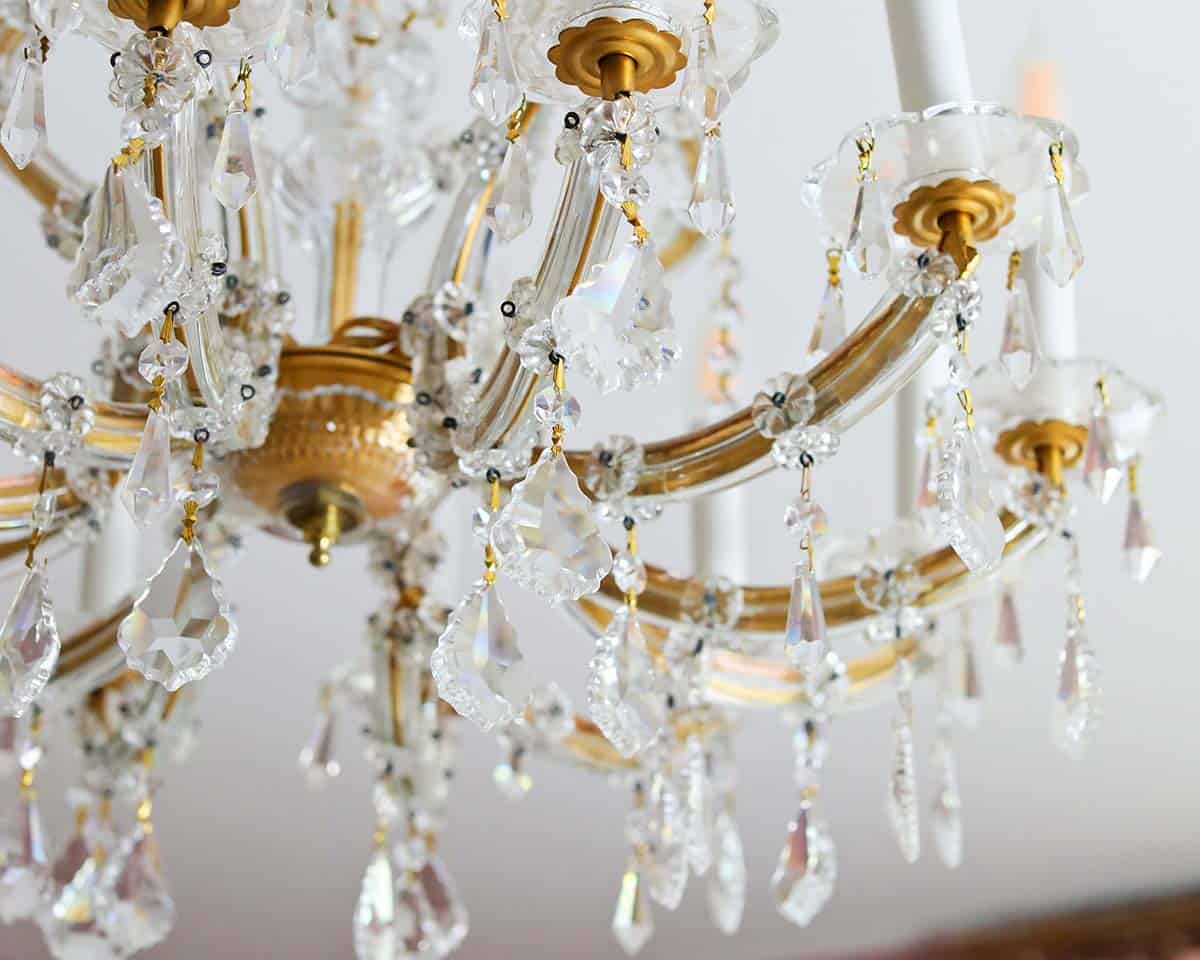
Another key element we leaned on when decorating our new home was vintage and antique light fixtures. This chandelier was an Etsy find. I found so many charming fixtures there, as well as locally at flea markets. They make a room so special and add a lot of historic charm. The sconces around her gallery wall match as well.
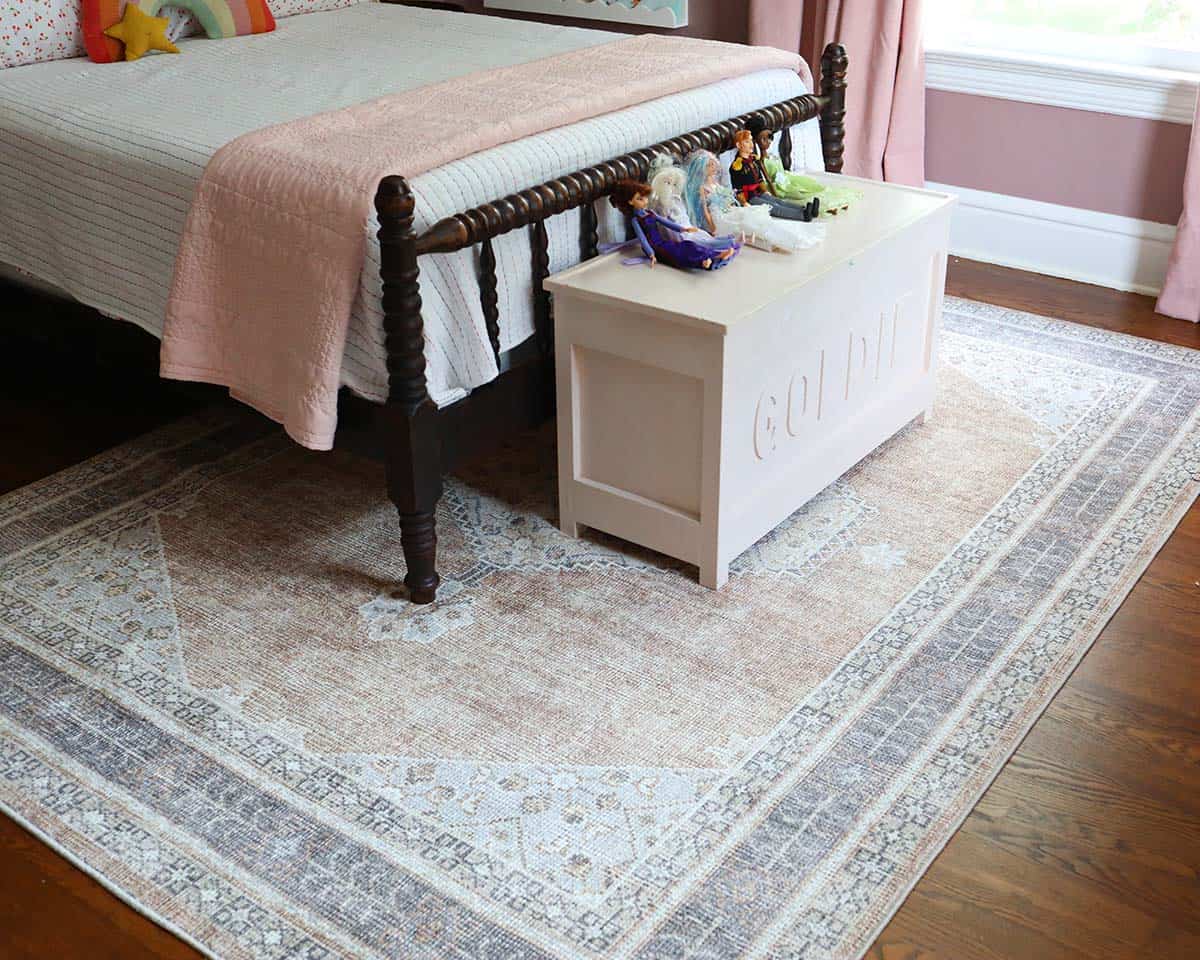
We chose the Lila area rug for this bedroom and the toy box is a DIY.
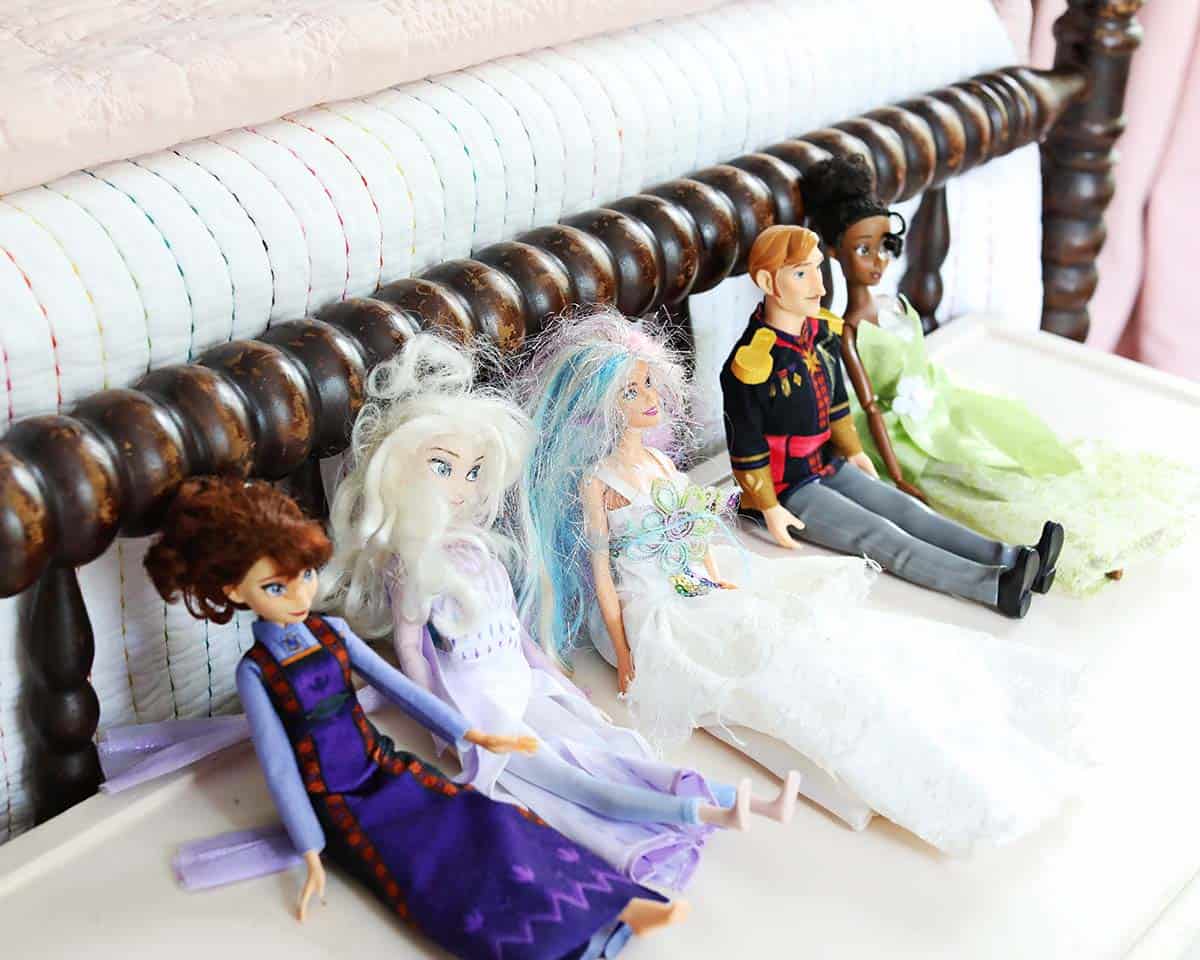
I was cleaning and decorating this room while my daughters were having a sleepover at my parents’ home. The instant she returned home she ran into the room and started re-decorating it her own way (before I even had a chance to take photos) and so these dolls are her personal touch. I think it’s important to let your kids be involved and put their touches on their spaces, even when they aren’t old enough to care about most details—they will love to organize their own things in their special, unique way.
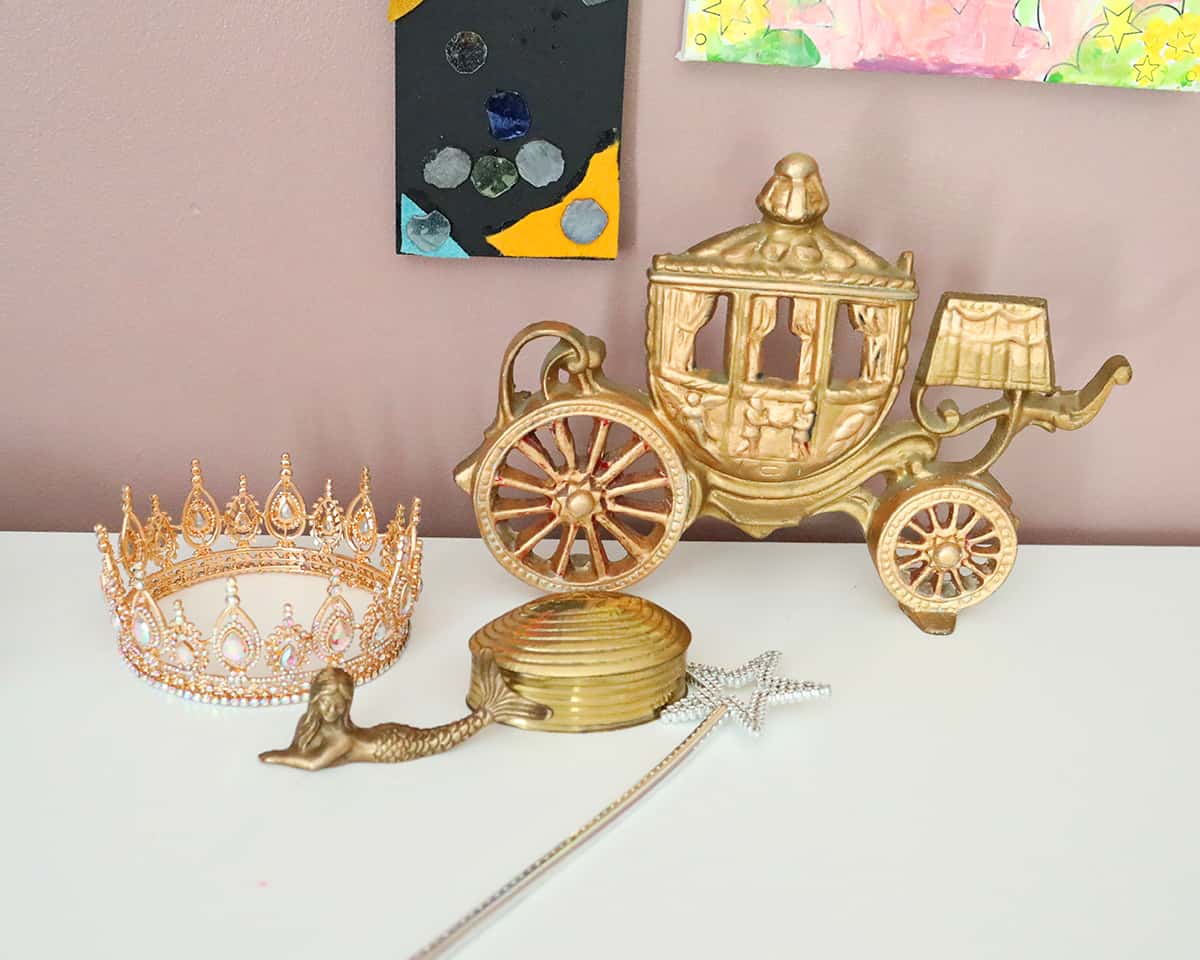
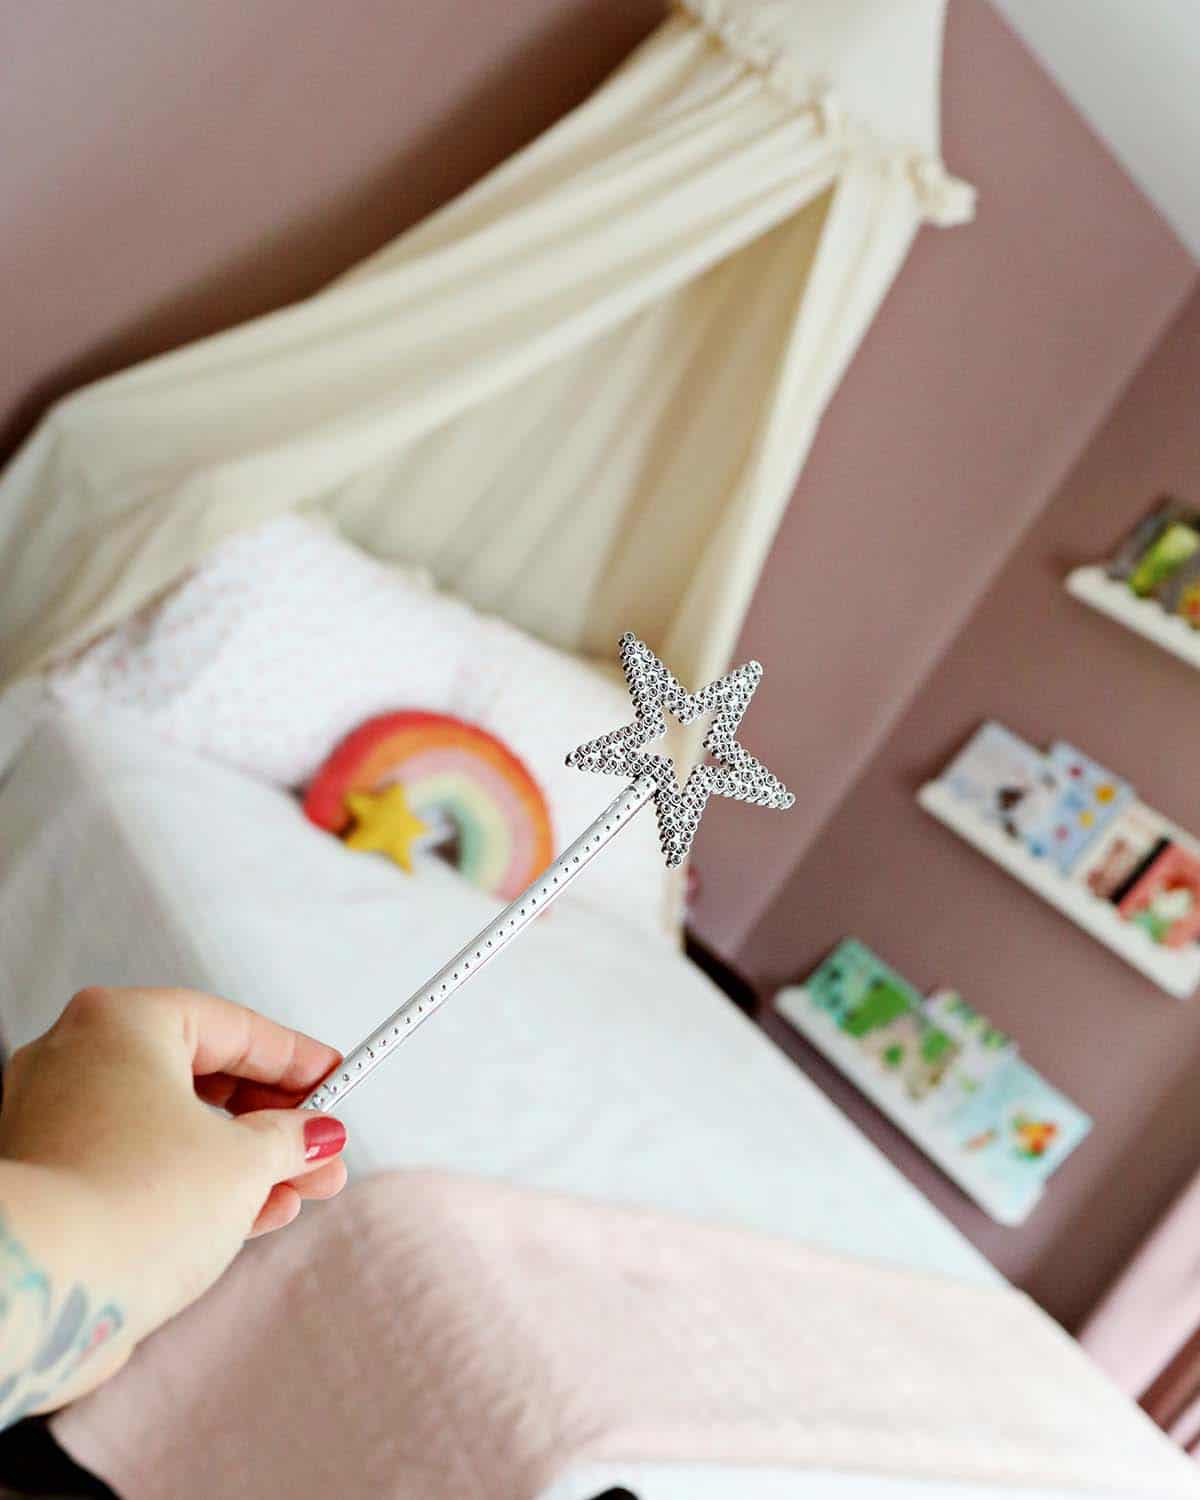
I’m so excited to keep adding details to this room over time! We are collecting little mermaid and princess things along the way. It’s so fun.
Thanks so much for reading!! If you’re curious what other home projects we’ve completed recently, check out our dining room wallpaper and stair runner carpet updates. More to come soon! xx – Elsie
]]>In this post, I will teach you everything I have learned about how to pack, how to move efficiently, and settle into your new home quickly. We’ll also cover budget tips and pointers for making the transition smooth for children.
I also have passionate feelings about the best packing supplies that streamline the process—especially if you are doing all the packing yourself!
Related: What I Learned Moving With Kids and How We Prepped Our Home To Sell.
Packing Tips For Moving
We chose to pack our own boxes because we wanted to take advantage of the chance to declutter and donate items as we packed.
I see the obvious benefits of hiring a mover to pack all your belongings for you, but I would at least consider doing it yourself if you feel you have a lot of clutter to get rid of. We spent time packing our belongings on nights and weekends.
Throughout this process, we saved thousands of dollars in moving fees and we were able to donate a lot of stuff instead of moving it and then donating it later. Here are my tips for doing your own packing:
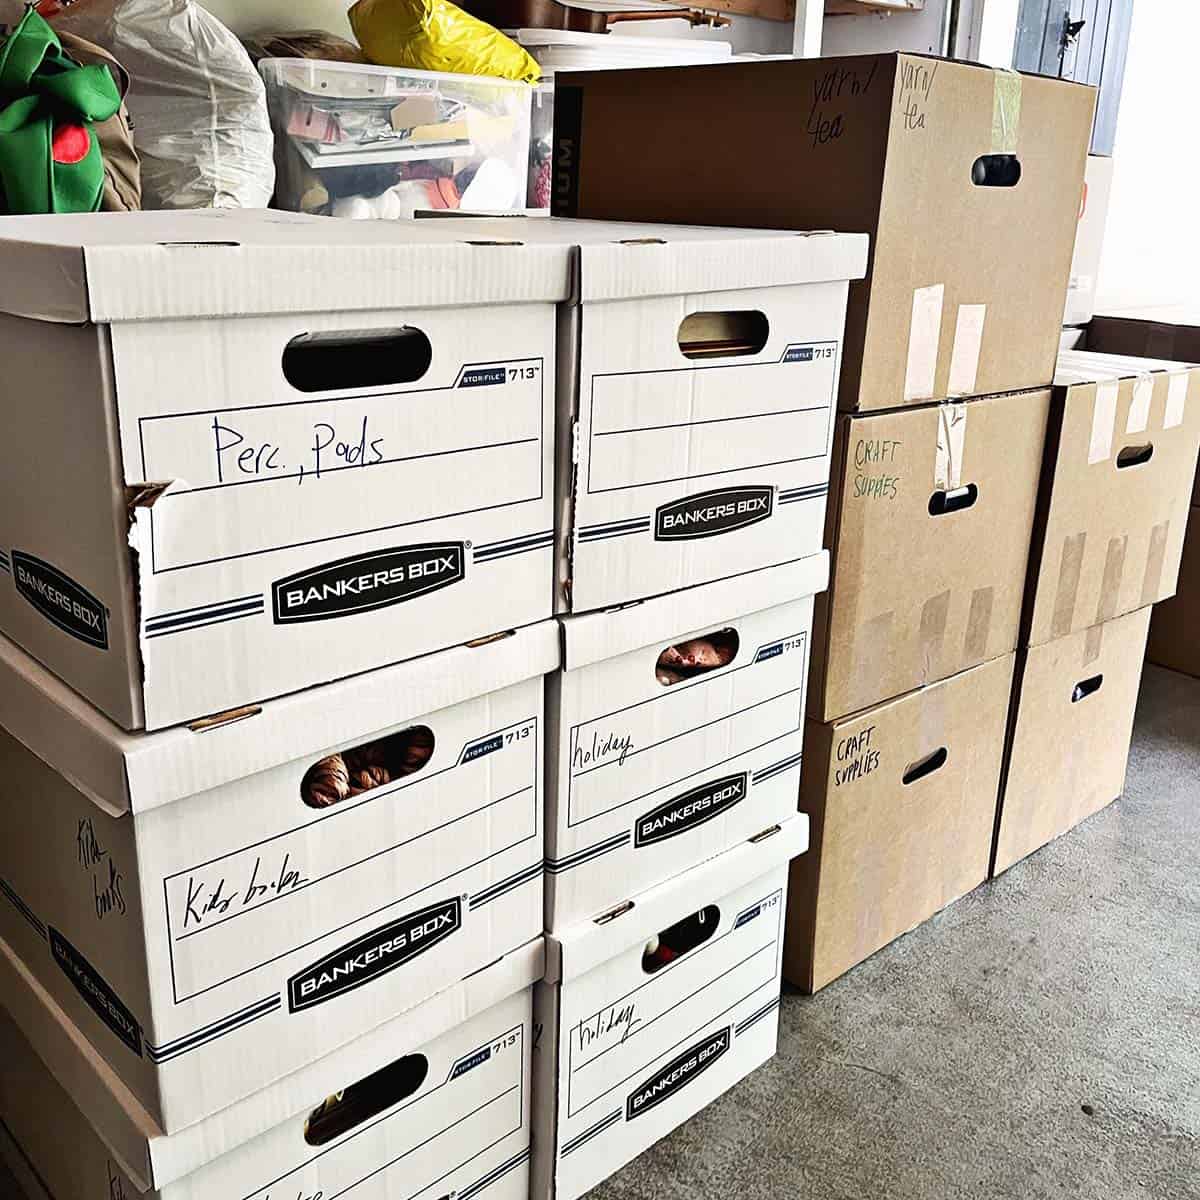
- Get matching boxes. I completely understand how tempting it is to try to save all your Amazon boxes or procure some boxes from a local grocery store. But hear me out—it’s worth it to get boxes that are all exactly the same size. The boxes we used were primarily medium boxes with handles and bankers boxes (which require no packing tape). I highly suggest bankers boxes for books and heavy, small items.
- Use clothing bags for clothing and linens. We purchased plastic storage bags for moving all our “soft stuff” like clothing, bed linens, pillows, and even items like kids toys. These bags fit a lot more than boxes and create a plush layer that is great to use as padding in your POD for furniture, mirrors (or other items that you are very concerned about protecting).
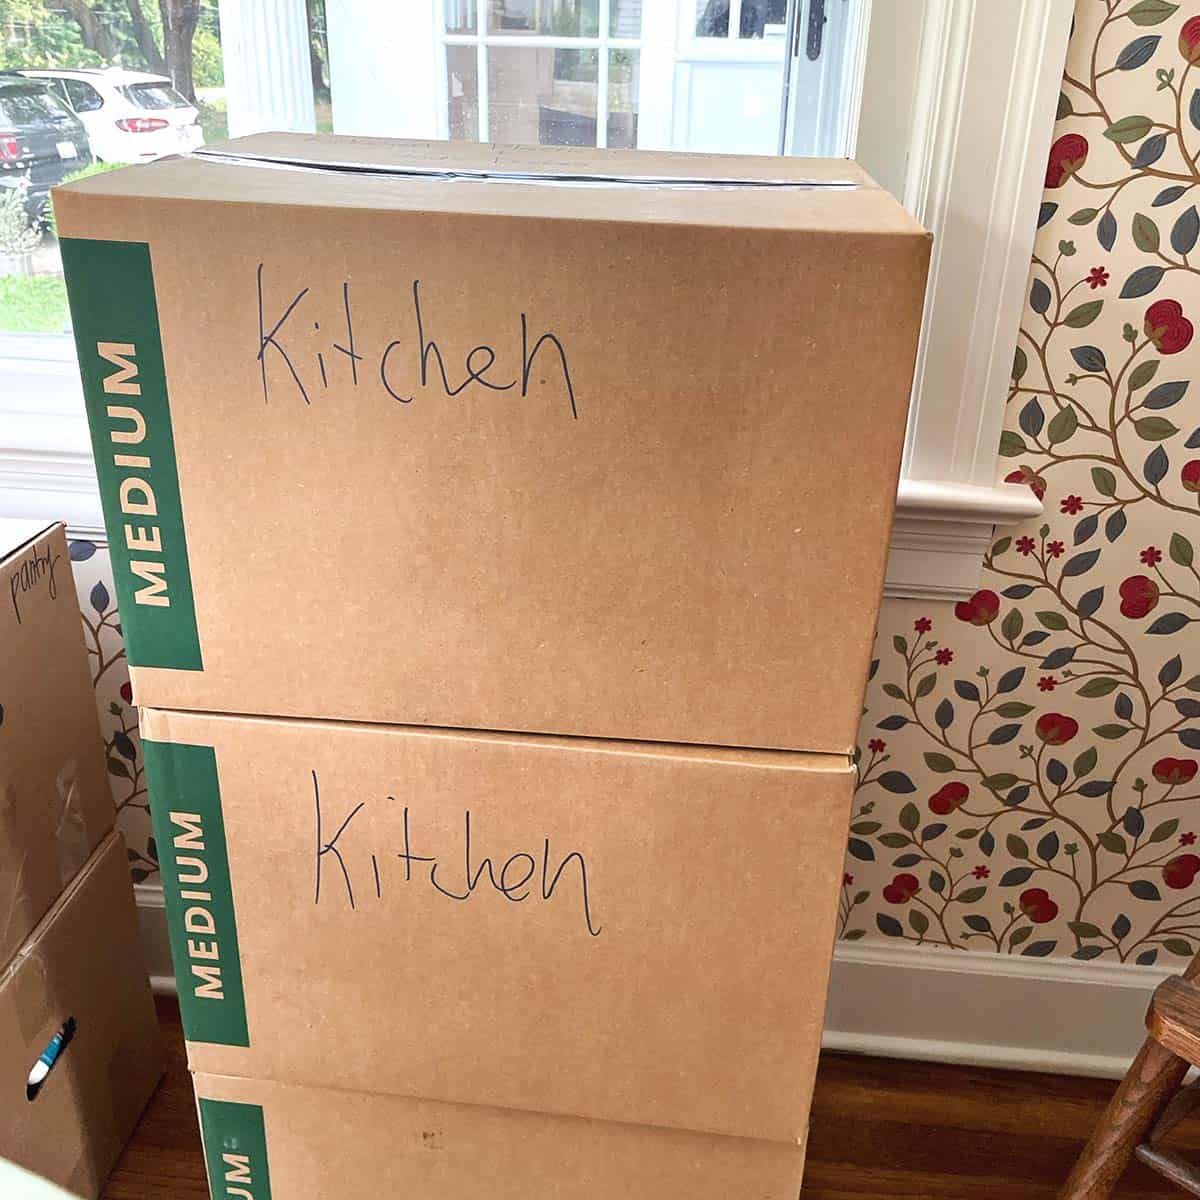
- Label everything. Even if the box you are packing seems “random,” try to resist the urge to label it that way or not label it. Instead, make notes on the boxes of any items you may try to find later. If you want to do a color coded system, I recommend these moving box labels.
- Declutter ruthlessly as you go. As I mentioned above, one of the best perks of packing your own boxes is you can simultaneously declutter your belongings as you go. I recommend getting rid of anything that you don’t use, you don’t love, or that you’ve outgrown in style. I like to use the Marie Kondo “Does it spark joy?” method. Try to donate as much as possible.
Booking a Moving Service
After reading our friend Julia’s moving fraud experience, we decided against a moving broker or a full service moving company. I am sure there are many reputable options out there, but after reading her story we felt safest with a simple POD moving option.
Having used a POD in the past to relocate across state lines, we knew what to expect and felt good about the option.
The biggest difference between a POD and a moving truck like U-Haul is that you don’t have to drive to POD yourself. So once it is packed and locked up, you can drive to your new home (or even fly) with minimal belongings and you know your POD will make its way to you in a few weeks time.
The way our POD experience worked is that we booked an exact day that our POD would arrive—about a week before we departed from our home in Tennessee. Once the POD arrived, it sat in our driveway for around a week.
You can choose to pack the POD yourself or hire a local mover to help you pack it. We chose to do a hybrid approach. We packed the majority all our boxes ourselves over about a month’s time before the POD arrived.
On the day the POD was dropped off in our driveway, my husband loaded the majority of our boxes himself. He wanted to do this because he was meticulous about putting all the heavy boxes at the bottom. He packed each row all the way to the ceiling so there was almost no wasted space.
The next day, a moving crew arrived and helped us move large and heavy items into the POD that we couldn’t have done on our own. Since we sold most of our furniture with our home, we only had about 10 big and heavy items to move and it took less than an hour.
Once that was completed, we used every inch of the remaining space to fit more stuff into the POD. We ended up using 100% of the space within the POD and were able to fit almost everything we wanted into the space. What we couldn’t fit, we squeezed into our cars or donated before moving.
Why we like PODS – First of all, PODS are affordable. I haven’t found a more affordable option for moving across country. I really like that you have up to a week to pack so there’s time to get it just right (most of my mistakes in life are a result of rushing).
The POD system is extremely simple and straightforward. We felt protected from fraud and we saved a lot of money on the move overall. Our move cost under $4,000 total, which is a big savings on what it would have been with a full service option.
Cons of PODS (be careful for these things) – The biggest complaint that I hear from people who have used a POD for moving is that a lot of stuff was broken or damaged. You are basically packing a small semi truck back and then you don’t see it for about two weeks when it arrives in your new driveway.
What happens to them during their journey? This is unclear, but it seems like they maybe go to hell and back. Haha! OK, but really—you have to be very strategic in your packing! It’s up to you to make sure furniture is sufficiently padded and secured.
Assume that the items in your POD are going to have a VERY rough trip and pack accordingly.
There are several things we would NOT put in a POD and instead kept in our cars that we drive. One was very expensive equipment like computers, frame TVs, and my husband’s music gear.
Another thing is plants. I personally would not put plants in a POD unless you absolutely had to because they may not make it.
The last thing to be careful about is anything that can melt or freeze. Depending on the season, be careful and remember that this POD is not temperature controlled. I would not put candles and things like that in the POD as they could melt and make a mess.
The last con of moving with a POD is that you don’t know the exact day it will arrive at your new home. You will be given a window of time. So you have to be flexible and able to live without EVERYTHING in your POD for up to a week or two extra.
To make up for this, we made sure we packed two weeks of clothing in our cars and you’ll want to pack other essentials (like maybe air mattresses to sleep on) until your POD arrives.

Moving Tips and Hacks
- Pack a “comfort box” for each member of your family, including pets. Items you will find in our comfort boxes are anything you can pull out the first night to feel comfort. Examples include the kids’ favorite blankets and stuffies, my favorite candle with a lighter to light it right away, favorite snacks, socks, tea or coffee. It’s also a good idea to pack essential items in an overnight bag like toothbrushes and a few changes of clothing. Your future self will thank you!
- Keep one box for super important items like passports, bills you will need to pay (basically anything that can not get lost for a month).
- Pack boxes fully. Don’t leave big gaps in boxes. We filled in many of our boxes with towels, extra clothing, even rolls of toilet paper.
- I have moved my clothing on hangers several times. To do this, you keep bundles of clothing on hangers and cover them with (unscented) trash bags that are turned over with a hole for the hangers. It saves a lot of time.
- Choose boxes that are uniform in size and have handles. Our favorite options are this size for bigger items (kitchen appliances, toys, etc.) and this size for books and decor.
- Label necessary items you will need immediately VERY clearly. Make them very easy to find. This could include sheets and blankets, towels, toiletries and daily use kitchen items like a coffee maker or tea kettle.
- Reward yourself for all your hard work. You deserve it!
Note: If any part of you feels guilty buying moving supplies instead of procuring freebies and cast offs, here is my pep talk. Most importantly, uniform boxes and bags will make your moving truck packing more tight and professional.
And remember—you can pass ALL of these items along to the next person you know who is in need of moving supplies. Nothing needs to be wasted. Almost everything can be used again.
Get Organized Before You Move
Here are some ideas for your pre-move checklist:
- Schedule utilities, internet, lawn care, or any other services needed for your new home.
- Schedule a stop date for services at your previous home. We typically do it right after the new owners take occupancy and let them know the date so they can schedule new services.
- Have your mail forwarded to your new address by USPS. Change your address on all accounts you use often (like Amazon, any bills you receive each month, your bank, etc.).
- Schedule a grocery delivery for the day you move into your new home.
- Change the address for any subscriptions you have that arrive each month.
Best Moving Boxes and Packing Supplies
These are the supplies that I personally used. It’s very annoying to have to run to the store for simple things like more boxes or tape, so stocking up before you begin packing is smart. I reordered a few things as we began to run low.
- Medium boxes with handle holes. These are our go-to boxes for larger items. We only used a few boxes larger than this. The majority of our stuff like kitchen appliances, kids toys and things like that fit within these medium size boxes. They are the best size so they don’t get too heavy you can’t lift them.
- Bankers boxes. These are the best for packing books, files and any kind of paperwork. I LOVE these boxes because they don’t require any packing tape (at all!) and once you learn to fold them they are quick and easy to assemble. I also love how easy the tops are to take on and off. I strongly recommend these boxes for books because they are stronger than taped bottoms and don’t get too heavy. We moved hundreds of books in these boxes with no issues.
- Clothing bags. These are great for clothing and also linens, pillows, and holiday decor like Christmas trees, garlands, and wreaths.
- Moving labels. These are great because they are color coded as well!
- Safer box cutter. I love this thing! It’s easy to use, works great and is far safer than a metal razor blade.
Tips For Moving Cross Country
Strategy is everything when moving across state lines with children and pets. Since the majority of our belongings were in our POD on moving day, we stuffed our vehicles with everything else we could fit.
Unfortunately, we ran out of space and had to give some items away at the last minute. This is common, so plan for it by packing your top priority items first.
On our moving day, I had the car with our dog and two kids, and my husband drove our other car, which was way more stuffed with belongings.
- Plan carefully. Since space (both in your new home and your moving vehicle) will probably be limited, plan as well as possible and try not to pack things you will need to sell or donate once you arrive. Also, be strategic in what you pack, prioritizing as you go and leaving optional items for last. If you are packing in a rush, it’s hard to purge as you go, so I recommend starting as far in advance as you can. Ideally with months or weeks to pack.
- Sell, donate, purge. Before moving, get rid of everything you aren’t sure will work in your new home. If your new space is a different era or style or if your preferences have changed, consider this an opportunity to start fresh. I downsized my closet by about 50% before moving and we ended up selling our house with most of the furniture included. Even still, I donated about five more kitchen boxes immediately the first week we were in our new home. Purging as you go will help to eliminate some of this wasted effort and make unpacking more of a pleasant experience.
- Ship helpful items to yourself. Because we used the POD system, I knew we wouldn’t have beds or mattresses. So, I shipped us some nice air mattresses to use the first week, along with some other useful items like cleaning sprays and toilet paper—all the stuff you need immediately.
- Create comforts anytime you can. When we pulled into the driveway of our new home, my in-laws were in the front yard waiting for us. My mother-in-law had offered to buy us groceries that day (I should have said yes!). We had a scheduled deep clean a few days before we moved in. We did the comfort box idea and I had candles to burn and our kids’ favorite blankets and pillows. Even with all of these comforts, the moving day is stressful and exhausting. My suggestion is to do as many of these comforting tips as you can, but also accept that no matter how hard you try, moving is an emotional experience with highs and lows. This is to be expected and normal.
Tips for Moving with Children and Pets
I’ve moved several times with our young children and we get a lot of questions about how to make it easier on kids. The truth is that leaving your school, the comforts of the home, neighborhood and town your child knows is very scary.
For our children, the big feelings seemed to come in waves and the worst of it was weeks after we moved when the dust began to settle.
In addition to the comfort boxes, which we talked about above, I have a few tips for navigating a move with children.
- Leave space for sad feelings. There is nothing wrong with missing your old home, school, friends, or life before a move. Leave space for these feelings and for your child to work through them at whatever speed they need to. Sad feelings about a previous home or school are not a reflection on how they feel about the new home or new school. You can feel two feelings at the same time—these are normal, healthy emotions.
- Create things to look forward to. When we first told our children that we sold our home furnished and that we were leaving all the furniture (even their beds), they reacted with sadness, which we expected. To help the kids feel excited for our move, we let them help us choose new beds for each of their rooms along with themes and colors for their walls. We also reminded them often of the reason we were moving—so they could see their family whenever they wanted. This was a huge help and comfort to us as the move approached.
- Do fun activities right away. The week we moved, my husband and I were overwhelmed and exhausted. If it were just the two of us, we probably would have ordered in every night and never left the house. With the kids, we found it useful to jump into new activities right away. We joined a pool where they could go swimming with their baby cousin, we walked to dinner in our neighborhood, and I took each child out for individual time like visiting the local bookstore and going out for ice cream. These extra activities brought the kids a lot of comfort and joy and gave us a soft place to land that first week.
Moving with pets. Our dogs have tended to be pretty flexible in all our moves. My suggestion is to give them a few extra treats, extra walks, and a consistent place to sleep from the first night. I have heard that moving with cats is more of a challenge, so if you have had that experience I’d love to hear your learnings in the comments.
If you have any tips for moving, packing or navigating change, I’d love to hear them in the comments! Love, Elsie
]]>Choosing a wallpaper that evokes your ideal mood (mine is warm and cozy) is key. In this post, I will share photos of my wallpapered dining room, tips for choosing the right wallpaper for your space, and everything you need to know about getting wallpaper installed.
Related posts: 5 Creative Uses for Peel and Stick Wallpaper, The Best Floral Wallpaper, Affordable DIY Wallpaper Hack, Wallpaper Removing Tips, Painted Daisy Wallpaper, and Removable Wallpaper on Etsy.
Transforming Our Dining Room with Wallpaper
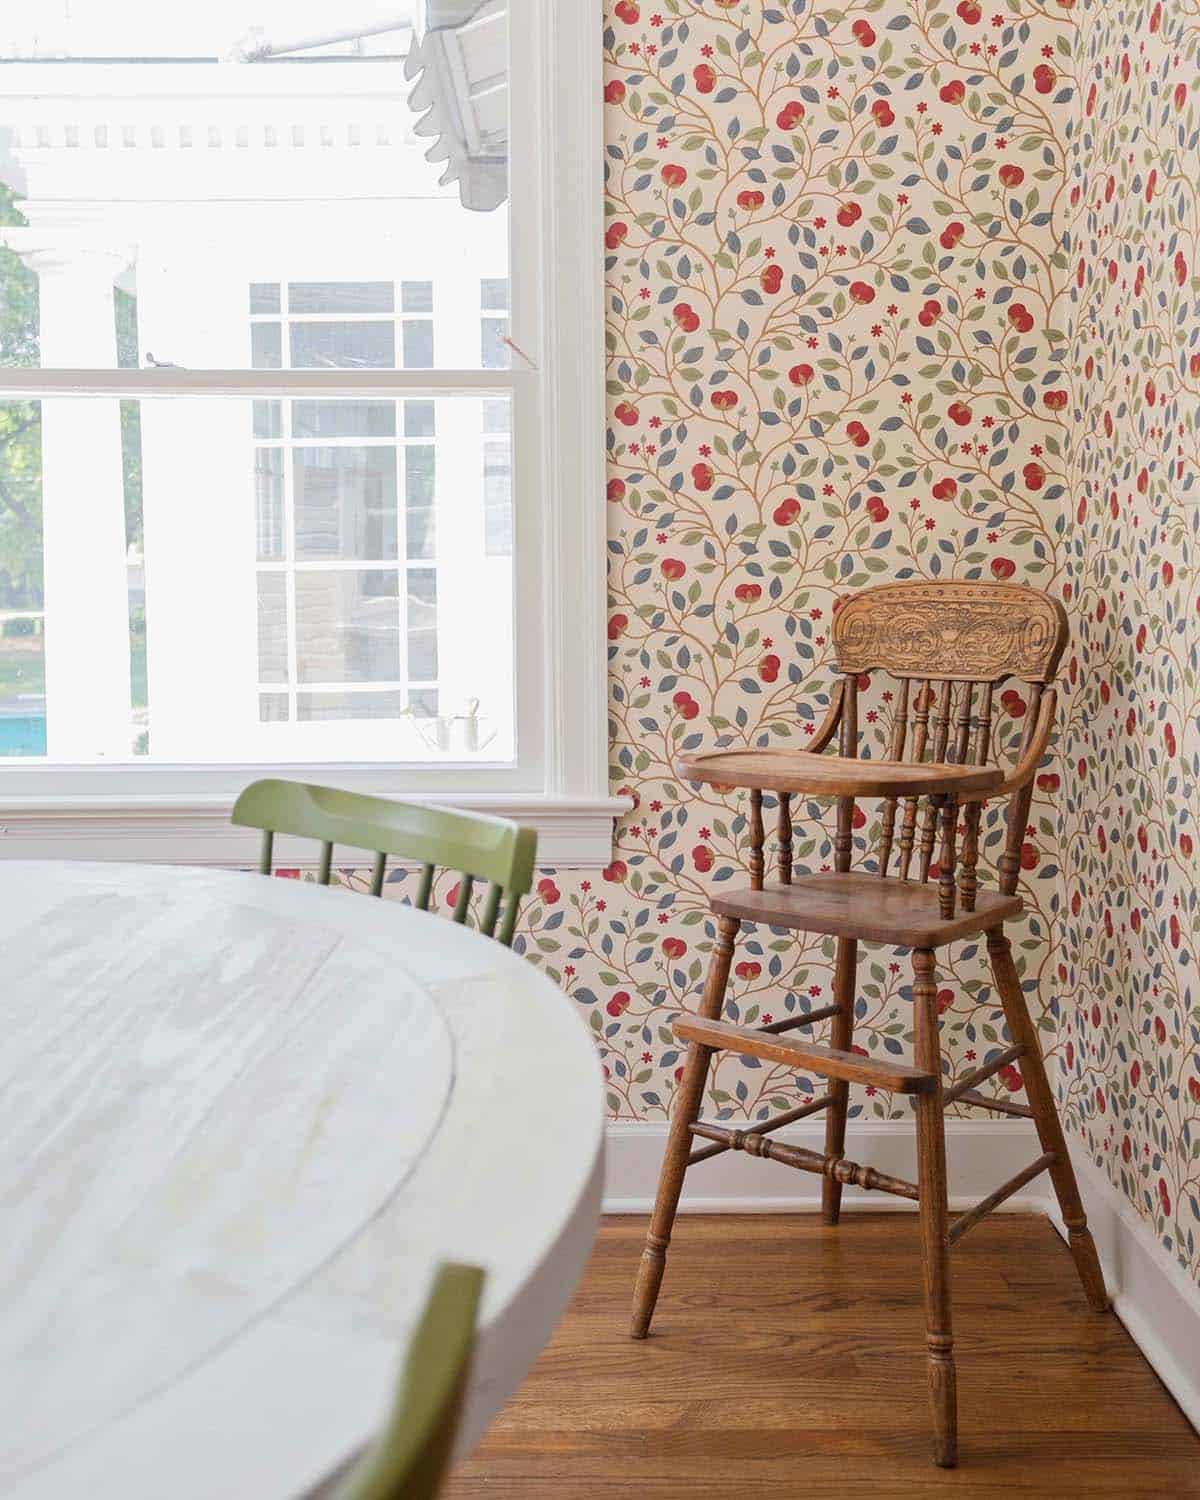
When we purchased this home, we instantly fell in love with this little nook that features original built-ins. It’s such a joyful, sunny space and I couldn’t wait to decorate it!
The room was previously wallpapered with a quirky, modern wallpaper featuring monkeys. When I shared it in my empty house tour video, many people commented that we should keep the monkey wallpaper. To me, that is the beautiful thing about wallpaper—it can be so wildly personal and expressive!
I knew I wanted a wallpaper that felt warm and cozy— almost an autumn-year-round kind of vibe. I also wanted a paper that could be from the era when our home was built, in 1904.
I considered a lot of different papers, careful to envision each one decorated with Halloween, Christmas, or kids birthday party decorations. I ended up choosing this Medlar pattern. The floral pattern felt the perfect mix of cozy, inviting and historic.
What to Consider When Choosing Wallpaper for Your Dining Room
- Always buy wallpaper samples. Wallpapers can be different in person than they appear online. If you are purchasing from a place like Anthropologie that doesn’t have samples, find the wallpaper somewhere else that does offer them. It’s always worth the extra $5-$10 per sample to see them in person. I keep a collection of samples because sometimes I find a home for a certain pattern later on as well.
- Consider the size and features of your home. Large scale prints look nicer in big open rooms, while super tight repeats can look nicer in smaller rooms. I always ask the advice of my wallpaper installer for whether or not they think a pattern will look good in a space. Rooms with a lot of angles need more forgiving patterns so that it’s less noticeable.
- Consider the era of your home. For my historic home, I want to use patterns that could have existed at the time it was built. More modern and funky patterns I think are a better fit for newer or mid-century homes. It’s worth considering if you can find a wallpaper option you love that suits the era of your home. Of course, it’s your home and the final call is yours—so choose what speaks to you and what you know you will enjoy for a long time.
- I always use a professional installer. In my experience, the price of the wallpaper is often about equal to the price of the installer’s labor. So, a large room with lots of angles might cost several thousand dollars for installation and a small room, like this breakfast nook, is typically under $1,000 for installation. The reason I always use a professional is because I am not a perfectionist and this job requires precision and skill. To me, it is worth it to hire a professional for this job.
- Many wallpaper installers will not install peel and stick wallpaper, so be sure to check. I strongly prefer traditional wallpaper over peel and stick unless it is for a very small space (maybe lining shelves or a closet). I have had a lot of issues with peel and stick wallpaper through the years that I have not experienced with traditional wallpaper.
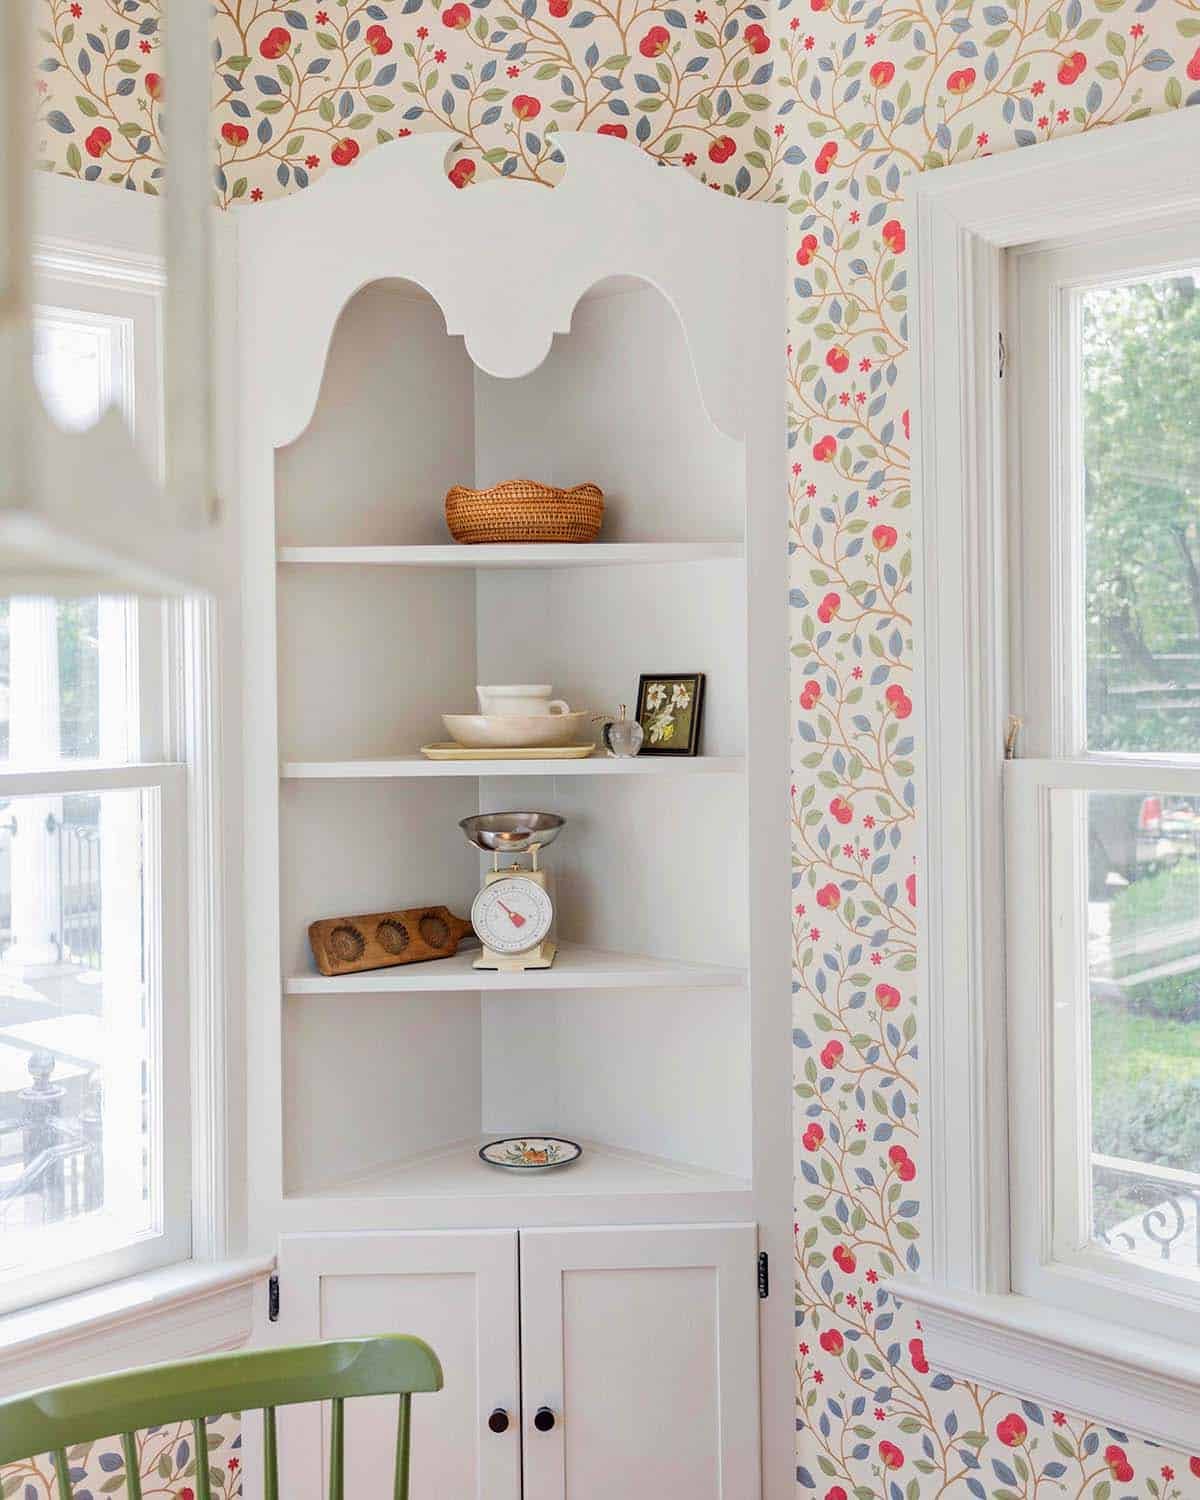
Here’s how the wallpaper turned out in our breakfast nook. I love how it accents the original built-ins and big windows. It’s such a warm and friendly space!
Wallpapers I Considered for This Room
Elsie’s Dining Room Sources
- Floral Wallpaper (also available here)
- Round Dining Table
- Green Dining Chairs
- Beautiful Faux Roses
- Lantern Light Fixture
Thanks so much for reading! I am so excited to take you along with me as I slowly decorate our historic home. Let me know if you have any questions in the comments section. Love, Elsie
If you’d like to see more peeks of rooms, sign up to receive our newsletter.
]]>